
Dutch Oven Sourdough Bread

This Dutch oven sourdough bread recipe delivers crispy, golden crusts and tender interiors using easy techniques and equipment you already have at home – no need for a commercial bread oven here!

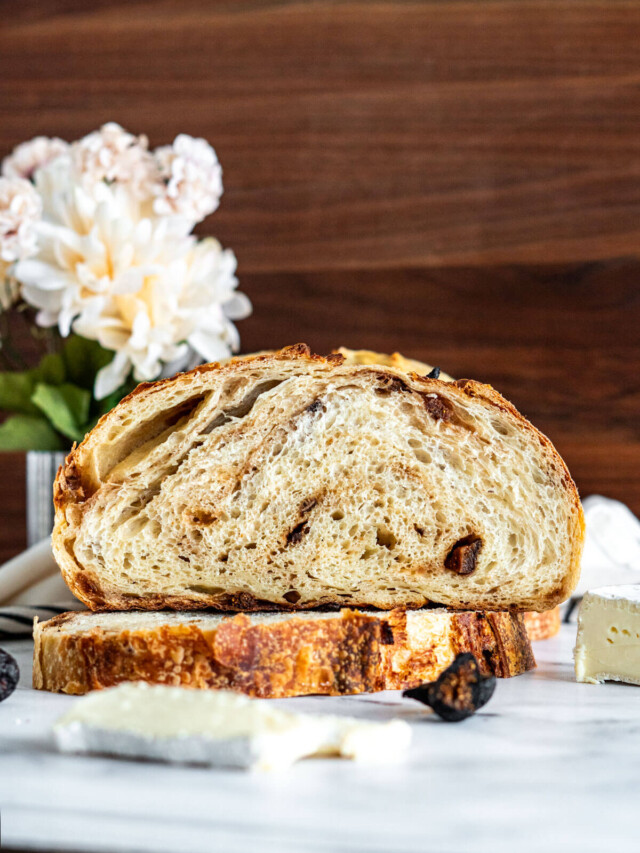
For most of us home sourdough bakers, the holy grail is a crispy crust with a tender, chewy crumb.
This can be difficult to achieve, especially if you are new to sourdough baking. It is important to understand the fundamentals of bread baking and develop a few key techniques in order to get your desired result.
One of the most important steps in creating that perfect loaf is empowering yourself with sourdough science! Understand the basics can help shorten the learning curve and improve your baking results.
This dutch oven sourdough bread recipe is dedicated to empowering.
Jump to:
- Why Does Bread Need Steam During Baking
- Why Does Bread Need Consistent High Temperatures During Baking?
- Why Use A Dutch Oven For Sourdough Baking
- What Size Of Dutch Oven Should I Use?
- Key Ingredients
- How To Make Dutch Oven Sourdough Bread:
- Expert Tips
- Batch + Storage:
- Want To Learn More About Sourdough?
- Sample Baker’s Schedule
- 📖 Printable Recipe
Why Does Bread Need Steam During Baking
Steam (moist air) carries heat better than dry air, and although it seems counter-intuitive, steam actually slows down the cooking process in a few ways!
- The moisture in the air and within the loaf condensates on the surface of the dough absorbing heat. This process reduces the surface temperature of the dough, slowing down the cooking process, it’s KINDA like the stall when you’re smoking a pork butt or cooking brisket on the Traeger! It takes a large amount of energy to convert the condensation on the surface from liquid to gas(steam), and during that process, the water is withdrawing heat from the surface of the loaf as it evaporates.
- Steam condensing on the cold surface of the crust also slows crust formation. This is important because we want the crust to stay pliable and continue to expand during the first part of the baking process. At the beginning of the baking process, the yeasts in your dough undergo a final fermentation before they die off due to heat, and the gas bubbles that are already trapped within the dough expand further, this is known as oven spring. Having a crust that sets too quickly will hinder the expansion of the dough.
- Steam helps to give us that golden blistered crust that all sourdough bakers cannot get enough of. Condensation steam on the crust interacts with starches in the dough, and as the crust bakes, it develops a brittle, crispy, delicious crust. Strangely enough, steam also helps achieve the color in the crust despite cooking at very high temperatures – the steam helps the sugars to caramelize (Maillard reaction – like in my Instant Pot coffee creamer) without burning.
Why Does Bread Need Consistent High Temperatures During Baking?
Bread has a short window while baking to expand before the crust begins to set. A consistent high temperature forces the bread to increase rapidly in volume, ensuring a good oven spring!
This is why it’s so important to ensure the oven is properly preheated before baking bread.
Why Use A Dutch Oven For Sourdough Baking
Now we know how high temperatures and steam work together to create the perfect loaf, but where does the dutch oven come in?
Most home cooks don’t have access to commercial bread ovens with fancy features like steam injection! But baking homemade sourdough bread without a commercial oven is still possible. The baking environment needs to be controlled so that the moisture in the dough doesn’t evaporate quickly and the loaf can develop properly.
We need steam and high temperatures throughout a bake cycle for this to happen. A heavy cast iron dutch oven provides the perfect high temperature and steamy environment. Its weight acts as a heat sink, negating temperature swings and radiating consistent heat, while the heavy lid clamps the pot closed and retains steam.
This baking environment is ideal for baking sourdough and any crusty, artisan, no knead bread.
What Size Of Dutch Oven Should I Use?
The best dutch oven for your sourdough bread depends on the dough weight and the shape of banneton you’re using!
Generally, the rule of thumb is if your proofing basket fits within the dutch oven and has about 1″ of margin around the edges, your dough will fit too. This extra space allows for the dough’s expansion during baking.
Here’s what I use:
- Batards: 6 quart oval dutch oven
- Boules: 5.5 quart round dutch oven

Key Ingredients
Sourdough Starter: For this recipe, you want to use a fed and active sourdough starter. Your starter should have been fed the night before, approximately 8 hours before beginning and have risen at least double in size.
Bread Flour: Use a high protein unbleached flour for best results. This could be all-purpose flour or bread flour.
Salt: I use hand-ground kosher salt, but any fine ground salt will do. The salt in this sourdough recipe is responsible for adding taste and enhancing the aromas and flavor present in the dough itself. Salt also helps to tighten the gluten structure and strengthen the dough – making it easier to create and hold air bubbles.

How To Make Dutch Oven Sourdough Bread:
Make the dough:
- In a large mixing bowl, combine 330g warm water with 150g of active starter until mostly combined. I like to use a Danish dough whisk, but anything will work.
- Add 500g bread flour and 10g salt to the bowl and mix until a shaggy dough forms. Knead the dough with your hands until all the shaggy bits are incorporated.
- Cover the bowl and set aside for 45 – 60 minutes.


Stretch and fold:
- Uncover the bowl and using damp hands, grab the dough and gently pull it until the flap is long enough to fold over itself, then fold the flap, rotate the bowl 90 degrees, and repeat 4 times.
- Recover the bowl, and set it aside for 30 minutes, then repeat the stretch and fold process at least 3 more times over the next 2 hours. The intervals can be as short as 15 minutes, or as long as 60 minutes, but it should be completed at least 4 times. You’ll notice after the second stretch and fold how much the dough has softened and begun to look like actual bread dough!


Bulk ferment:
- Complete one final stretch and fold, then cover the bowl with a shower cap or tea towel and set aside for 2 hours to bulk ferment. I like to use a reusable shower cap for covering my bowls, the patterns are fun, funky, and bright, but they also work amazingly well, are lined with plastic to help keep the moisture in the dough, and are reusable for ages. It is important to keep the dough bowl somewhere warm to encourage the microbes to work quickly!


Shape:
- Observe your dough, at this point, the dough should have risen in the bowl, and have a smooth surface with visible bubbles. If the dough is domed in the bowl it is ready to work with, if the dough is flat it may need more time in the bulk ferment.
- Lightly flour the work surface and use a bowl scraper to turn the dough out onto the floured surface. Try to get the smooth top part face down so that the sticky underside is on top facing you, this will make shaping the dough easier.
- Fold the edges into the middle, alternating sides as though lacing the dough together. Then starting from the top, fold the dough into thirds as you would a letter, but pull the bottom all the way around to flip the dough so the seam is facing downward. Stop there if making a batard, or tuck the long ends underneath to create a boule.
- Dust the top of your boule or batard with rice flour, then use a bench scraper to pick up the dough, flip the dough, and place it upside down, or seam side up, into a banneton to prove.
Don’t have a banneton? I have a list of banneton alternatives.


Prove:
- Cover the banneton either using a damp kitchen towel or a shower cap. During the proving period, the dough will rise and become puffy in the banneton, but it should be watched – as over-proofing can cause the dough to bake up flat. This process will take a different amount of time based on the ambient temperature.
- To test the dough, gently poke it and observe how the dough reacts. If the dough feels tight and dense and looks like it hasn’t relaxed in the basket, it is likely under proofed. Underproofed dough will resist your poking and spring back almost immediately. If the dough feels airy but still elastic and looks relaxed in the basket, it is properly proofed. Properly proofed dough will be easily poked, and the indent will slowly fill back in but may not even totally recover. Overproofed dough feels sticky and lacks elasticity, it will likely look slack in the basket and your indentation won’t rebound.
Pre-heat oven:
- Place your dutch oven, cloche, or desired baking dish in the oven and preheat to 450f.
- Meanwhile, place the banneton in the freezer. Although this seems counterintuitive, the 30 minutes in the freezer won’t adversely affect your dough, it will just make it easier to remove from the banneton, score, and transfer to the dutch oven.
If you don’t have a dutch oven, I do have a recommendation on how to bake sourdough without a dutch oven!
Bake:
- Once the oven is preheated, remove the dough from the freezer and invert the banneton onto a sheet of parchment paper.
- Use a lame, sharp knife, or clean razor blade to score the dough, I usually like to make one deep curved slash, but you can get as fancy as you like!
- Carefully remove the dutch oven from the oven, and using the parchment paper as a sling, transfer the sourdough loaf from the counter into the preheated dutch oven.
- Bake the dough at 450f covered for 30 minutes and uncovered at 450f for 25-30 minutes, or until the loaf is cooked through. You can test the doneness of the loaf with an instant-read thermometer. Bread is cooked once it reaches 205 – 210 degrees Fahrenheit internal temperature.


Cool:
- Remove baked bread from the dutch oven and transfer it to a wire mesh cooling rack to cool completely before slicing. I like to leave it for at least 2 hours before slicing, as slicing too soon can affect the crumb and texture of your loaf.
Expert Tips
- If you’re overwhelmed with all things sourdough, I can help you! I have guides on everything from making a one day sourdough starter, to picking the best jar for your starter, to feeding sourdough starter, to storing sourdough starter, to proofing basket use and maintenance, to using up discard, and more.
- Don’t have a banneton basket? I have guides on banneton alternatives
- Don’t forget to feed your starter the night before!
Batch + Storage:
Batch:
This recipe bakes a nice-sized loaf of sourdough bread. This is the perfect amount for our family of 4 to serve with at least 2 meals.
Storage:
If you’ve got leftover sourdough, you’ve got serious willpower! There are a couple of ways to store sourdough bread to help prolong its quality after cutting.
Your boule can be kept cut side down on a cutting board for up to 12 hours before the crust becomes too crisp. This is our go-to. I recommend transferring it to a bread bag after 16-18 hours though.
Your sourdough loaf can also be frozen. To freeze sourdough bread, cool the loaf to room temperature, then tightly wrap it in plastic wrap, slide it into a bread bag, seal it up, and stick it in the freezer for 1-2 months. To use after freezing, remove the loaf from the freezer, unwrap, and allow it to come to room temperature (1 -2 hours) before slicing and enjoying.


Sample Baker’s Schedule
- 8 am: Mix dough
- 9 am: Stretch and fold every 30 minutes
- 11 am: Set aside to bulk ferment
- 1 pm: Shape the loaf
- 3 pm: Preheat oven
- 3:30 pm: Bake loaf
More Great Sourdough Bread Recipes:


📖 Printable Recipe

Dutch Oven Sourdough Bread
Ingredients
- 330 g water, warm
- 150 g sourdough starter, active
- 500 g bread flour
- 10 g fine salt
Instructions
Make the dough:
- In a large bowl, combine 330g warm water with 150g of active sourdough starter until mostly combined.
- Add 500g bread flour and 10g salt to the bowl and mix until a shaggy dough forms. Knead the dough with your hands until all the shaggy bits are incorporated.
- Cover the bowl and set aside for 45 – 60 minutes.
Stretch and fold:
- Uncover the bowl and using damp hands, grab the dough and gently pull it until the flap is long enough to fold over itself, then fold the flap, rotate the bowl 90 degrees, and repeat 4 times.
- Recover the bowl, and set it aside for 30 minutes, then repeat the stretch and fold process at least 3 more times over the next 2 hours.
Bulk ferment:
- Complete one final stretch and fold, then cover the bowl and set aside for 2 hours to bulk ferment. It is important to keep the dough bowl somewhere warm to encourage the microbes to work quickly!
Shape:
- Observe your dough, at this point, the dough should have risen in the bowl, and have a smooth surface with visible bubbles. If the dough is domed in the bowl it is ready to work with, if the dough is flat it may need more time in the bulk ferment.
- Lightly flour the work surface and use a bowl scraper to turn the dough out onto the floured surface. Try to get the smooth top face down so that the sticky underside is on top facing you, this will make shaping the dough easier.
- Fold the edges into the middle, alternating sides as though lacing the dough together. Then starting from the top, fold the dough into thirds as you would a letter, but pull the bottom all the way around to flip the dough so the seam is facing downward. Stop there if making a batard, or tuck the long ends underneath to create a boule.
- Dust the top of your boule or batard with rice flour, then use a bench scraper to pick up the dough, flip the dough, and place it upside down, or seam side up, into a banneton to prove.
Prove:
- Cover the banneton either using a damp kitchen towel or a shower cap. During the proving period, the dough will rise and become puffy in the banneton, but it should be watched – as over-proofing can cause the dough to bake up flat. This process will take a different amount of time based on the ambient temperature.
- To test the dough, gently poke it and observe how the dough reacts. If the dough feels tight and dense and looks like it hasn't relaxed in the basket, it is likely under proofed. Underproofed dough will resist your poking and spring back almost immediately. If the dough feels airy but still elastic and looks relaxed in the basket, it is properly proofed. Properly proofed dough will be easily poked, and the indent will slowly fill back in but may not even totally recover. Overproofed dough feels sticky and lacks elasticity, it will likely look slack in the basket and your indentation won't rebound.
Pre-heat oven:
- Place your dutch oven, cloche, or desired baking dish in the oven and preheat to 450f.
- Meanwhile, place the banneton in the freezer.
Bake:
- Once the oven is preheated, remove the dough from the freezer and invert the banneton onto a sheet of parchment paper.
- Use a lame, sharp knife, or clean razor blade to score the dough.
- Carefully remove the dutch oven from the oven, and using the parchment paper as a sling, transfer the sourdough loaf from the counter into the dutch oven.
- Bake the dough at 450f covered for 30 minutes and uncovered at 450f for 25-30 minutes, or until the loaf is cooked through. You can test the doneness of the loaf with an instant-read thermometer. Bread is cooked once it reaches 205 – 210 degrees Fahrenheit internal temperature.
Cool:
- Remove baked bread from the dutch oven and transfer it to a wire mesh cooling rack to cool completely before slicing. I like to leave it for at least 2 hours before slicing, as slicing too soon can affect the crumb and texture of your loaf.


This is now my ‘go to’ recipe. I am new to sourdough baking and have tried this recipe three times and each time it has been perfect. Going to try baking it in a bread pan next.
So happy to hear this! That is the highest compliment <3
Most beautiful rise ever, and I am sure the inside will be wonderful, but the top and bottom burned. Have you dealt with this before? Maybe my oven was running hot? When I baked another load on a silicone mat placed on a baking sheet with a tin of water to create steam below it, no burning. Maybe it’s my cast iron? (It’s coated cast iron)
Interesting! The dutch oven I used in these pictures is a family heirloom that is bare cast, though I often bake my sourdough in enamelled cast. Where was the dutch oven in relation to the actual oven? I like to keep mine at least somewhat centered. Some people put rice or cornmeal on the bottom of the dutch oven to prevent burning, others place a bare baking sheet under the dutch oven to kind of buffer the heat.
One thing that wouldn’t hurt is to put a oven thermometer in there to see where your oven is at temp wise and calibrate it – I had to calibrate mine, it was out 30 degrees! I just googled the model and how to calibrate oven temp and it popped right up.
There are several comments on how steam is important/beneficial but none of the recipes indicate when and/or how to incorporate this. I believe one briefly mentioned ice but that may have been on another site. Any advise on this would be appreciated. Many thanks in advance.
Hey Nedra, sorry that it’s not more clear, but the bread creates its own steam while baking and that’s why home bakers benefit from using dutch ovens which trap that steam during the baking process. If you want to increase the amount of steam, you can always spritz the surface of your dough with water or add an ice cube to the dutch oven. Though sometimes adding an ice cube makes for a doughy spot on the bottom where the water ends up pooling before evaporating.
I loved the recipe. The fact that you can have an artisan loaf of sourdough in one day is amazing. This is definitely my go to recipe!
I decided to use your recipe for proofing this Dutch oven sourdough in the fridge. I might have gotten confused between the two recipes. I made as directed above, including the 2 hour bulk ferment at room temp. Then I did the folding and placed it in the banneton for 36 hours. Then baked. Looking at some of the comments, I think I should have put the dough in to the fridge before the 2 hour bulk ferment. Is that correct?
Hey Caroline,
If that resulted in a great loaf, you’ve done it right!
Usually, if I’m going to cold proof in the fridge, I will follow all the steps though shaping the dough and placing it in the banneton, then I’ll put it in the fridge. By then the dough has been in bulk ferment (starts as soon as everything is mixed together) for 3 or so hours and I find I get a healthy oven spring with that method, you could always proof it in the banneton at room temperature for an hour or 2 before putting in the fridge, but the only hazard with that is that it takes a long time for all of that dough to cool down and slow the fermentation, which can inadvertently cause over-proofing.
Hope that helps!
@Ally,
The loaf did come out really well, but I think I’ll try putting it in the fridge after the folding to see if it is any different. Thanks
Awesome to hear! Sourdough is complicated but also simple and a lot of times, the yeast do what they want regardless of us haha!
@Ally,
Ok so follow the stretch and fold then to the two hour bulk ferment then place it in the Banneton then in the fridge. I want to proof mine overnight so im not cooking bread a midnight hahaha
This page is so helpful thank you
Hey Lee, Exactly!
Using the fridge is a great way to help fit sourdough into a busy schedule, it allows you to pause time, so to speak!