
Small Loaf Sourdough

This small loaf sourdough recipe might be the best reason to keep a living, growing, fermenting thing in a jar on your counter! This easy, no knead sourdough recipe will result in a gorgeous sourdough boule that’s just right!

I saw a meme the other day that said “Are we just gonna let March come back after the way it acted last year?” I laughed and laughed. March 2020 was a month, alright.
We spent the following months having morning coffees together. We had lunch and dinner together as a family every single day. We totally made the most of the opportunity to slow down and enjoy each other’s company.
And every afternoon for months, I’d come out of the kitchen with a gorgeous sourdough loaf for a snack! I guess we know where that quarantwenty came from!
This small batch sourdough bread recipe is dedicated to maximizing things.
Jump to:
Tips + Tricks
No. 1 –> Don’t have a starter yet? Check out my step-by-step 24-hour sourdough starter recipe! It’s got a secret ingredient that helps the yeast along! Then take a quick look at my guides on storing sourdough starter, feeding sourdough starter, what makes the best sourdough starter jar, and how to use discard!
No. 2 –> Ensure that your starter is mature and lively to provide the best results possible. A weak, immature starter will have a hard time leavening your dough.
No. 3 –> Avoid over-proofing the dough. The “more proof = more sour” temptation is definitely hard to resist, BUT over-proofed sourdough will likely result in a flat loaf and sticky dough that’s nearly impossible to shape. That said, don’t worry about proofing sourdough in the fridge, the cold temperature slows down the fermentation process considerably.

Key Ingredients
Starter: Use an active, recently fed starter. Your starter should be dotted with bubbles and risen by at least double.
Salt: I use hand-ground kosher salt, but any fine ground salt will do. The salt in this sourdough recipe is responsible for adding taste and enhancing the aromas and flavor present in the dough itself. Salt also helps to tighten the gluten structure and strengthen the dough – making it easier to create and hold air bubbles.

How To Make A Small Sourdough Loaf
Make The Dough:
- Combine 60g fed and active starter with 220g water, then add 330g unbleached flour.
- I usually stir with a spoon until I get to the shaggy stage. Once the dough looks shaggy, I just mix it with my hands or bowl scraper for a couple of seconds just to ensure everything is incorporated.
- Cover the bowl with plastic wrap and a clean kitchen towel.
- Set the dough aside to rest for 1 hour. This step helps to reduce mechanical mixing by activating the gluten structure and softening the dough.


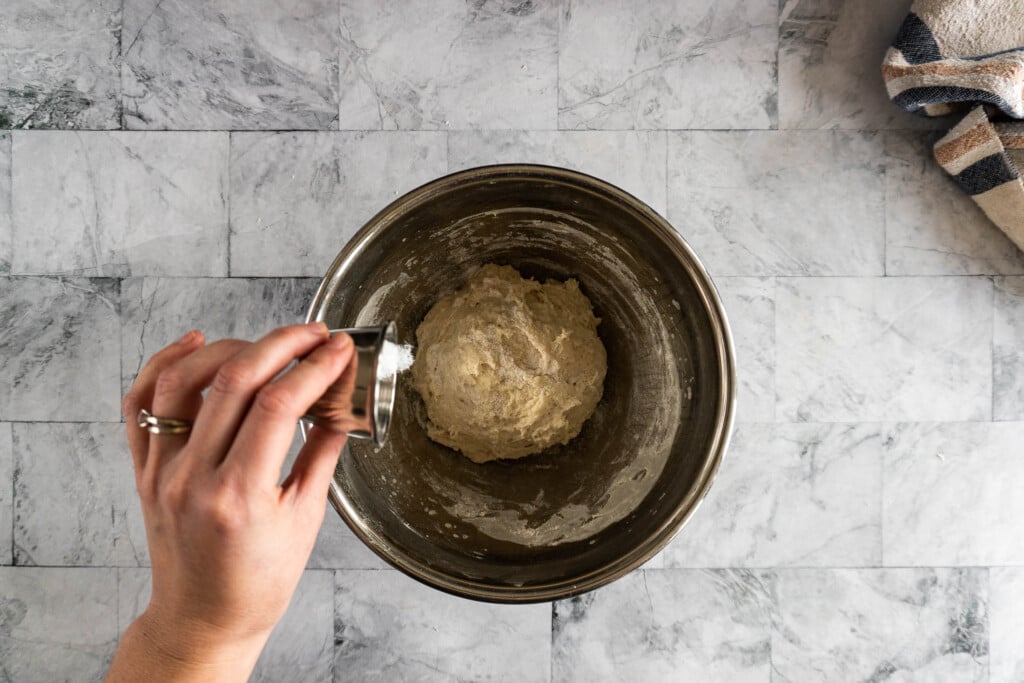
Add the salt:
- After the dough has rested for 1 hour, it’s time to add the salt.
- Sprinkle 8g salt around the top of the loaf.
- Using damp hands, knead the salt into the dough for approximately 10 folds.
- Recover the bowl with plastic wrap and a clean kitchen towel.
- Set aside for 30 minutes.


Stretch + Fold:
- With wet hands, grab the dough and gently pull it until the flap is long enough to fold over itself, then fold the flap, rotate the bowl 90 degrees and repeat 4 times.
- Recover the bowl, and set it aside for 30 minutes.
- Repeat the stretch and fold process at least once more for a total of 3 sets of stretch and fold.
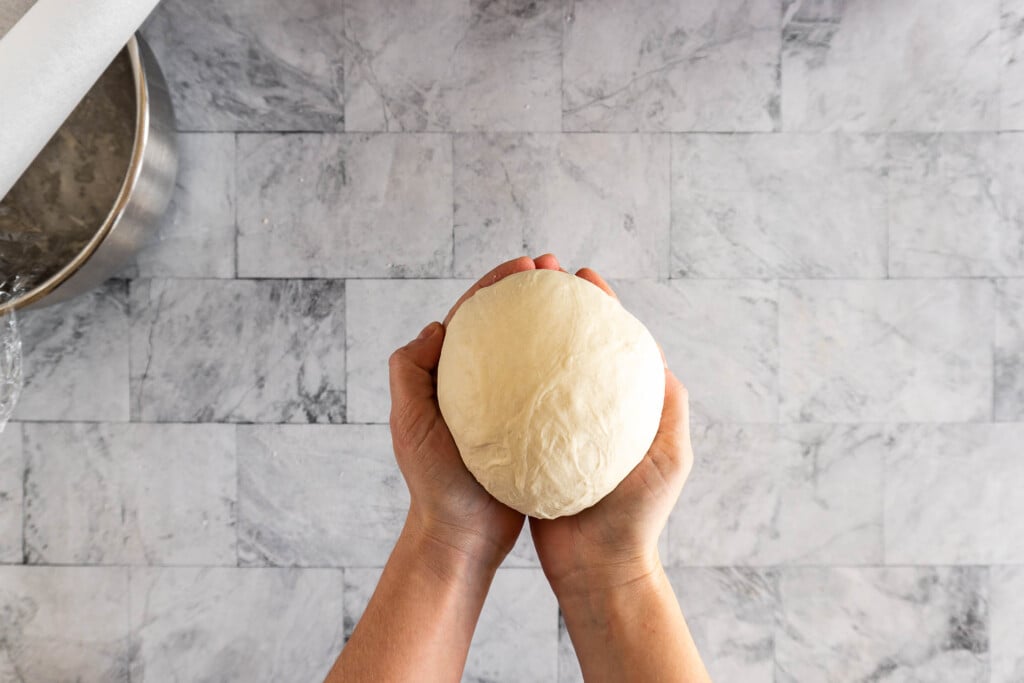
Shape + Proof:
- On the last stretch and fold, pick up your sourdough and form it into a boule. Either place it seam side up into a banneton or banneton alternative or seam side down on a square of parchment paper and using the parchment paper as a sling, pick up and place the boule in a bowl approximately the same size as your baking dish. Re-cover the bowl with plastic wrap and the kitchen towel and set it aside to rise.
- The timing of the proof depends heavily on a lot of factors; the temperature in your house, the temperature of the water used, and the vibrancy in your starter.
- This final proof is done when the dough has at least nearly doubled in size and looks less dense and airier. This usually takes 3-4 hours.


Bake bread:
- Place your cast iron dutch oven inside the oven and pre-heat both together to 450f.
- Once the oven has reached temperature, uncover the bread, and score it with a sharp knife or razor blade.
- CAREFULLY pick up the parchment paper sling and lower the bread into the heated dutch oven.
- Recover the pot and return it to the oven for 30 minutes at 450f.
- After 30 minutes of baking, uncover the dutch oven and bake the sourdough until a deep caramel brown, about 15 minutes, but this may vary.


Cool:
This may be the worst part! Allow your small-batch sourdough loaf to cool before cutting into it, at least a bit!
Speed It Up
Yes, good things come to those who wait but good things ALSO come to those who make it happen!
This sourdough bread can be sped up in a few ways:
- When feeding the starter, use warm water. I like to use water that’s between 80-85f. Adding heat can speed up the activation time.
- Adding a little heat during the bulk fermentation can also shave precious hours off your rising time.
Here’s what speeding up the recipe looks like for me:
- 6 am: Feed my starter with warm water (between 80-85f) while my coffee is brewing, then pop it into the microwave with the light on, and allow it to “proof” in there for 4-6 hours. By the time noon rolls around, my starter has easily doubled and is full of bubbles.
- My microwave hack to keep the light on: I stick a piece of folded paper towel in the corner of the door, this allows the door to close but not completely, keeping the light on. This is a trick I learned from my mom, and I proof ALL my bread this way!
- 12 pm: Mix up the dough for a small batch sourdough loaf, again, using warm water, and start the autolyze process.
- 2:30 pm: The stretching and folding process is complete, and my loaf is shaped and resting in a parchment paper hammock! At this point, I tightly cover the rising bowl with plastic wrap and place it in the microwave with the light on for about 3 hours.
- 5 pm: Set my favorite small dutch oven into the cold oven and preheat both together at 450f.
- 5:30 pm: Remove the rising bowl from the microwave, and carefully score the surface to allow for expansion. Then remove the dutch oven from the oven, and using the parchment paper as a sling, lower the boule into the dutch oven. Recover then bake as per the recipe.
- 6:30 pm: We’re eating warm, fresh sourdough with our dinner!

Slow It Down
I 100% get that not everyone has the luxury of being around their kitchen all day, so there’s a way to slow down this recipe too!
Just like speeding it up, this recipe can be slowed down using temperature manipulation:
- Feed the starter room temperature or cooler water.
- Don’t encourage the starter to activate by applying heat.
- Complete the bulk ferment in the fridge.
Here’s how I make overnight sourdough:
- Day 1 –> 6 am: Feed my starter room temperature or cooler water. Set aside in a cooler place to activate.
- 6 pm: Mix up the dough for a small batch sourdough loaf again, using room temperature water, and start the autolyze process.
- 7:30 pm: The stretching and folding process is complete, and my loaf is shaped and resting in a parchment paper hammock! At this point, I tightly cover the rising bowl with plastic wrap and place it in the fridge overnight.
- Day 2 –> 7:30 am: Remove the dough bowl from the fridge and set it on the counter, covered in plastic wrap and a kitchen towel.
- 5 pm: Set my favorite small dutch oven into the cold oven and preheat both together at 450f.
- 5:30 pm: Uncover and carefully score the surface of your boule. Then remove the dutch oven from the oven, and using the parchment paper as a sling, lower the boule into the dutch oven. Recover then bake as per the recipe.

Batch + Storage Information
Batch:
This small batch sourdough bakes a 1 1/2 lb loaf. This is the perfect amount for our family of 4 to serve with dinner and have toast leftovers in the morning!
Storage:
If you’ve got leftover sourdough, you’ve got serious willpower! Storing sourdough bread can be done, BUT be warned that it doesn’t have the preservatives that a store-bought loaf of bread has, so the process is a bit different.
Your boule can be kept cut side down on a cutting board for up to 18 hours before the crust becomes too crisp. After 18 hours, I recommend transferring it to a bread bag.
Your sourdough loaf can also be frozen. To freeze sourdough bread, cool the loaf to room temperature, then tightly wrap it in plastic wrap, slide it into a bread bag, seal it up and stick it in the freezer for 1-2 months. To use after freezing, remove the loaf from the freezer, unwrap and allow it to come to room temperature (1 -2 hours) before slicing and enjoying.
More Sourdough + Sourdough Discard Recipes


Variations + Substitutions
I know you’re gonna ask! But first things first: If this is your first time baking your first loaf, follow the recipe as specified so you know what to expect.
Whole wheat flour: Results in a more flavorful, but dense loaf. If adding whole wheat to your sourdough, I would substitute a maximum of 50g of whole wheat. The flour proportions would be 270g all-purpose flour and 50g whole wheat. My sister has a GREAT recipe for whole grain sourdough!
Rye flour: This will also give a more flavorful loaf, but again, I would be cautious about the proportions, as rye tends to be weak and can be hard to work with. I would substitute rye to a maximum of 50g as well. I do have a great recipe for rye sourdough and an accompanying rye sourdough starter.
Flavor Add-Ins: If you’re looking to whip up a fancier loaf, check out some of my flavored recipes, like pumpkin sourdough, chocolate sourdough, jalapeno and cheddar sourdough, and cinnamon raisin sourdough.

Recommended Equipment
3 qt cast iron dutch oven: Much of the success of this bread depends on having a heavy ass cast iron dutch oven. It’s one of those things you should already have, and if you don’t have one, fix that! The little red one in these photos was my first piece of cast iron and something that started somewhat of a cooking revolution for us a decade ago.
A 3-quart cast iron dutch oven is a workhorse in the kitchen, and you’ll find yourself reaching for it often.
Scale: It’s really hard to make sourdough without a scale. Sorry, but them’s the facts! bread baking and bread dough are a bit of a science. A good kitchen scale will treat you well over a huge range of recipes, like homemade bacon!
📖 Printable Recipe

Small Loaf Sourdough
Ingredients
feed the starter:
- 50 g sourdough starter
- 50 g unbleached all purpose flour
- 50 g filtered water
Sourdough:
- 60 g active, bubbly, fed sourdough starter
- 220 g filtered water
- 330 g unbleached all purpose flour, or bread flour
- 8 g salt
Instructions
Feed the starter:
- 8-10 hours before baking, feed your starter. Use 50g starter, 50g water, and 50g flour. Stir it all together and set it aside to rise.
- Once the starter has risen to double its size and is full of bubbles, it's ready to use.
Start the dough:
- Combine 60g fed and active starter with 220g unchlorinated water, then add 330 g unbleached all purpose or bread flour.
- Stir until completely combined.
- Cover the bowl with plastic wrap and a clean kitchen towel. Set the dough aside to rest for 1 hour.
Add the salt:
- After the dough has rested for 1 hour, sprinkle 8g salt around the top of the loaf.
- Using damp hands, knead the salt into the dough for approximately 10 folds.
- Recover the bowl with plastic wrap and a clean kitchen towel.
- Set aside for 30 minutes.
Stretch And Fold:
- With wet hands, grab the dough and gently pull it until the flap is long enough to fold over itself, then fold the flap, rotate the bowl 90 degrees and repeat 4 times.
- Recover the bowl, and set it aside for 30 minutes.
- Repeat the stretch and fold process at least once more for a total of 3 sets of stretch and folds over about an hour and a half's time.
Final rise:
- On the last stretch and fold, form the dough into boule. Place it seam side up in a banneton or banneton alternative, or seam side down on a square of parchment paper and using the parchment paper as a sling, pick up and place the boule in a bowl approximately the same size as your baking dish. Re-cover the bowl with plastic wrap and the kitchen towel and set it aside to rise.
- The final rise is done when the dough has at least doubled in size and looks less dense and airier.
Bake:
- Place your cast iron dutch oven into the oven and pre-heat both together to 450f.
- Once the oven has reached temperature, uncover the bread, and if using a banneton turn it over onto a parchment paper square and score it with a sharp knife or razor blade, if using the bowl method simply score the top of the loaf.
- CAREFULLY pick up the parchment paper sling and lower the bread into the heated dutch oven.
- Recover the pot and return it to the oven for 30 minutes at 450f.
- After 30 minutes of baking, uncover the dutch oven and bake the sourdough until a deep caramel brown, about 15 minutes, this may vary depending on your oven.


Hello, Ally! And everyone else! Just chiming in to say that four years later I’m still baking sourdough with this recipe- my first and successful try! I have this recipe memorized and have learned so much from it: autolysing, adding salt after so it doesn’t slow down the fermentation, strength building stretching and folding, bulk fermentation, proofing, scoring, and baking! This shall forever remain the quintessential sourdough bread recipe for me! Thanks again!
Wow! That is such high praise! So happy to hear you still love the recipe, Allan <3
Hi Ally
I made this small loaf and it was delish! So I put the rest of my starter in the fridge and plan to use once a week, how do I go about feeding it?
Thanks Charlotte
Hey Charlotte, so glad to hear it! I have a guide feeding your sourdough starter and one on storing your sourdough starter that may help you!
Hi Ally, I was delighted to read detailed instructions about cold proofing. I am so much more confident knowing the cold fermentation keeps the dough from spreading and is easier to score. Problem solved! Thank-you so much. I’ve been baking sourdough for over 10 years and am always eager to learn more.
Also, I had a question for clarification. There is reference to place a “small Dutch oven into the cold oven and preheat both together at 450f”. What is “both together” – would that be the Dutch oven pot and the lid?
Hey Karen, you got it! By both together I mean the dutch oven (and lid) and the oven.
Glad to hear you still have a passion for sourdough baking – it’s such a true love of mine, I’m so happy other share it!
So I’m waiting for my bread to rise and wondering if my 8 grams of salt measured out wrong? It looked like too much, like 1tbs? Another thing…no sugar, honey, oil, or butter in this recipe?
Hey Kathleen, it depends on the grain of your salt how much volume it takes. This is not an enriched dough, when it comes to sourdough you really only need starter, flour, water, and salt.
I’d love to hear how your loaf turned out.
This is my favorite recipe!! I’d love to add inclusions to it, any recommendation for how to do it?
So happy to hear that! When I add inclusions to this recipe, I often just toss in after the first stretch and fold!
I stumbled upon this recipe looking for a small loaf recipe to try for my very first attempt… It turned out perfect!! Thanks for posting!!
So happy to hear this! It’s a great recipe for a smaller loaf! You might like my dutch oven sourdough bread recipe, too, it’s a bit larger in volume, but still super yummy!
What size of Dutch oven would you use for this recipe? Thank you! I’m excited to try it!
I use a 3 quart, but that size or larger would work great!
Hi! I love your recipe. I have made it a few times. Can we double the recipe if we want to make it a bigger loaf? Thank you!!
Absolutely!
I double this recipe quite often, but bake it in a Dutch oven that is at least 5 qts. in capacity. I first baked it in a 4.5 qt. enamel cast iron Dutch oven and it rose to the roof of the pot and looked like it wanted to expand but the lid eis too heavy!