
Cinnamon Raisin Sourdough

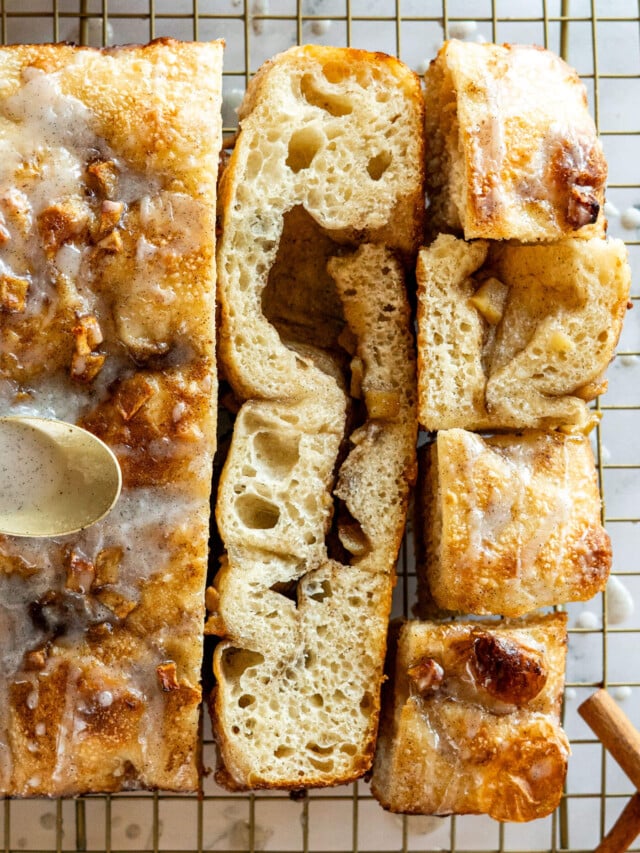
This cinnamon raisin sourdough bread features naturally leavened dough swirled with cinnamon sugar and studded with plump raisins for the ultimate breakfast loaf. Learn how to create beautiful swirls and achieve tender crumb with overnight cold fermentation.

When I make this sourdough cinnamon raisin bread I have to hide it. And I don’t mean like tuck it in the cupboard, I mean, like… HIDE it.
I literally have to bake it when the house is empty and wrap it twice before stuffing it in the cupboard up above the microwave, because I’m the only one who knows that hiding spot exists.
I swear Kevy and the kids are like drug-sniffing dogs, but with sourdough. They walk into the house and just know I baked some of that goodness. Then they eat it 🙁 It’s just rude if you ask me. Ha!
But who can blame them? Rich sourdough taste with an irresistible cinnamon raisin swirl? I can’t. That’s why I hide it!
This cinnamon raisin sourdough recipe is dedicated to keeping the good stuff for yourself!
This cinnamon raisin sourdough recipe is shared with you in partnership with Brod + Taylor. They’ve asked me to share one of my favorite sourdough recipes with my awesome readers!
Jump to:
Expert Tips
- If you’re overwhelmed with all things sourdough, I can help you! I have guides on everything from making a 24 hour sourdough starter, to picking the best starter jar, to feeding your sourdough starter, to storing sourdough starter, to proofing sourdough the fridge, to using up discard, and more.
- Using the Brod + Taylor proofing box has revolutionized my sourdough baking. With the proofing box, not only do I get more consistent bakes, but I can go from feeding my starter to making my dough within 3 hours, and speed up my bulk fermentation time too! See more on the proofing box below.
- Adding the buttery cinnamon mixture to this recipe will be similar to adding the filling to my jalapeño cheddar sourdough. BUT the shaping is much easier and is done in basically 1 step!
- I finally(!) got a couple of bannetons! They are 100% NOT necessary for baking sourdough, but I do prefer the results of the loaves that have been proofed in the bannetons. Here’s a guide to using and maintaining banneton baskets!
- If you don’t have one, I have a great guide to banneton alternatives.
- Can’t get enough sourdough and cinnamon? Try my sourdough cinnamon rolls!

Key Ingredients
Active Sourdough Starter: For this recipe, you want to use a fed and active sourdough starter. Your starter should have been fed within the last approximately 6-8 hours and have at least doubled in size. This recipe is based on a sourdough starter with 100% hydration (equal amounts of flour and water by weight, not volume.)
Cinnamon: Even if you’re a cinnamon aficionado with a collection of cinnamon, I would still recommend Saigon cinnamon. It’s more affordable, easily accessible, and has a rich, spicy flavor that’s perfectly suited to the sourdough flavor in this recipe.
Raisins: I recommend dark Thompson raisins. These seed-free raisins are sun-dried and have a delicious, caramel-like flavor that pairs perfectly with the spice in the cinnamon. Golden raisins will work in a pinch, but they are treated to prevent their skin from darkening and tend to have a more acidic taste.

How To Make Cinnamon Raisin Sourdough Bread
Build The Dough:
- In a large mixing bowl, combine 100g fed and active starter with 350g warm water. Whisk until homogenous.
- In another bowl, whisk together 500g bread flour, 10g salt, and 25g granulated sugar. Mix this into the wet ingredients. I usually stir with a whisk until I get to the shaggy stage. Once the dough looks shaggy, I’ll switch to a bowl scraper or my hands to help lift and fold the dough into itself to ensure all the flour is absorbed.
- Cover the bowl and allow the dough to rest for 45-60 minutes. This rest period improves the extensibility of the dough, leading to a better crumb and crust. I usually use a shower cap to cover my bowl, but a tea towel will work too!


Stretch + Fold:
- With wet hands, grab the dough and gently pull it until the flap is long enough to fold over itself, then fold the flap, rotate the bowl 90 degrees, and repeat 4-8 times, for 1-2 rotations around the bowl. This is considered a set of stretches and folds.
- Recover the bowl and rest for another 45 minutes before repeating the stretch and fold process.
- After the second stretch and fold, pour hot water over 125g of seedless raisins and allow them to soak during the next 45 minute rest.
- Prior to the third stretch and fold, strain the water out of the soaked raisins. Then add the raisins to the dough and stretch and fold the raisins into the dough. You’ll likely have to do a little convincing and pressing the raisins into the dough. Any way you get it done is perfect! Recover the bowl and allow it to rest for another 45-60 minutes.


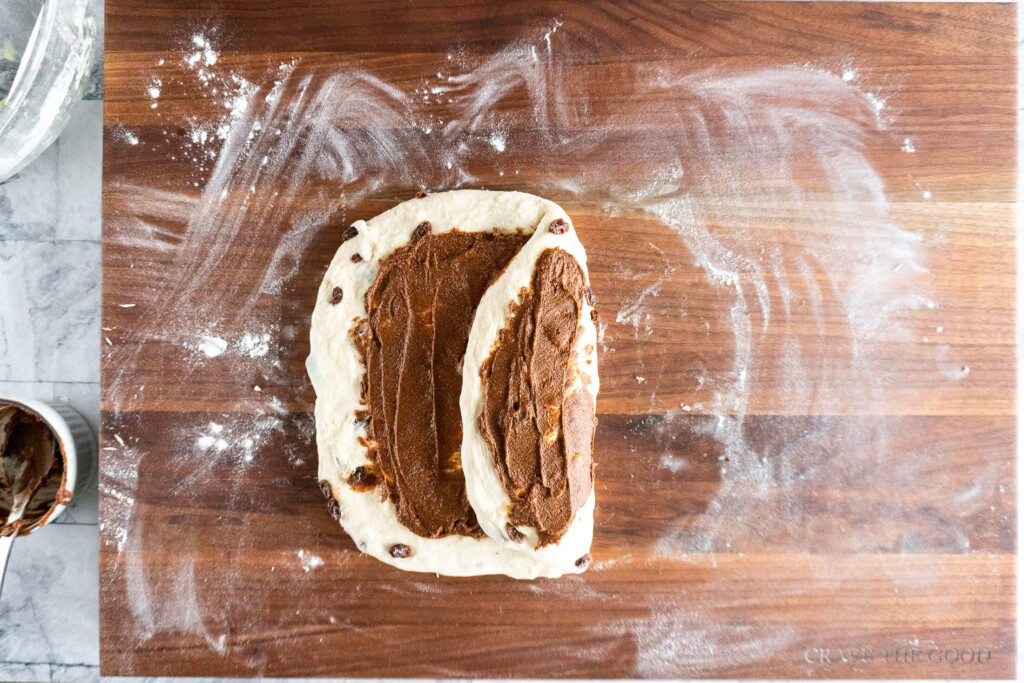
Cinnamon Raisin Swirl:
- In a small bowl, combine 40g softened butter with 25g granulated sugar, 8g ground cinnamon, and 15g all purpose or bread flour to make a paste.
- Lightly dust your countertop with flour, then turn the dough onto the work surface.
- Carefully press/stretch the dough into a rectangular shape with wet hands. The dough may fight your pulling, but take care to not tear the dough – if required, stretch a bit, then let the dough rest for a couple of minutes before stretching more.
- Spread most of the cinnamon butter mixture over the surface of the dough, leaving about a 1/2″ gap along the edges to ensure your dough sticks together and the cinnamon doesn’t run out.
- Fold up the bottom of the rectangle about 1/3 of the way up, like you’d fold a letter. Spread the remaining cinnamon sugar blend on the top, ensuring you leave 1/2″ along the edge. Fold the top of the dough over the bottom. Gently fold the sides under to form a boule shape.
- Place the shaped dough seam-side up into a banneton, floured with rice flour. Allow the dough to rest at room temperature 4-5 hours to bake today, or place in the fridge to cold proof overnight for 6-24 hours.


Bake:
- Preheat oven with dutch oven inside to 450f. I use a large, bare cast iron dutch oven for this recipe. A light-colored enamel dutch oven absolutely works as well, I just find the lighter color enamel gives a lighter crust and tends to stain.
- Once the oven is preheated, turn the dough out onto a piece of parchment paper, then score the top of the loaf.
- Lift the dough using the parchment paper as a sling and place it into the hot dutch oven.
- Bake at 450f for 35 minutes covered and then another 15-20 minutes uncovered, until the crust is golden brown.
- Remove from dutch oven immediately and place on a wire rack to cool for at least an hour before slicing.

Baker’s Schedule
- Day 1 –>
- 6:30 am: Feed the starter.
- 12:00 pm: Make the dough and rest for autolyze.
- 3:00 pm: Stretch and fold process is complete.
- 3:45 pm: Spread cinnamon butter mixture on the dough, shape the dough, and place into banneton. Allow shaped loaf to proof for 4-5 hours to bake today, or slide into plastic bag and place in fridge for 6-24 hours.
- Day 2 –>
- 8:30 am: Set a dutch oven into the cold oven and preheat both together at 450f.
- 9:30 am: Flip the cinnamon raisin sourdough loaf onto a parchment paper square, score the top of the loaf. Then bake in the dutch oven.
Why Use A Proofing Box?
I absolutely adore my Brod + Taylor proofing box! It has simplified and improved my sourdough baking in a few different ways.
- Speed! One of the major factors in fermentation is temperature, and keeping my sourdough starter at a warmer temperature has helped me to learn my starter better and know how long it will take to activate after feeding, or what to expect for my bulk fermentation time.
- Consistency! Due to the consistently warmer temperature in the proofing box, my bread is consistently rising and ready for baking at expected times.
- Scheduling! This one ties into speed, but deserves its own section. Increasing the speed of fermentation means that I can much more easily fit sourdough baking into my busy schedule, and you will too.
- Better rise! The photos below show a fed starter split into two containers over the course of 3 hours. One was placed at room temperature and one was placed in the proofing box. It is evident that the starter in the proofing box rose/activated much more quickly than the room temperature starter. The starter from the proofing box also rose taller than the room temperature starter overall.


Using A Proofing Box For This Recipe
It’s really easy to incorporate the proofing box into sourdough baking!
Fill the water reservoir and set the proofing box to 80f. Return the dough to the proofing box each time you’re done handling it and reduce the time by approximately 1/3rd. If your stretch and folds need 45 minutes rest at room temp, reduce the time to 30 minutes in the proofer.
Batch + Storage
Batch:
This recipe bakes a nice-sized loaf of cinnamon raisin sourdough bread. This is the perfect amount for our family of 4 to serve with breakfast for at least 2 days. Or for me to hide from my kids and spouse for up to 3 days!
Storage:
If you’ve got leftover sourdough, you’ve got serious willpower! There are a couple of ways to store sourdough bread to help prolong its quality after cutting.
Your boule can be kept cut side down on a cutting board for up to 12 hours before the crust becomes too crisp. This is our go-to. I recommend transferring it to a bread bag after 16-18 hours though. Once it gets a little crusty or hard, cinnamon sourdough makes a great french toast!
Your sourdough loaf can also be frozen. To freeze sourdough bread, cool the loaf to room temperature, then tightly wrap it in plastic wrap, slide it into a bread bag, seal it up and stick it in the freezer for 1-2 months. To use after freezing, remove the loaf from the freezer, unwrap and allow it to come to room temperature (1 -2 hours) before slicing and enjoying.
More Sourdough Bread Recipes To Love


Recommended Equipment
Brod + Taylor proofing box: Aside from streamlining and improving my sourdough baking, I love this bread proofer. It’s easy to fold flat to put away, and quick to pop back open when my company leaves and I’m good to have stuff on my countertops! HA! I love that I can feed my starter and be ready to bake within 3-4 hours. You can’t make sourdough happen instantly, but this nifty unit helps it happen a heck of a lot faster!
Scale: It’s really hard to make sourdough without a scale. Sorry, but them’s the facts! bread baking and bread dough are a bit of a science. A good kitchen scale will treat you well over a huge range of recipes, not just sourdough recipes – I use mine to cure homemade bacon!
📖 Printable Recipe

Cinnamon Raisin Sourdough Bread Recipe
Ingredients
Dough:
- 100 g active sourdough starter
- 350 g water, filtered, room temperature
- 500 g bread flour
- 25 g granulated sugar
- 10 g sea salt
- 125 g Thompson seedless raisins
Cinnamon fiiling:
- 40 g butter, softened
- 25 g granulated sugar
- 15 g bread flour
- 8 g ground cinnamon , Saigon
Instructions
Build the dough
- In a large mixing bowl, combine 100g fed and active starter with 350g warm water. Whisk until homogenous.
- In another bowl, whisk together 500g bread flour, 10g salt, and 25g granulated sugar. Mix this into the wet ingredients. I usually stir with a whisk until I get to the shaggy stage. Once the dough looks shaggy, I'll switch to a bowl scraper or my hands to help lift and fold the dough into itself to ensure all the flour is absorbed.
- Cover the bowl and allow the dough to rest for 45-60 minutes. This rest period improves the extensibility of the dough, leading to a better crumb and crust.
Stretch + Fold:
- With wet hands, grab the dough and gently pull it until the flap is long enough to fold over itself, then fold the flap, rotate the bowl 90 degrees, and repeat 6-10 times, for 2-3 rotations around the bowl.
- Recover the bowl and rest for another 45 minutes before repeating the stretch and fold process.
- After the second stretch and fold, pour hot water over 125g of Thompson raisins and allow them to soak during the next 45 minute rest.
- Prior to the third stretch and fold, strain the water out of the rehydrated raisins. Then add the raisins to the dough and stretch and fold the raisins into the dough. You'll likely have to do a little convincing and pressing the raisins into the dough. Any way you get it done is perfect! Return the bowl to the dough proofer and allow it to rest for another 30 minutes.
Add-ins:
- In a small bowl, combine 40g softened butter with 25g granulated sugar, 8g Saigon cinnamon, and 15g all purpose or bread flour to make a paste.
- Lightly dust your countertop with flour, then turn the dough onto the work surface.
- Carefully press/stretch the dough into a rectangular shape with wet hands. The dough may fight your pulling, but take care to not tear the dough – if required, stretch a bit, then let the dough rest for a couple of minutes before stretching more.
- Spread most of the cinnamon butter mixture over the surface of the dough, leaving about a 1/2" gap along the edges to ensure your dough sticks together and the cinnamon doesn't run out.
- Fold up the bottom of the rectangle about 1/3 of the way up, like you'd fold a letter. Spread the remaining cinnamon sugar blend on the top, ensuring you leave 1/2" along the edge. Fold the top of the dough over the bottom. Gently fold the sides under to form a boule shape.
- Place the shaped dough into a banneton, floured with rice flour, or banneton alternative, and cover. Allow the dough to rest at room temperature 4-5 hours to bake today, or place in the fridge to cold ferment for 6-24 hours.
Bake:
- Preheat oven with dutch oven inside to 450f. I use a large, bare cast iron dutch oven for this recipe. A light-colored enamel dutch oven may need to bake longer uncovered or at a higher temperature.
- Once the oven is preheated, turn the dough out onto a parchment sheet. Score the dough with a lame or razor blade.
- Lift the dough using the parchment paper as a sling and place it into the hot dutch oven.
- Bake at 450f for 35 minutes covered and then another 15-20 minutes uncovered until the crust is golden brown.
- Remove from dutch oven immediately and place on a wire mesh rack to cool before slicing.
Notes
baker’s schedule
Day 1 –>- 6:30 am: Feed the starter.
- 12:00 pm: Make the dough and rest for autolyze.
- 3:00 pm: Stretch and fold process is complete.
- 3:45 pm: Spread cinnamon butter mixture on the dough, shape the dough, and place into banneton. Allow shaped loaf to proof for 4-5 hours to bake today, or slide into plastic bag and place in fridge for 6-24 hours.
- 8:30 am: Set a dutch oven into the cold oven and preheat both together at 450f.
- 9:30 am: Flip the cinnamon raisin sourdough loaf onto a parchment paper square, score the top of the loaf. Then bake in the dutch oven.


I’m new to sourdough dough- been dabbling for a year and just started branching out. Originally found this recipe on Pinterest and have become obsessed. My family loves it so much it’s gone within 12 hours. I’ve given the final products to friends and they beg for more! Love it and bring me more
So happy to hear this, Patty!
I’ve been looking for a good, simple cinnamon raisin sourdough – this looks great! Would it be possible to incorporate some whole wheat flour into it??
Hey Tess, I’m sure you could! I wouldn’t go much more than 50-75g of whole wheat in exchange for bread flour, but I do have a whole wheat sourdough recipe that you could use as a base and finish similar to this recipe!
Haven’t checked the inside yet so I guess this is a bit premature, but I’m wondering what I did wrong. I am VERY novice at sourdough so I’m obviously considering that as a factor, but all throughout I noticed the dough was thick. Not hard, but not shaggy like the pictures showed, despite me following the recipe to a T! Also, the bottom was burned but I read how to help that for next time through another baker’s comment. Any help is appreciated!
Hey Allie (great name BTW!), sourdough definitely has a learning curve! Please don’t be intimidated by it, once it clicks, you’ll be golden! How did the loaf turn out once cooled and cut?
Still fairly new to sourdough but wanted to try a breakfast bread. Made two boules of this recipe the first go round and making two more today. This time trying in loaf pans. It was uh-mazing!! Tasted like something from a European bakery in my opinion. Absolutely love the taste and texture. And appreciate the tip of wetting your hands before stretching the dough. It makes it so much less messy. 😉 Grateful for this go-to recipe to add to my cookbook.
So happy to hear this, Pamela!