
Sourdough Pita Bread

Soft, puffy sourdough pita bread made at home! This easy recipe turns simple ingredients into light, airy pitas that pocket perfectly for sandwiches, gyros, dips, and more!

It’s been a few months since we welcomed Fred The Second Sourdough Starter into this house. And let me tell you, we’ve been so happy to have him.
As a cook, I really enjoy something different. I enjoy cooking foods with a more complicated process, with a different step than I’m used to, or interesting ingredients. None of those things mean any of my recipes are harder to make, just that they are a bit more complex.
The complexity, for me, the variety of steps and different preparation methods help to keep the kitchen interesting. These recipes capture my attention and keep me excited about cooking.
That probably explains the intense sourdough tear I’ve been on lately.
This sourdough pita bread recipe is dedicated to keeping it interesting.
Jump to:
Tips + Tricks
No. 1 –> Need a kick-ass sourdough starter, and want it to produce by tomorrow? Check out my 24 hour sourdough starter!
No. 2 –> This recipe as written has an overnight (or more!) fridge nap, I find this helps me fit the recipe into my personal schedule better, but if you want to bake your pita’s the same day, absolutely, simply skip the refrigeration time. Or bake them in 2 days? Leave the dough resting in the fridge for a couple of days. No harm no foul!
No. 3 –> Overrun with discard? Hate to be wasteful? Housemates complaining about the containers of discard in the fridge? Check out my sourdough discard recipes; sourdough chocolate chip cookies + sourdough banana bread.
No. 4 –> If you find that your rolled pitas are a PITA to get to the oven, you can roll them on a sheet of parchment paper then transfer the whole thing to the oven. This can definitely make it easier to handle.

Key Ingredients
Sourdough Starter: This recipe requires an active, bubbly, and at least doubled sourdough starter. To measure, stir down the bubbles before scooping the starter into the measuring cup.
Olive Oil: Adding oil to this dough helps to crisp up the outer crust and keep the inner crumb tender. Oil is a great way to tenderize your dough.

How To Make Sourdough Pitas
- Combine warm water, active starter and half of the flour in the bowl of your stand mixer. Mix with the paddle attachment until completely combined. Let rest 10 minutes.
- Add the remaining ingredients and switch to the dough hook. Knead the dough on low speed for 5 minutes or until a smooth, slightly sticky dough forms. Don’t worry, it will tighten up.
- Cover the bowl and set aside for 30 minutes to rest. After a 30 minute rest, uncover the bowl and perform a series of stretch and folds, this is stretching the dough from one side of the bowl and folding it over the opposite side of the bowl. Rotate the bowl a quarter turn and repeat for a total of 4 folds. Recover the dough, and repeat twice more; 30-minute rest then stretch and fold.
- Tightly cover the mixing bowl and transfer to the fridge. At this point, you have a lot of flexibilty, as the dough can nap in the fridge for up to 3 days before being baked.
- Remove the sourdough pita dough from the fridge and allow it to come to room temperature, this will take approximately 3 hours.
- Once the dough has reached room temperature, place a baking stone into your oven and preheat oven to 500 degrees Fahrenheit. If you don’t have a baking stone, check the section below for some alternatives!
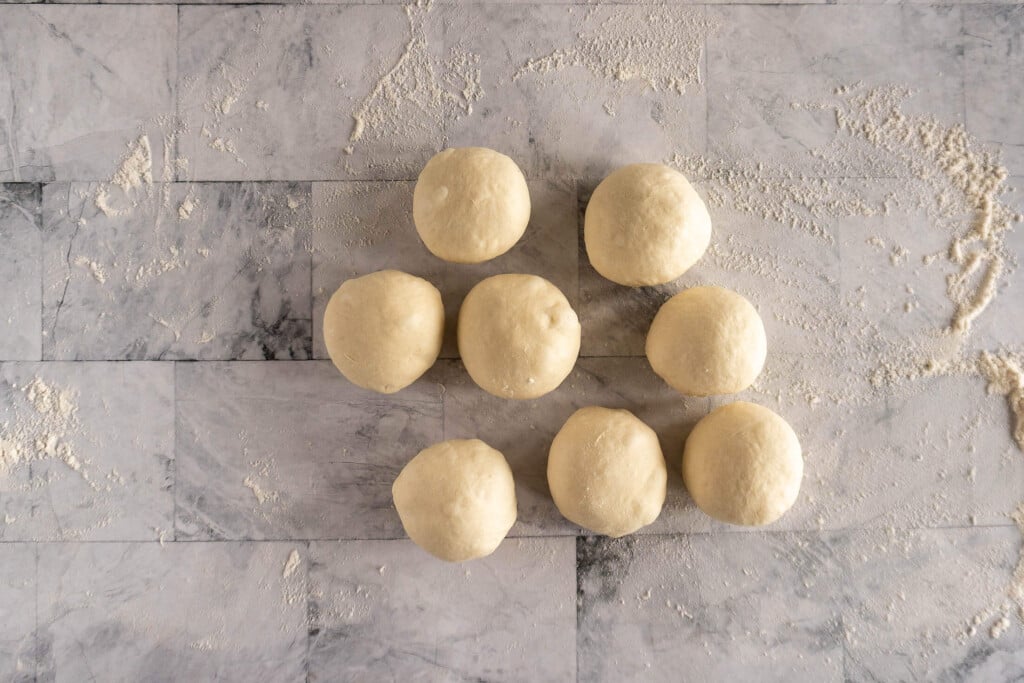
- Meanwhile, divide the dough into 8 pieces. Roll each dough piece into a ball, cover the balls with a clean kitchen towel and allow them to rise/ rest for 20 minutes.
- Just before baking each pita, take one ball and roll it out on a lightly floured surface into a round around 6 inches. The thickness of the dough is more important than the diameter. Aim for 1/4″ thick dough, too thin and it won’t puff up, too thick and it won’t be like a pita at all! If the dough is giving your trouble and keeps springing back while rolling, allow it to rest for 5 minutes and it will be much easier to roll consistently.
- Take place the pita round onto the baking stone and allow it to cook for 3-5 minutes, or until puffed and slightly browned.
- Remove cooked sourdough pitas from the oven and wrap in a kitchen towel and slide into a plastic bread bag while rolling and baking the remainder of the pitas. This will keep them warm, soft, and pliable!


No Baking Stone?
While I feel that the best results come from a baking stone, I understand that not everyone has a baking stone at home. There are definitely alternatives!
- Baking steel – If you bake a lot of bread, a baking steel is a great addition to your kitchen.
- Baking sheet – Use a heavy, dark-coloured baking sheet flipped upside down on your oven rack. A lightweight cookie sheet won’t work nearly as well because it lacks the ability to retain and transfer heat as a heavier metal can.
- Cast iron – A cast iron griddle would work awesome for this recipe, but in a pinch, a 12″ cast iron skillet will work too. The skillet method needs a careful hand so as not to burn yourself.

Baking Timeline
Day 1 – 8 am : feed your sourdough starter.
Day 1 – 5 PM: prepare dough and complete 3 sets of stretch and folds.
Day 1 – 8 PM: tightly cover bowl with plastic wrap and place in fridge overnight.
Day 2 – 8 AM: remove dough from the fridge and allow to come to room temperature.
Day 2 – 11 PM: start the baking process.

Batch + Storage Information
Batch:
This sourdough pita recipe makes 8 6″ inch pitas. It can easily be doubled or halved.
Storage:
While your pitas are best served fresh, they can be cooled to room temperature, then stored in a plastic bread bag to maintain freshness for 2-3 days.
If you’d like to store some in the freezer, they can be cooled to room temperature, placed in an airtight freezer bag or container and kept in the freezer for 2-3 months. To use out of the freezer, remove the pitas and allow them to thaw at room temperature for 1-2 hours before enjoying.
More Sourdough Recipes To Enjoy


How To Use Sourdough Pitas
We actually eat a lot of pitas in this house! Here’s a few ideas!
- Use your sourdough pitas to wrap up a delicious homemade donair!
- Dip your fresh pitas in a balsamic oil dip.
- Make homemade pita wraps by opening the pocket and stuffing full of yummy fillings!
- Try our absolute favourite! Pita pizzas! Smear the pita with pizza sauce and top as you would a pizza then bake until the cheese is melty.

Recommended Equipment
- Baking stone: a baking stone or baking steel makes baking these pitas an absolute breeze. They are an awesome tool to have in the kitchen.
- Stand mixer: I use my Kitchenaid Mixer for so many things. It makes everything much easier – I couldn’t live without it for my baking!
📖 Printable Recipe

Sourdough Pita Bread
Ingredients
- 1 cup active starter, stirred down
- 1 cup warm water, between 80-90 Fahrenheit
- 3 ½ cups unbleached all purpose flour or bread flour, using the scoop + level method – see notes
- ¼ teaspoon granulated sugar
- 1 ½ teaspoon coarse kosher salt
- 3 tablespoons olive oil
Instructions
- Combine 1 cup warm water, 1 cup sourdough starter and 2 cups flour in the bowl of your stand mixer. Mix with the paddle attachment until completely combined. Let rest 10 minutes.
- Add the remaining 1½ cups flour, ¼ teaspoon granulated sugar, 1 ½ teaspoon coarse kosher salt, and 3 tablespoons olive oil to the bowl and switch to the dough hook. Knead for 5 minutes.
- Cover the bowl and let it rest for 30 minutes. After 30 minutes, stretch and fold the dough. Repeat the rest and stretch/fold cycle 3 times total.
- Cover tightly and place in the fridge overnight – from 12-72 hours.
- Remove from fridge and allow to come to room temperature for about 3 hours.
- Place a baking stone in the oven and preheat oven to 500 degrees Fahrenheit with a baking stone.
- Meanwhile, divide the dough into 8 pieces. Roll each into a ball. Let the rounds rest for 20 min.
- Immediately before cooking, roll each piece out into a 6-inch circle. The size is less important than the thickness, aim for 1/4" thick. (see note)
- Place on the baking stone and bake at 500f for 3-5 minutes or until completely puffed and starting to turn golden brown.
- Once baked, remove the pita from the oven and wrap them in a clean kitchen towel and slide into a plastic bread bag while rolling and baking the remaining pitas.


Ally,
I followed the recipe to the letter. I have never attempted pita before, this was my 1st try-it was a disaster! It was not stated that you need to roll them out onto semolina flour, they were sticking to the rolling pin, the silicone mat, the bench scraper, everything! I do not have a pizza stone and tried a cast iron skillet- there was no real guidance as to how to use the skillet with this- the skillet got WAY too hot and just burned them immediately. Additionally, I got no rise, no picking like pits should- was more like a naan but without the delicious naan flavor :0( Would love any advice you have because I really do want to make home made fresh pita
Hey Kathleen,
Sorry to hear that you struggled. I did not roll my pitas out into semolina flour, I lightly floured and rolled them on the counter with bread flour. I also included a tip in the article that says if you’re having a hard time rolling them, they can be rolled out onto a parchment paper. I am not sure how the skillet got too hot, as I’ve baked these directly on a baking steel preheated in the oven at 500f and had no problem with them burning. I also bake sourdough pizza on baking steels at 500f for longer than 3-5 minutes and they never burn.
My immediate guess would be over proofed dough, or weak sourdough starter. I’d like to troubleshoot that a little bit – over proofed dough would be sticky and tough to work with, likewise would under-fermented dough due to a weak starter. Did you bulk ferment long enough? too long? What was the temperature in your house? Was your starter doubled and filled with bubbles? Did you stir the starter down before measuring?