
Best Bread Machine Recipe

If you’re looking for the best bread machine recipe, you’ve found it! This one is made with simple ingredients creating a soft, flavorful loaf that's perfect for sandwiches and toast.

Jump to:
There’s no arguing it, my Mom is 100% the best at baking homemade bread.
Me, on the other hand? It’s not one of my skills, I prefer sourdough baking! She’s handed down her recipe to me, tried to teach me, gave up teaching me, then taught my husband instead.
We’ve all decided that mom's bread will live on with Kevy!
But my mom gave me this white bread recipe so that I could bake my own light, fluffy sandwich bread on my own and I’ve been using it for over 10 years!!
This easy bread machine recipe is dedicated to mom.
This article was updated April 2025 to add new photos and weights in the recipe card, the recipe itself is unchanged!

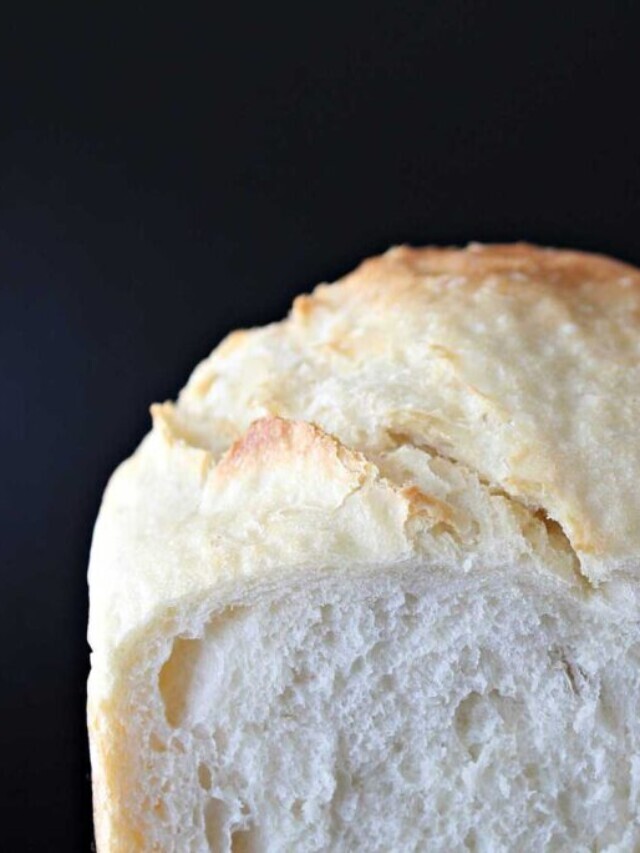
High Hydration
This is a high hydration recipe, about 72%.
It will look and behave differently than doughs you might be used to, but there’s a method to the madness. High hydration doughs:
- have thinner, crispier crusts but more tender crumbs
- ferment more quickly
- are more stretchy and sticky
All of these qualities add up to the perfect bread machine recipe, resulting in light, airy loaves that are full of flavor, with a beautiful rise and an irresistibly soft interior.
Key Ingredients

Flour: Use a high protein flour in this recipe, something like unbleached bread flour or all purpose flour with at least 12% protein.
Calculate protein content as follows:
Grams of Protein / Grams per Serving = _________ X 100 = ______%.
ex: 4g protein /30g per serving =.1333 x 100= 13.3% protein
Yeast: This recipe calls for instant yeast, or bread machine yeast, but if you don’t have any, you can use active dry yeast. Increase the amount to 2 1/2 teaspoons of active dry yeast and add it along with the liquid ingredients instead of on top.
Read More: Bread machine yeast substitutes
Variations + Substitutions
- Vegetable oil in this recipe can be substituted for butter, olive oil, margarine, I’ve even used rendered lard from own home-grown pork!
- Granulated can be substituted for brown sugar, maple syrup or honey. Though I prefer granulated sugar as it doesn’t bring affect the flavor profile of the bread.
- You can use all purpose flour if the protein content is around 13%. Determine the protein content with this formula: Grams Of Protein /Grams Per Serving = ___ -> ___X 100 = ___ %
- If you want to add some whole wheat flour, you can swap out up to 1/2 cup of bread flour for whole wheat, but I do have a bread machine recipe for honey whole wheat bread!
How To Make Bread Machine White Bread

- Step 1: Combine the liquid ingredients: 1 3/4 cup warm water, 2 tablespoons vegetable oil, 1 1/2 teaspoons granulated sugar, and 1 teaspoon coarse kosher salt in the baking pan of your bread machine.

- Step 2: Layer the dry ingredients as follows; 4 cups bread flour followed by 2 teaspoons rapid rise or bread machine yeast. Either sprinkle the yeast on top of the flour, where it’s not touching the water or create a well in the flour, then add the yeast there.
Pro Tip: To test your water, use my extremely scientific method: dab some on the inside of your wrist like you would with a baby bottle. If it feels too warm, use cooler water.

- Step 3: Place the baking pan into the bread machine. Select Basic, Light Crust, and 2 lb Loaf options. If your machine does not have all these settings, simply select the Basic or White setting.

- Step 4: Allow the bread machine to bake.
This is the hard part! Walk away! You’ll be tempted to check on your bread and then start panicking cause the texture looks weird, the dough looks too wet, or the corners still have dry flour. Don’t worry, I did all the peeking for you through the process – pics are below.


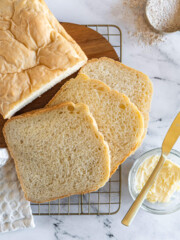
- Step 5: Remove the bread pan from the bread machine. Overturn the baked loaf onto a wire mesh cooling rack. It’s important to get to your machine as soon as possible once it beeps complete to avoid it kicking into keep warm mode, this will dry out your bread and make it less than pleasant.
Allow the bread to cool completely (if possible, I know it’s hard!) before cutting.

Expert Tips
- This bread maker recipe gives a 2 lb loaf. Please double check that your machine has 2lb capacity – or you’ll likely have a heck of a mess!
- Use the scoop and level method for your flour: stir the flour well in the bag, then scoop the flour into your measuring cup and level the cup by scraping a knife across the top. This will result in more consistent scooping!
- After the last punch down or prior to the final rise, I like to open the bread machine and remove the kneading paddle. This helps to prevent a large cavity in the bottom of the loaf. Because this dough is pretty sticky, my hands do get a little dirty haha

Batch + Storage
Batch:
This easy bread machine recipe makes 1x 2 lb loaf. Be sure to check that your bread machine can handle a 2-pound loaf before you begin baking!
Storage:
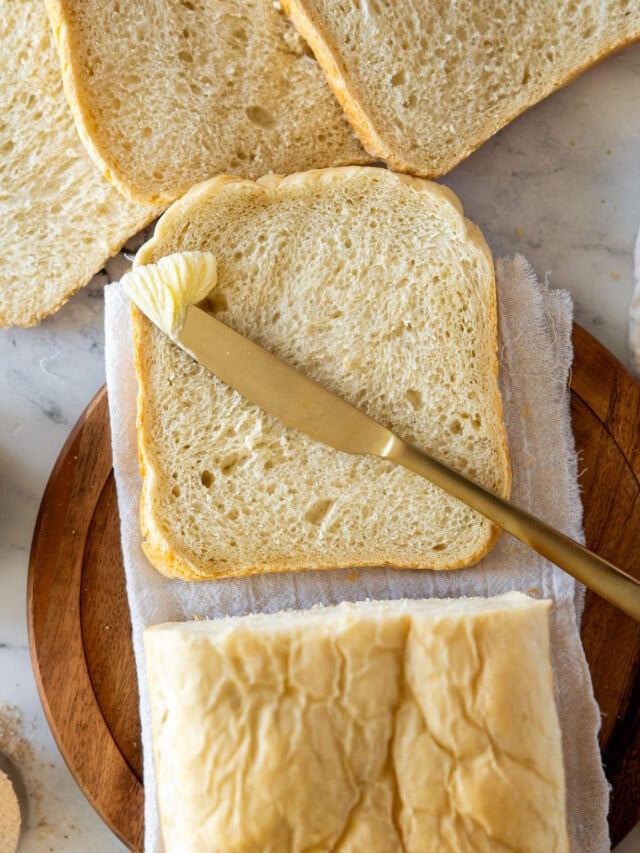
Once your loaf is fully cooled, place it in a sealed plastic bag and store it at room temperature. It'll stay fresh for 2-3 days, perfect for sandwiches, toast, or enjoying as-is!
Homemade bread doesn’t keep long. It doesn’t keep any better in the fridge either, so we often eat half fresh and freeze the other half.
Freezing a Whole Loaf:
To freeze, wrap the cooled loaf tightly in plastic wrap, then wrap it again in aluminum foil to protect it from freezer burn. You can freeze it for up to 3 months. When you’re ready to enjoy, let it thaw at room temperature (no need to unwrap until it's fully defrosted!).
Freezing Slices:
For easy, grab-and-go portions, slice the cooled loaf and place the slices in a single layer on a baking sheet. Freeze until solid, then transfer the slices to a freezer-safe bag or container. This way, you can pull out just what you need! Simply toast or let the slices thaw at room temperature-either way, you're ready to enjoy fresh bread in no time.
Bread Machine Recipe Troubleshooting
I have a complete guide to bread machine recipe troubleshooting but here are some quick suggestions:
Bread Too Dense:
- Type of flour: As mentioned above, if you’re using a flour that doesn’t have a high enough protein content, you can expect a dense loaf of bread. Protein is necessary for the bread to produce gluten, and as we know, gluten is the amazing thing that gives bread it’s stretch and elasticity, and the ability to trap air and create bubbles in bread.
- Quantity of flour: I never weigh my ingredients for this recipe, nor do I sift my flour. Here’s how I scoop my flour for this recipe – stir the flour in the bag or container well, then use a 1/2 cup measuring cup to scoop the stirred flour into my 1 cup measuring cup. Give it a quick shake, then level with a knife. It’s quick and easy, keep it simple!
- Yeast – Add this at the very end of the ingredient layering. I toss all the flour into the baking pan, then sprinkle the yeast on top of the flour away from the water and liquid ingredients.
Bread Collapsed During Baking:
- Too much liquid: ensure that you’re measuring with a liquid measuring cup.
- Not enough salt: If you’re using coarse ground salt in this recipe, you may not be using enough salt! Try adding a bit more next time.
- Yeast: Too much or too old yeast can cause your bread to collapse. To avoid this in the future, proof a small amount of your yeast to confirm it’s still active, and if so, decrease the quantity in your next loaf by 1/4 – 1/2 teaspoons.
Other Problems:
If this is your first time using this recipe, I highly recommend checking in on the recipe while it’s 10 or so minutes into the first kneading cycle. At this point, you’ll be able to tell if your dough is forming a nice ball and pulling away from the edges.
If the dough is too wet at this time, and not holding a ball, add a couple tablespoons of flour.
Serving Suggestions
- Smoked ham and Swiss sandwich
- Toasted with creamed honey, or homemade raspberry jam
- BLT with homemade bacon
- Topped with a fried farm fresh egg
More Bread Machine Recipes To Love


If you tried this Bread Machine Bread recipe or any other recipe on my blog, please leave a 🌟 star rating and let me know how it went in the comments below. Thanks for visiting!
📖 Printable Recipe
The Best Bread Machine Bread Recipe
Ingredients
- 1 ¾ cups warm water, 415g
- 2 tablespoon oil , 25g
- 1 ½ teaspoons granulated sugar, 7g
- 1 teaspoon salt, 8g
- 4 cups bread flour, 570g
- 2 teaspoons bread machine yeast, 8g
Instructions
Add Ingredients To Bread Pan:
- Combine the liquid ingredients: 1 ¾ cup warm water, 2 tablespoons neutral cooking oil, 1 ½ teaspoons granulated sugar, and 1 teaspoon coarse kosher salt in the baking pan of your bread machine.
- Layer the dry ingredients as follows; 4 cups bread flour followed by 2 teaspoons rapid rise or bread machine yeast. Either sprinkle the yeast on top of the flour, where it's not touching the water or create a well in the flour, then add the yeast there.
Bake:
- Place the baking pan into the bread machine. Select Basic, Light Crust, and 2 lb Loaf options. If your machine does not have all these settings, simply select the Basic or White setting.
- Allow the bread machine to bake.
Cool:
- Remove the bread pan from the bread machine. Overturn the baked loaf onto a wire mesh cooling rack. It's important to get to your machine as soon as possible once it beeps complete to avoid it kicking into keep warm mode, this will dry out your bread and make it less than pleasant.
- Allow the bread to cool completely (if possible, I know it's hard!) before cutting.
Notes
Recommended Equipment + Ingredients
Nutrition
Flour Protein Content
As a Canadian, I use purpose flour for literally all purposes. Here’s why it matters to you and the results for your recipe:
- Canadian flour is different than American flour!
- The protein content of the flour greatly affects the bread’s ability to absorb water, produce gluten, and, therefore, your final results.
- IF you are using American flour, please use Bread flour specifically – OR ensure that your flour passes the protein content test 12-13%
How To Determine Protein Content In Flour:
Simply do a little math – make your teachers proud!

Grams Of Protein /
Grams Per Serving = __
__X 100 = __ %
4/30=.1333
.1333 x 100= 13.3%


I followed this recipe to the T with the 2 cups of water. The dough was pretty wet and it sank after its final rise, about 40 or less minutes before it was done. The inside was a bit undercooked and the top had a paper mache texture.
I decreased the water to your revised amount, 1 3/4 cup, and still had the same problem.
My bread machine was my grandpa’s and he passed nearly 20 years ago… it’s old lol. So I found the manual on the internet and apparently with this bread machine you can’t sprinkle the yeast on the flour, you need to dig a small hole in the flour and put the yeast in the well. Otherwise your yeast gets activated too soon and won’t rise properly. (Anyone else with an old bread machine with rise issues this might help)
When the bread came out this time around… oh my lanta. AH-MAZING!! This bread is so good – you just put an end to me buying store bought bread 🙂
Thank you so much for sharing that!
I’m so happy you loved it <3
I have a brand new bread machine and the same thing happened with my loaf— much too wet and the only thing I can think of is that I sprinkled the yeast rather than making a well for it. Oh well. 😉 I have also had success with other recipes by putting the water, sweetener and yeast in first, letting it bloom for 10 minutes and then adding the rest of the ingredients. I may try that technique with this recipe. Not sure how it changes things other than maybe I won’t have a goopy loaf next time haha
It’s worth a try – I’d also test your yeast – If you plan on proofing the yeast with the liquid ingredients first, I recommend using active dry yeast instead – I kind of discuss it in my bread machine yeast alternatives article.
Hi, can thus be made as a gluten free version? Has anyone done this?
Gluten free is a whole different animal. I have talked about making this recipe GF, but I haven’t been able to dedicate the time to truly getting it right! Sorry I don’t have any better advice 🙁
Thank you! This recipe turned out great the second time I made it! FYI, I just used 12 of the smaller 1/3 Cup measure, mostly because it was easier to put it in the bag of flour. The first time, I forgot to troubleshoot during the 10 minute mark, so it came out flat on top. I do have a few questions: When is it the right time to remove the metal bread mixer piece? Is there a way to know before it bakes, if it needs more salt? Lastly, have you ever tried the recipe by weighing the ingredients instead of measuring them? I wonder what would happen if I used different measuring tools. I am very grateful that you included the recipe, tips, and troubleshooting sections.
Best,
Annie
Hey Annie, I could certainly try to measure this recipe using grams instead of cups! All of my sourdough recipes are done via weight, I find when the average baker sees a measurement in grams they tend to back away slowly like it’s a sleeping bear!
If you’d like to remove the mixing piece, the best time to do that is as soon as the final rise begins. Turn the dough out, remove the paddle and pop it back in. This will ensure that any deflation that happens while you handle it will be filled out during the rise.
Glad you liked the recipe!
Would using flour milled with hard red wheat berries work? I am new to bread making and jumped in with both feet and hands.
Bread baking rocks! Glad you’re diving in! If your milled flour has the germ and the bran I would actually recommend my whole wheat bread machine recipe. In that recipe, all-purpose or bread flour is combined with the whole wheat to add a bit more lightness, because all whole wheat bread can be dense. If your flour is not whole wheat, then I would definitely try it!
Hello! I used 1 3/4 c water and the dough was still too sticky so I added about 1/4 c more. Also I have a 2lb bread maker and it was too big for the machine the top was uncooked. I liked the consistency of the bread better than some other recipes I’ve tried that are very dense. I will probably try this recipe again but as a 1.5 lb loaf however I must admit I don’t like the way the bread pot cooks/shapes the finished loaf. I may try baking this in a loaf pan in the oven the bread comes out too tall for the toaster in the pot. Thanks for sharing your recipe
You can totally bake this bread in your oven! I would set my bread machine to the dough cycle, then turn onto a floured surface and shape into 2 loaves. Cover and allow to rise 45-60 minutes, then cook in a 350f oven for 20-30 minutes or until tops are nicely browned
This is amazing bread. I will be making this recipe from now on. Thank you for sharing it.
so glad to hear it!
Hi i just wanted to tell you thank you for the recipe! I wanted to have homemade bread with our soup for supper Friday and found your Recipe. As it was kneading, i found my everything Bag seasoning and decided to add it in on the last CycLe, absolutely delicious!
Hi i was just wondering If it was possible to haLf this recipe? Mine also was squished onto the lid even though i have a 2lb option but holy cow this bread is The best recipe ever! It is DELICIOUS!
I’ve not played with halving this recipe, I know I keep mentioning it in the comments but it makes such a good size in my bread maker, a great alternative would be to use the bread machine to make the dough and then transfer the dough to two loaf pans and bake in the oven?
hi
im in england , what is best flour to make a bread that is not dense , we have self raising ,plain , all purpose flour ,
Hi Mike, to determine the best flour, you’ll have to look at the protein content. Use this formula!
Grams Of Protein /
Grams Per Serving = _______
________ X 100 = _________ %
I’m currently making my second batch of this bread. I made it two weeks ago but added garlic and herbs and it was -incredible-!!
I love this recipe and plan to use it as a base. This time I’ve added garlic, herbs and onion powder. I will also be baking it in a 400F oven for about 20-24 minutes.
The first time I did this recipe, the dough rose so high it was pressing against the lid of the machine! Crazy, right? So, I had pulled about 1/3 of the dough out and baked that third in the oven. the texture was even better (though the machine-baked bread was still amazing).
Thanks for this! I think next time, I will try adding cheese… or raisins and cinnamon. The possibilities are endless!
Oh my! That sounds lovely! Thanks for sharing! You might like my Everything Bagel Bread too – it’s got the same base recipe!
I will check it out! Thanks!
Hi Ally, your recipe is amazing, the best white bread I baked. I did not know which Crust program to choose. I chose Dark, but the crust was lighter than in your photo. Can you please advise which crust to choose? Thanks…
I’m glad you liked the recipe! I usually put mine on the medium crust setting. If you like a darker crust you could try adding a pinch more sugar to the dough, it may darken up for you a bit more!
I lovefrench bread but none look as good as yours.
I have always been told be exact in measuring quantities therefore stating cups is a bit misleading. As i live in the uk Could you inform me of quanities in either ounces or grams.
Thank you
my email address is all in lower case letters not upper.
Hi Ray,
Sorry, I do not have oz or gram measurements for this recipe.
Omg… just found your site about 2 weeks ago and been Neglecting to pull out the machine.
Where have you or this RECIPE been HIDING… id say this is very similar to the JAPANESE-British bread. after toasting, YOU’VE got a Crispy Crust and soft airY inside texture.
For what its worth my only mod is that i used 1 1/2 tsp of honey! And Still tasty. Using a Panasonic bread machine SD-YD250
So GRATEFUL 🙏🏽
This recipe is a hit in our house! Just curious as to how i would bake it in the oven after the remove paddle beeps…. everytime i make it, it overflows in the machine so was hoping to put it into 2 bread pans before last rise and bake in oven but dont know what temp or for how long….. any suggestions?
YUP! Just pull it out after the last knead cycle, shape and place into greased loaf pans. Bake at 350f for 30 or so mins – until golden brown! <3
Ally, made this bread today. It rose beautifully. I thought–then it caves it. It still has 15 minutes to cook. I was so excited because other recipes I have tried did rise that high. Thus other recipes only made 1\2 the size of the bread machine. Help what happened?
Could it be the yeast? Or maybe too warm of water?