
Pickled Jalapenos

Preserve your fresh jalapeño harvest with this easy water bath canning recipe that creates tangy, crispy pickled jalapenos perfect for tacos, sandwiches, and nachos. This beginner-friendly method requires just a few ingredients and basic canning equipment.

You know you’re in for something when your mom calls giggling. “I’ve got some garden goodness for you!”
Later that day, she dropped off 5 pounds of fresh jalapeños. FIVE POUNDS.
So I did my usual, I made dehydrated jalapeños, I made frozen jalapeños, I fermented jalapenos and I STILL had a bowl full of hot peppers left.
Kevy walked by while I had the kitchen straight up destroyed and saw the pile of jalapeños that still needed to be preserved and the defeated look on my face. Thankfully, he’s the brains of this operation and he reminded me that it’s been a few years since I canned pickled jalapeño peppers.
This pickled jalapeños recipe is dedicated to the brains.
Jump to:
Tips + Tricks
No. 1 –> If you’re new to the canning process, this is a great recipe to start with. It’s quick, easy, and if you follow my simple steps you’ll be set. It’s one of the easiest canning recipes and it’s the perfect way to use plenty of jalapeños!
No. 2 –> You’re processing a lot of hot peppers, wear rubber gloves! I learned this the hard way the first time- after making a mega batch of spicy salsa. I had to sleep with my hand in milk because the capsaicin burned so bad!
No. 3 –> Finger-tight is such a vague term, here’s how I tighten my jars: screw the bands on until the jar starts to turn on the counter, then back off about a 1/8th of a turn.
No. 4 –> Like with dill pickled carrots, you’ve gotta wait a couple of weeks to sample your picked peppers! The flavor will mellow and meld, and the outrageous tangy vinegar will settle down after 2-3 weeks.
No. 5 –> Don’t skip adding the sliced peppers to the brine before canning. By adding the peppers to the hot brine for a few seconds, we’re allowing the cell walls to burst and release some of the trapped air within the pepper itself – this helps to keep them suspended in the brine and avoids floating.

Canning Safety
Sterilizing Jars:
Everyone and their dog has their own way of sterilizing jars, but make sure that you do it. National Center For Food Preservation has clear guidelines about sterilizing jars.
Processing Time:
| Elevation | Processing Time |
|---|---|
| 0-1,000 feet | 10 minutes |
| 1,001 – 3,000 feet | 15 minutes |
| 3,001 – 6,000 feet | 20 minutes |
** Processing time for pint-sized jars only

Key Ingredients
Jalapeños: Choose fresh, firm, ripe jalapeños without blemishes, holes, or mold. Any jalapeños with wrinkled or dark spots should be either discarded or have those bits cut out. This recipe also works well with banana peppers and other hot peppers!
Vinegar: Vinegar is used to increase the acidity of the vegetables. Higher acidity kills off microorganisms and aids in preserving the jalapeños, preventing spoilage.
Sugar: Reduces some of the sourness of the vinegar and saltiness of the pickling salt.
Pickling salt: Salt is added to this recipe for flavor as the vinegar brine takes care of acidifying the brine. If you don’t have canning salt, you can replace it with coarse kosher salt.

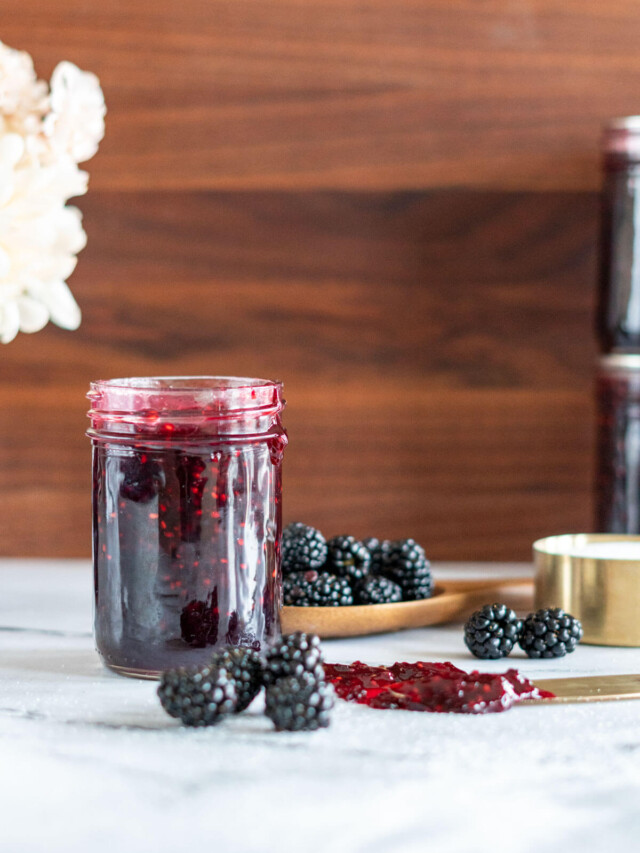
How To Can Pickled Jalapeños
Prepare:
- Fill a large water bath canner with enough water level to cover the pint jars by at least an inch. Bring this water to a full boil.
- Meanwhile, sterilize your jars via your preferred method.
- Add vinegar, water, pickling salt, and granulated sugar to a large saucepan. Bring this mixture to a boil.


Slice:
- Meanwhile, wash the jalapeños well, and slice them into even-sized rings. Use disposable gloves to prevent the capsaicin from burning your skin. I used my KitchenAid Exact Slice attachment for this job to make it quick and painless.


Can:
- Once the pickling liquid comes to a boil, remove from heat and add the jalapeño slices and crushed garlic cloves allow to rest for 30-60 seconds.
- Place a canning funnel on top of the jars and ladle the jalapeño rings and hot brine into the jars. Top off each clean jar with brine, leaving 1/2 inch headspace. If desired, run a canning spatula or clean chopstick along the edges of the jar to release the air bubbles.
- Wipe the lips of each jar before placing the lid and tightening the rings finger-tight.
- Use a jar lifter or canning tongs to transfer the hot jars to the hot water bath ensuring water is 1-2 inches above the jars. Cover the canner with the lid. Once the water bath returns to a full rolling boil, begin your timer.
- Process each jar for 10 minutes, then carefully remove and set on a heatproof surface to cool untouched for 24 hours at room temperature before removing rings, wiping down and storing for later use.
- Allow the jars of pickled pepper slices to rest for 2-3 weeks before opening them.


Batch + Storage Information
Batch:
This recipe as written gives three pint (500ml) jars. It can easily be halved, doubled, or tripled if required.
If you have extra jalapeños and brine that won’t fit in your canning jars, quickly sterilize another jar, transfer the leftover sliced peppers and brine into that jar and store them in the fridge. You’ll have quick refrigerator pickles – they’ll keep for at least 2 weeks!
Storage:
Keep your canned jalapeños in a cool dark space, and use them within 12 months. Once opened, keep the jar in your fridge for up to a month.

How To Use Pickled Jalapeños
Pickled jalapeños are great for adding an acidic heat to your recipes. I love adding them to a number of things:
- air fryer nachos or tacos
- sourdough cornbread
- pizza topping
- smoked queso
- smoked brisket chili topping
- top Traeger burgers or smoked hot dogs
- cheese boards
- jalapeno and cheddar sourdough
More Great Canning Recipes


Recommended Equipment
Water Bath Canner: I have and LOVE an All- American Canner. Yes, it’s a pressure canner, but it works for water bath canning too! The 925 model is a beast, she can handle whatever I toss her way! If you’re new to canning and not sure you’ll love it, there are some really reasonably priced water bath canners out there too.
Mason Jars: Mason jars are an investment, but they’ll last you for years and years with proper care and maintenance. I have some Improved GEM jars that are so old, you wouldn’t believe me if I told you they’ve been through 5 generations of canners and still work great!
📖 Printable Recipe

Pickled Jalapeños
Ingredients
- 2.5 – 3 lbs jalapeno peppers, fresh
- 6 cups white vinegar
- 2 cups filtered water
- ¼ cup pickling salt
- ¼ cup granulated sugar
- 4 cloves garlic, crushed
Instructions
- Fill a large water bath canner with enough water to cover the pint jars by at least an inch. Bring this water to a boil. Sterilize your canning jars.
- Meanwhile, wash 2.5 – 3 lbs jalapeno peppers well, and slice into even sized rings. Use disposable gloves to prevent the capsaicin from burning your skin.
- Add 6 cups of vinegar, 2 cups of water, 1/4 cup pickling salt, and 1/4 cup granulated sugar to a large saucepan. Bring this mixture to a boil.
- Once the brine comes to a boil, remove from heat and add the chopped jalapeños and 4 cloves of crushed garlic allow to rest for 30-60 seconds.
- Ladle the jalapeños into the sterilized jars. Top off each jar with brine, leaving 1/2 inch headspace in each jar.
- Wipe the lips of each jar before placing the lid and tightening the rings finger-tight.
- Use a jar lifter to transfer the hot jars to the boiling water bath ensuring water is 1-2 inches above the jars. Cover the canner with the lid.
- Process each jar for 10 minutes, then carefully remove and set on a heatproof surface to cool untouched for 24 hours before removing rings, wiping down and storing for later use.
- Allow the jars of pickled jalapeños to rest for 2-3 weeks before opening them.
Notes
Processing Time:
Elevation / Processing Time0-1,000 feet / 10 minutes
1,001 – 3,000 feet / 15 minutes
3,001 – 6,000 feet / 20 minutes


My favorite chopped jalapeño recipe…the only one I use now. Instructions are well explained. I highly recommend this recipe. Thank you so much for posting this recipe!
Janet! You rock, thanks so much for using my recipe!
I have 250 ml jars not 500ml. Would the processing time still remain 10 min?
Hey Amber, you bet!
I think I did something wrong. For some reason my jalapeños are mushy. Is there anything you can think of that would do that. They were still tasty but texturally they are odd.
Hey Tabatha, next time you can try to use pickle crisp or reduce the amount of time you have them in the hot brine before bottling and preserving!
I am doing my jalapenos tomorrow and am hoping I can do them right. Going shopping now and am going to search for the Pickle Crisp as I do like them to stay crispy. I also am a cougher once I start cutting up jalapenos. Would love to know a trick to stop that from happening. The biggest question I have been searching for is how to pickle and water bathe diced jalapenos. One place I go says that they are probably too dense in the jar to pickle and can. But I buy them that way so I can’t understand why I couldn’t do them that way. Any insight? Thank you!
Hey Judi, I hear you on the coughing, mine starts as soon as I start rinsing my kitchen tools – the way I’ve figured to stop doing that is to use cold water, and to hit the switch and run out of the kitchen whenever I’m garburating anything to do with spicy peppers. HA!
As for the diced jalapenos, I’m not qualified to tell you if it’s safe and sometimes commercial canneries and industrial food producers have access to higher tech tools and techniques than we do in our home kitchens. I know that commercially produced sun dried tomatoes in oil are shelf stable, but not homemade versions. From a foodie perspective, I think that diced jalapenos would retain less texture after the pickling process than the sliced version. I’d suggest sticking to the slices and then dicing before using. Hopefully that helps.
Do I have to wait the 2 to 3 weeks before I could enjoy them?
You don’t have to wait, but the flavor definitely changes after the rest period. I find when tried right away they are sharp and vinegary and after a couple weeks that sharpness settles down and gives you a better flavor!
So unless I overlooked it what are the brine ingredient measurements?
Hey John, the exact measurements are at the bottom of the post in the recipe card. If you scroll to the top of the page and tap the “jump to recipe” button it will take you straight there!
@Ally, thank you for this information. The best jalapeno canning recipe I have ever tried.
So happy to hear this!
Hello… My novice question is… It states we process each jar for ten mins… Does this mean 30 mins for three pints… Or just 10 mins total for however many pints in the canner…forgive my ignorance I just wanna do this right… It’s been years since I have canned .. and I’m excited to do as much as I’m able to.. and is it safe to add more garlic? Thank you
Hey Tammy, the time remains the same regardless of number of jars 🙂 So if you have 1 or 3 jars the time remains 10 minutes.
My first jalapeño canning .These instructions are well written,comprehensive and the results are delicious.
Could I add crisping salt as well?
If you’re talking about the Pickle Crisp additive, that shouldn’t be a problem!
Excellent recipe…. So I am one of the “dingbats” that raw packed the peppers because that’s how I always did green beans. And yes, they are floating with an inch of space at the bottom.
Great instructions, one question- my canning experience before now was with pressure canning. I used my pressure canner without the top gauge, open steam escape.
I wasn’t sure if water bath canning was supposed to be with the lid as I did, or without the lid?
You aren’t a dingbat – just learning! It won’t massively impact the finished result, they’ll just float for a while then probably sink.
Yes, water bath should be done with the lid on, I have edited the post to make this more clear for future readers!
The clearest written instructions I’ve ever found for pickling and canning. I appreciate the elevation times as well. Thank you!!!
Thank you so much! This is such a great compliment – it’s a challenge to write concise directions that include enough information. I’m so happy they resonated with you. Hope you enjoy the recipe!
Novice here…so, how long do you soak the peppers in the brine with the garlic before ladling them into jars? Do I ladle the garlic into the jars, as well?
E, basically, you just want to soak the peppers in the brine for a 30-60 seconds. The reason for that is to help burst the cells and prevent them from floating up in the jars! I’m going to edit the post to reflect that!
I always add the garlic, not only does it impart a lot of flavor after the brine stage, it’s one of my favorite things in the bottom of a jar of pickles or peppers LOL
@E, no more than a minute. Yes, add bits of garlic into the jars.
I used the dish washer to sterilize and clean my jars and lids…while the white vinegar smell is admittedly strong, I didn’t wheeze…
A few things: First, maybe you could specify WHY it is important to dump the sliced peppers into the boiling brine before putting them into jars: so dingbats like me don’t think they’ll just skip that step and fill jars with raw jalapenos and pour the brine on top, then water bath them. End result is that you get a lot of empty space at the bottom of the jar, because the peppers soften up as they cook and take up less room in the jar. Secondly, a warning that a brine with this much white vinegar left me gasping for fresh air as I cooked and ladled. In 25 years of making pickles, I’ve never had apple cider vinegar do that to me. Would these taste as good with apple cider vinegar? And last, I doubled the recipe and had enough brine for six QUARTS of peppers, with a quart of brine leftover. It will take weeks to find out how successful I’ve been, but these are my thoughts the day after making them. 🙂
No dingbats here, Maureen, just people learning <3
I will definitely add it to the post, but the reason the peppers floated up in your jars was that you essentially raw packed them, vs hot pack. By adding the peppers to the hot brine for a few seconds, we're allowing the cell walls to burst and release some of the trapped air within the pepper itself - this helps to keep them suspended in the brine and avoids floating. Though after a bit they'll likely sink down. That might have also explained the extra brine, as the air comes out of the peppers, the brine is able to permeate those spaces.
I have never found vinegar to make me wheeze too much during pickle making, but I definitely feel like I have the black lung when I deal with HOT capcasin. OH my gosh, even rinsing a cutting board used for hot peppers in hot water sends me into a coughing fit. I haven't tried these with apple cider vinegar, the science behind it should work, but the ACV does have a different flavor that may or may not be desireable to you for your pickled jalapenos - that said, I'd be tempted to try a half batch, just to see!