
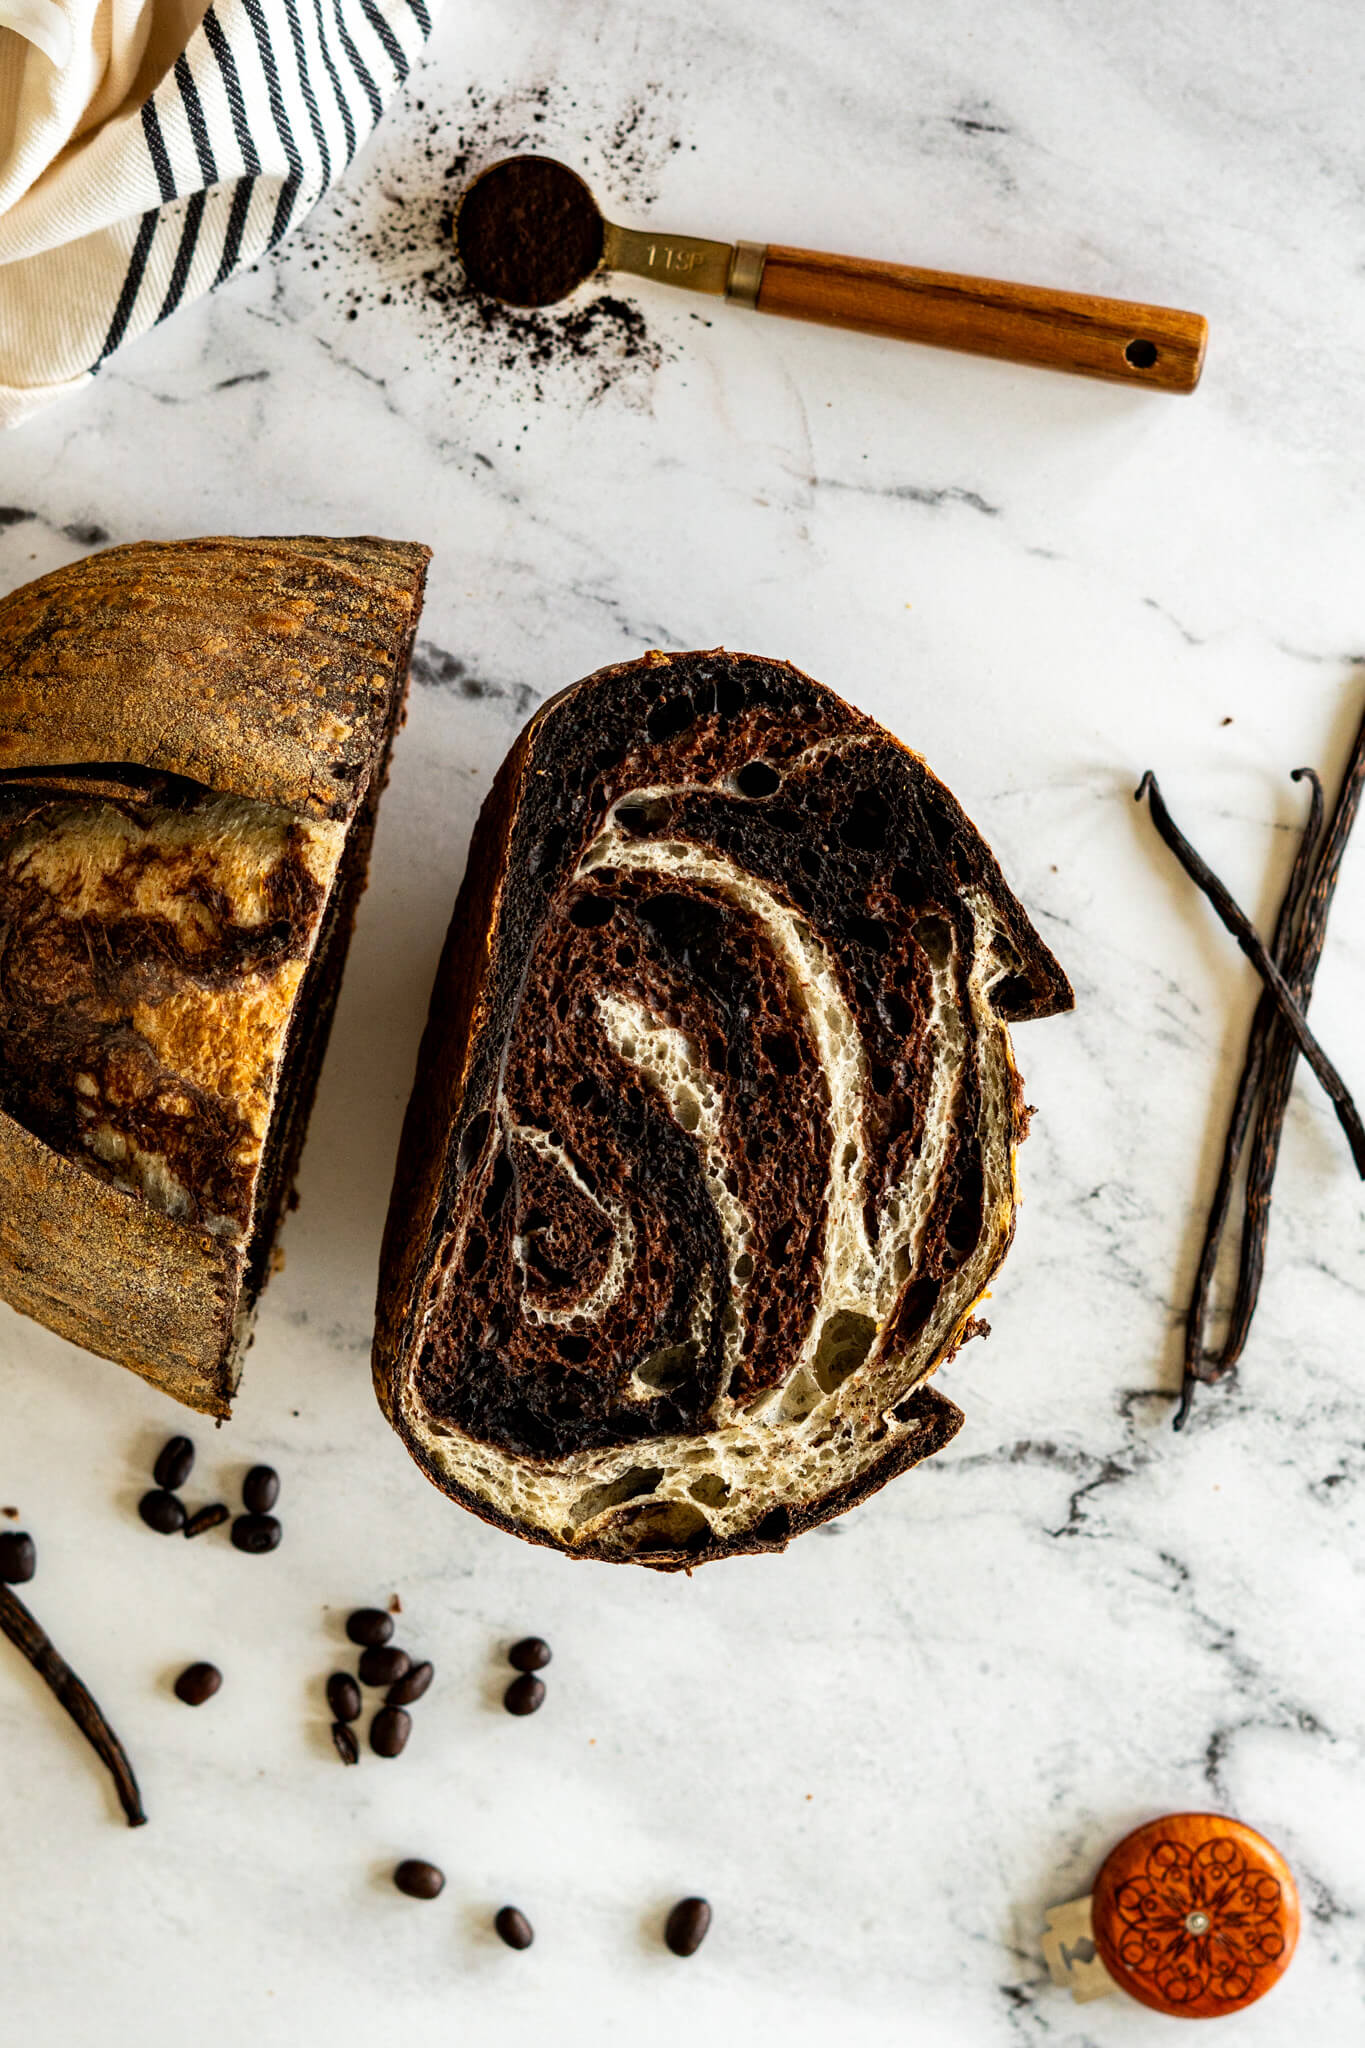
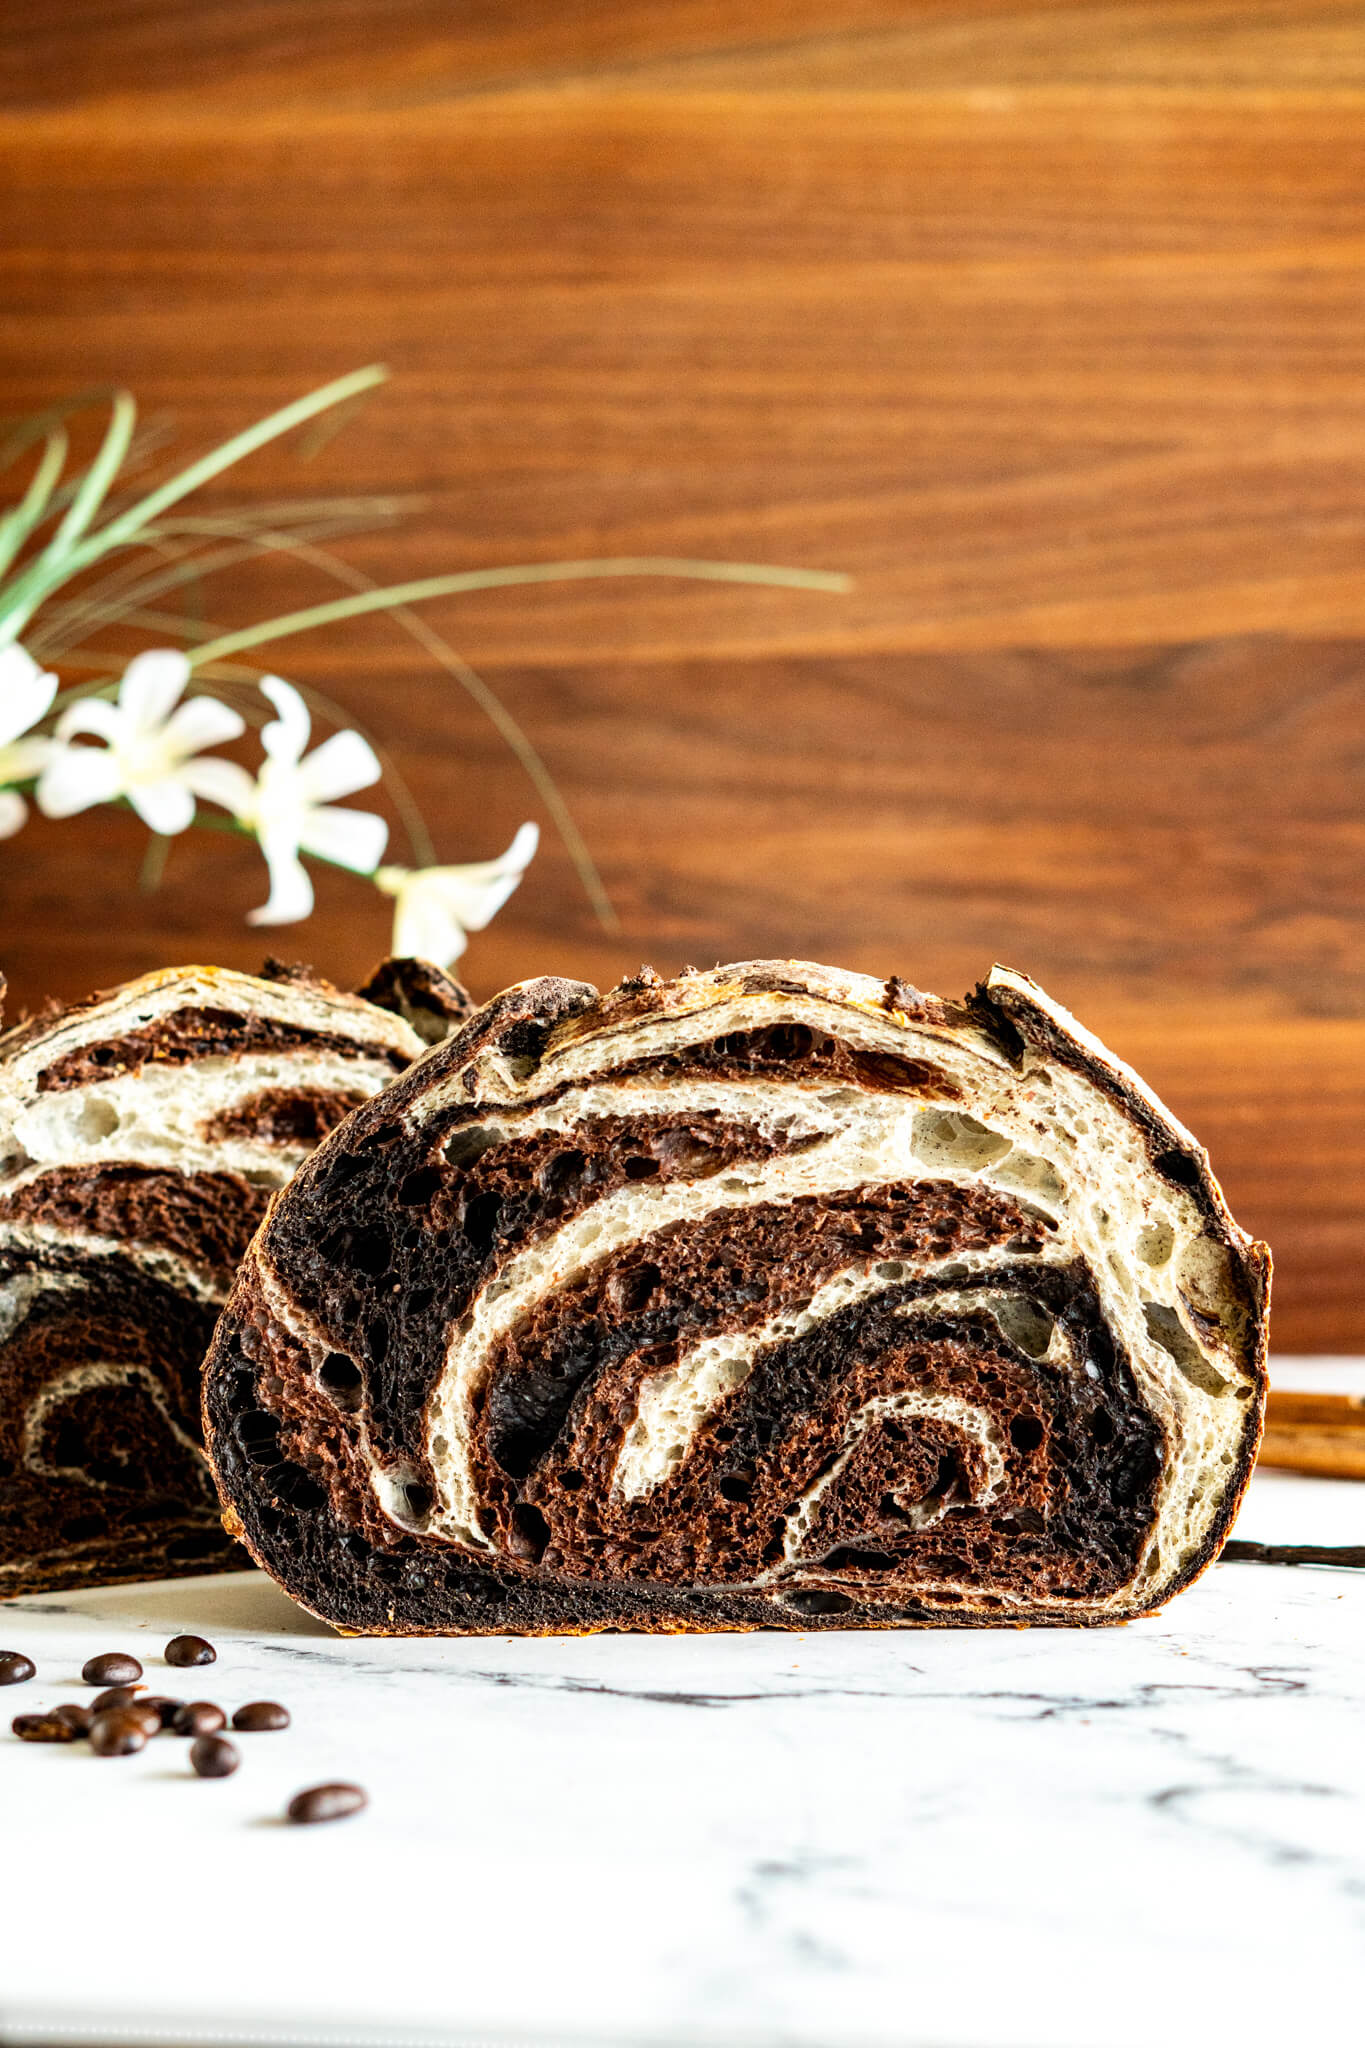
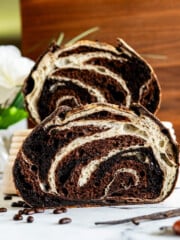
Chocolate Swirl Sourdough
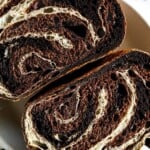
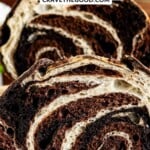
Bake a stunning chocolate swirl sourdough bread with three distinct layers. This marbled sourdough loaf sandwiches vanilla bean dough between chocolate and dark chocolate espresso layers for a bold swirl.

Craving The Recipe Details?

What it is: A stunning marbled sourdough bread made with layers of vanilla, cocoa, and dark chocolate espresso dough for a bold, bakery-style swirl.
Why you'll love it: It's a true showstopper. Rich chocolate flavor, aromatic vanilla, and beautiful contrast in every slice, all wrapped in a chewy sourdough crumb and crisp crust.
How to make it: Mix and develop three separate doughs, then laminate and layer them together. Shape, bulk ferment, proof (optionally cold retard), then bake at 450°F until deeply golden and cooked through.
I kind of got obsessed with the marbled sourdough process when I was recipe testing my peanut butter and jelly sourdough bread, and it got me thinking… what other flavors can I mix together with this method?
Chocolate swirl sourdough bread is made by layering three separate doughs: vanilla, cocoa, and black cocoa espresso, then laminating them to create that signature marbled pattern during baking. Each dough is developed on its own first, which is what keeps the layers distinct instead of blending together.
Worried about laminating? Don’t be – I got you covered with a complete photo guide below!
This chocolate swirl sourdough is dedicated to being obsessed!

Master Your Sourdough Starter In 5 Days!
From Confused To Confident.
Find success with 5 simple, actionable secrets delivered to you. No more guessing games – just clear, proven steps to a thriving starter.
Jump to:
What Does Chocolate Swirl Sourdough Taste Like?
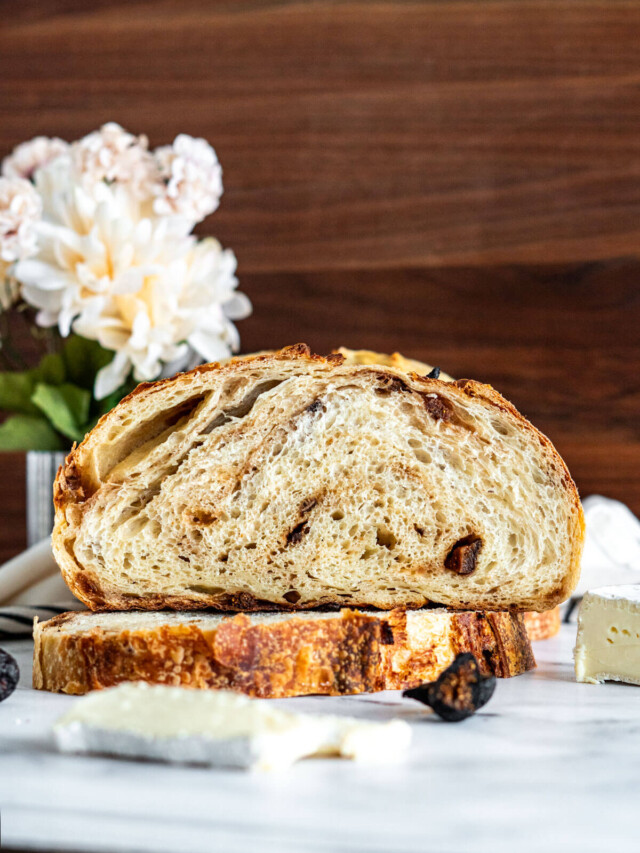
This isn't a dessert bread. The cocoa adds richness and a slight bitterness, while the sourdough fermentation brings a gentle tang. The result is something balanced and complex, more like dark chocolate than chocolate cake.
Key Ingredients
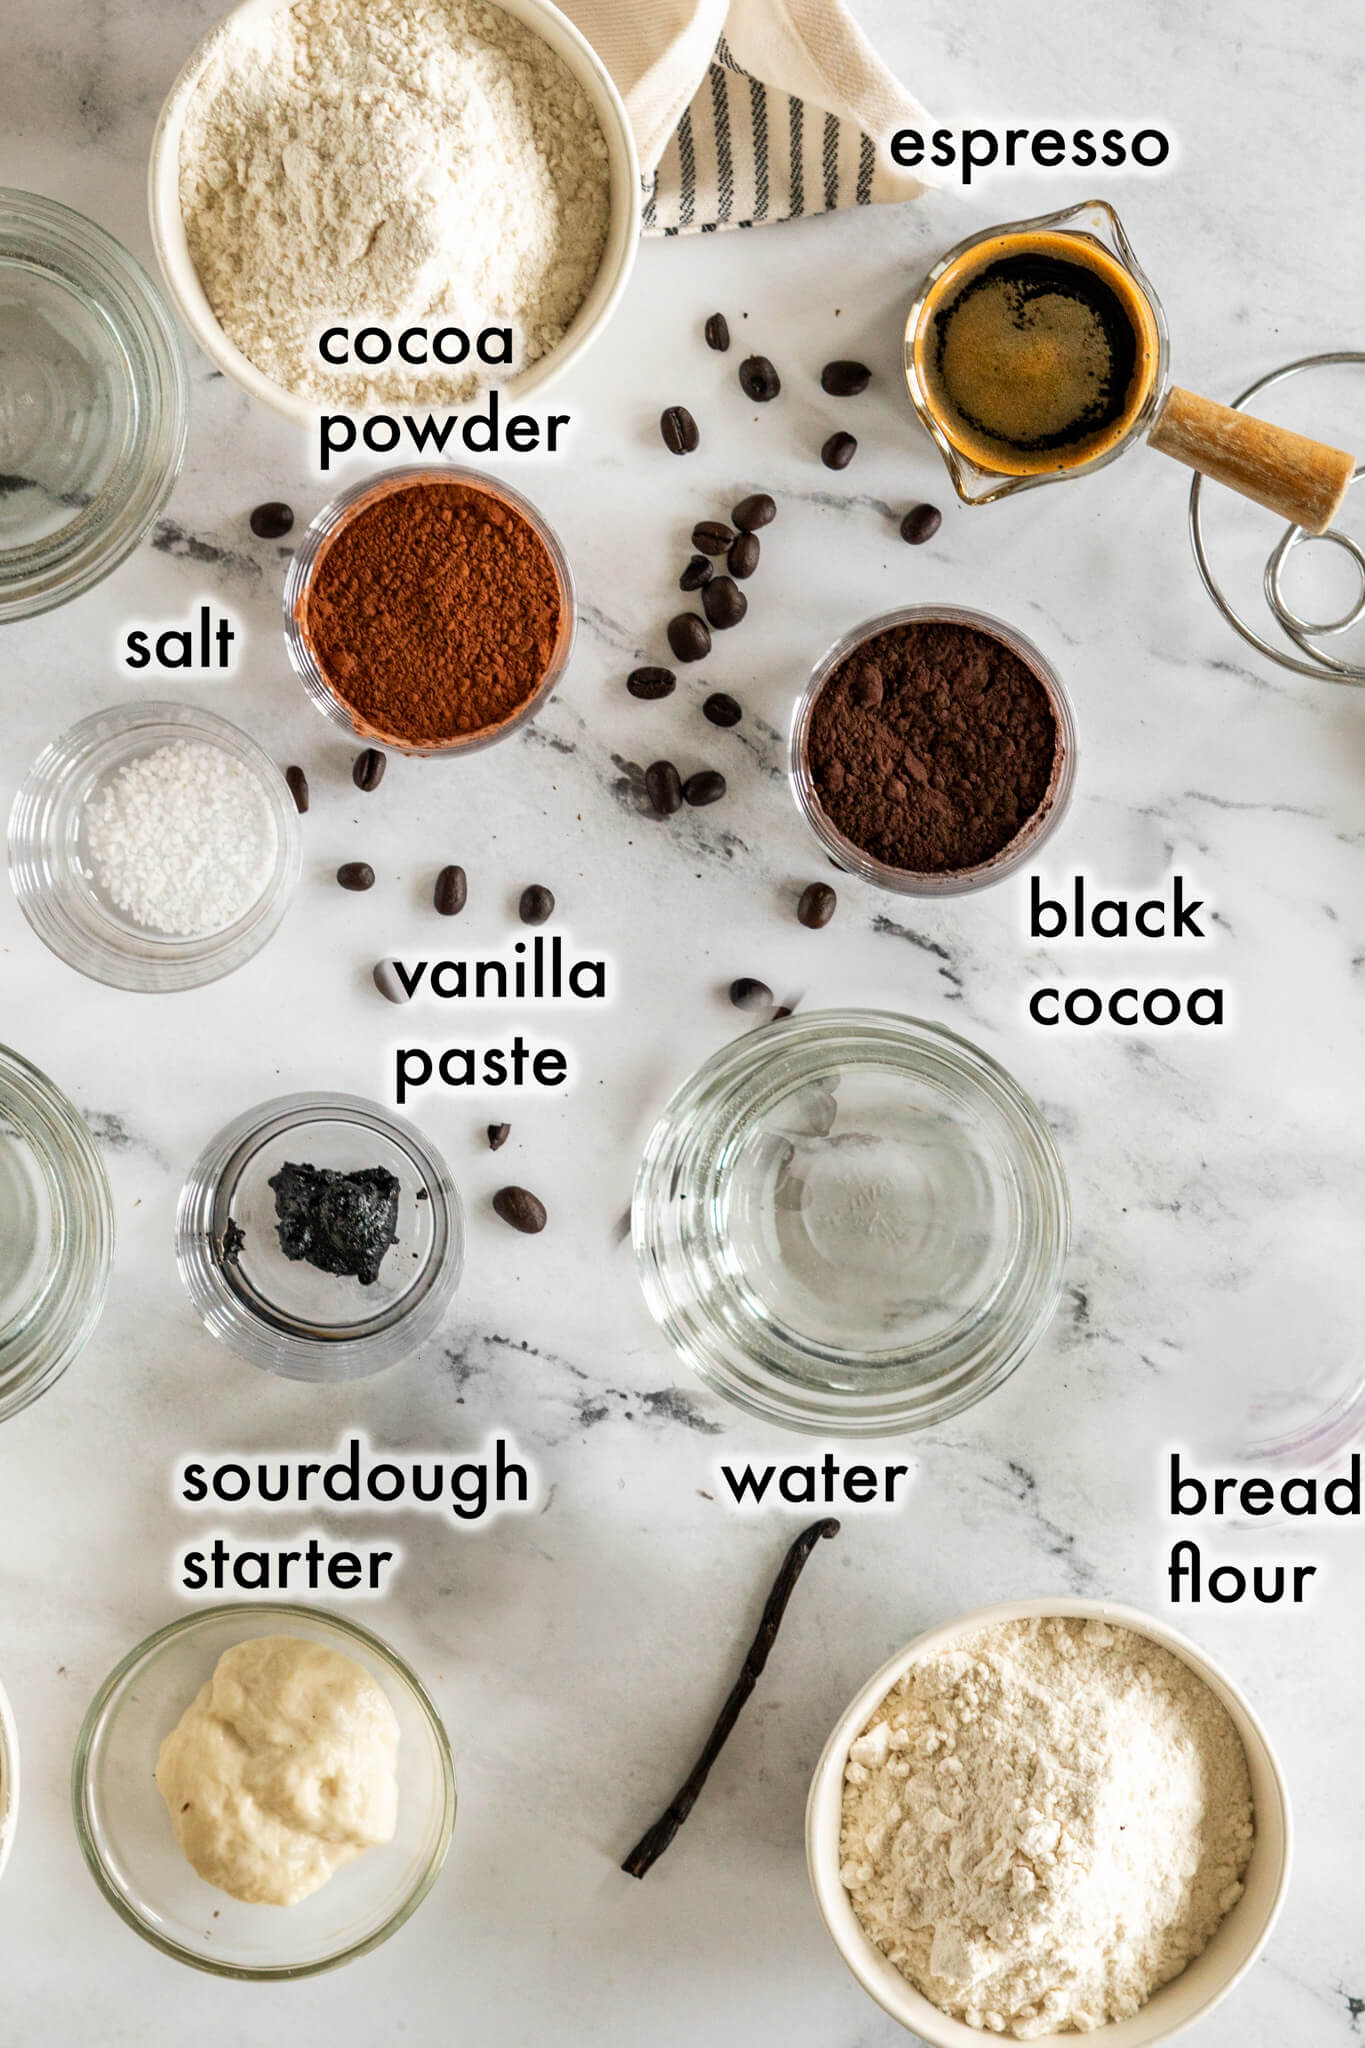
Vanilla Paste: Vanilla bean paste is a thick mixture of vanilla extract and actual vanilla seeds. The flavor from vanilla paste is much more intense than an extract, and I find it also feeds your visual appetite by giving your bread the little vanilla seed specs. If you don’t have vanilla paste, you can substitute vanilla extract 1:1 or omit it completely.
Dutch Process Cocoa Powder: I prefer to use dutch process cocoa powder. Dutch-process cocoa is less acidic and has a smoother, more mellow flavor profile. In my experience dutch process powder plays nicer with sourdough. That said, you can absolutely use regular cocoa powder, just watch your fermentation times.
Black Cocoa Powder: Black cocoa powder is really just cocoa powder that has been “dutched” or alkalized more than regular cocoa powder. The flavor of black cocoa powder is distinctly different than other cocoa powders – some people find it more chocolaty, others find it less. In this recipe, I paired it with fresh espresso to help bring out more intense chocolate flavor.
Make It With Me!
How To Make Chocolate Swirl Sourdough Bread:
Make The Doughs:
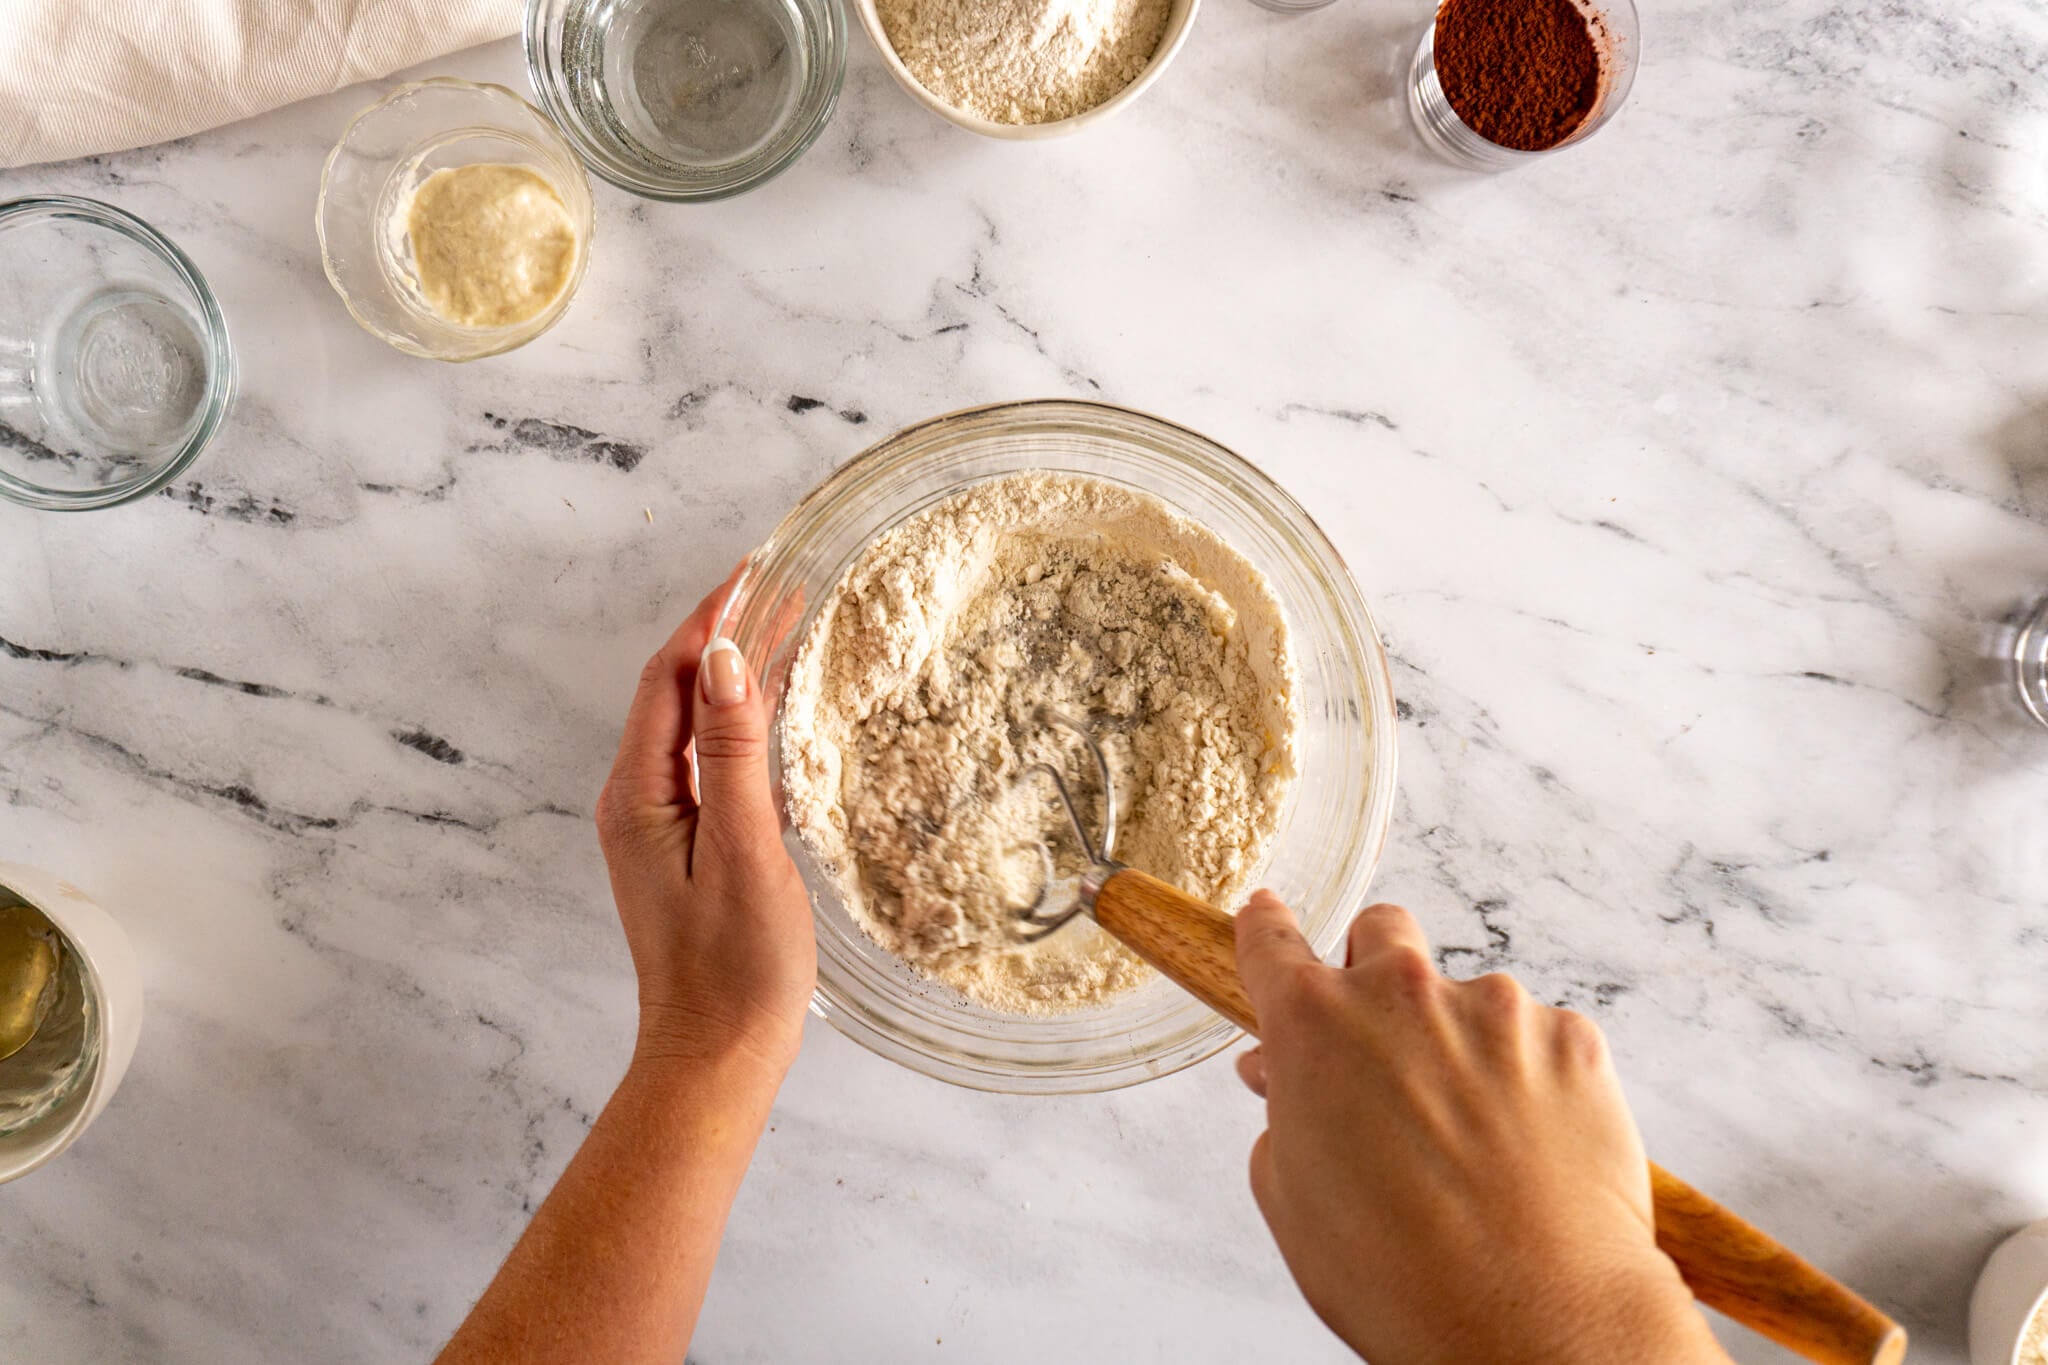
- Step 1: In a medium bowl, combine 110g water with 30g sourdough starter and 6g vanilla paste. Whisk together with a dough whisk or spoon until combined. Then add 160g unbleached bread flour, and 4g sea salt. Mix until completely combined and no dry bits remain, you may have to knead by hand.
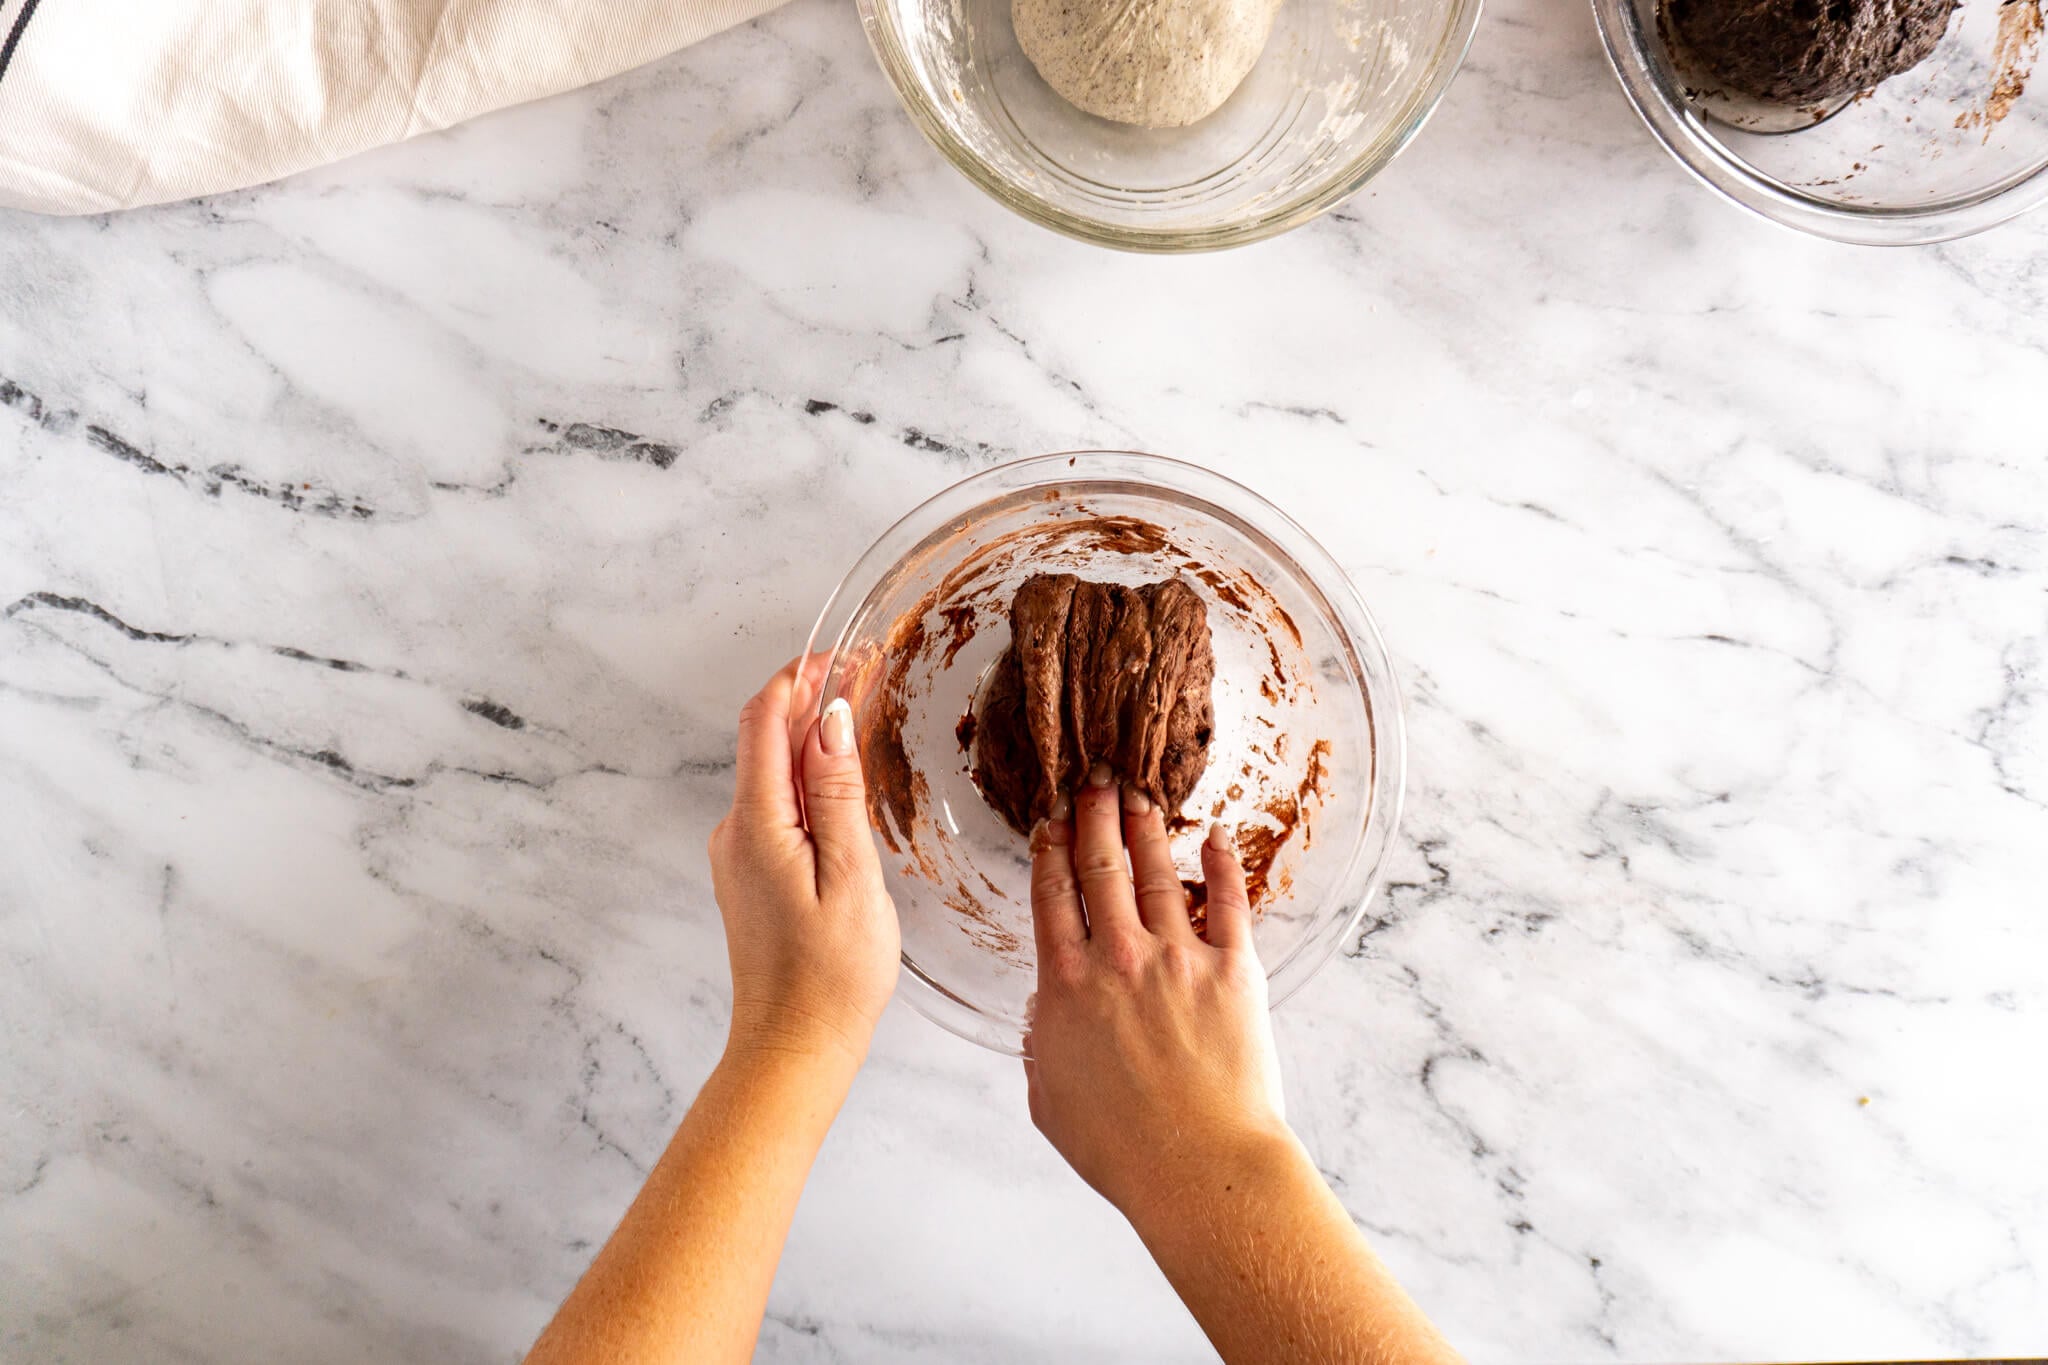
- Step 2: In a second bowl, whisk 115g water with 30g sourdough starter until combined. Add 140g unbleached bread flour, 15g dutch process cocoa powder, and 4g sea salt. Mix until fully combined and no dry bits remain, you may have to knead by hand to fully incorporate.
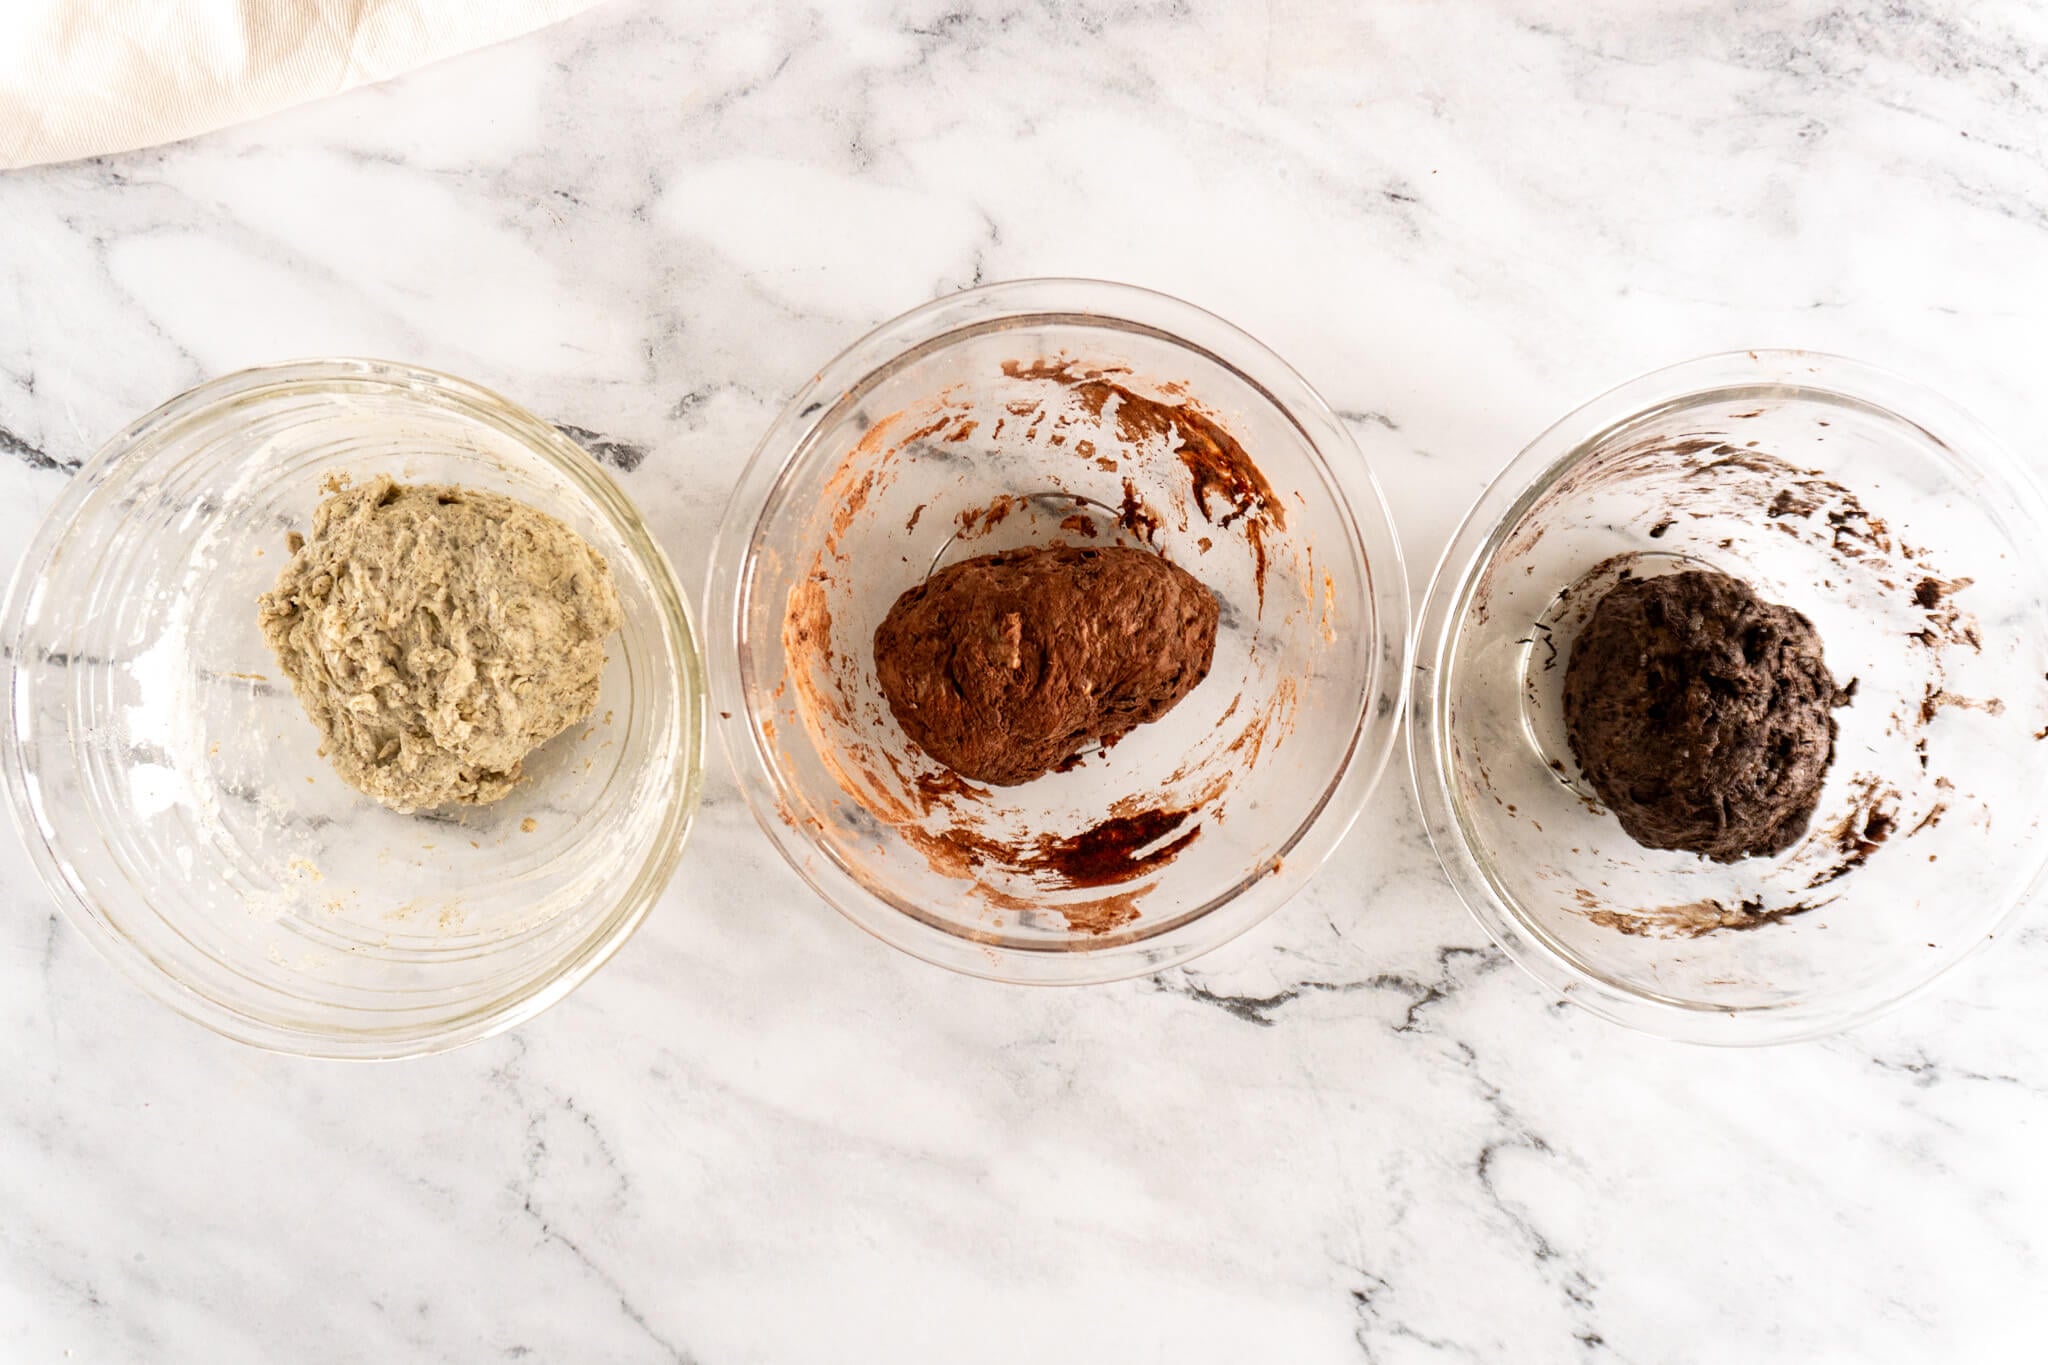
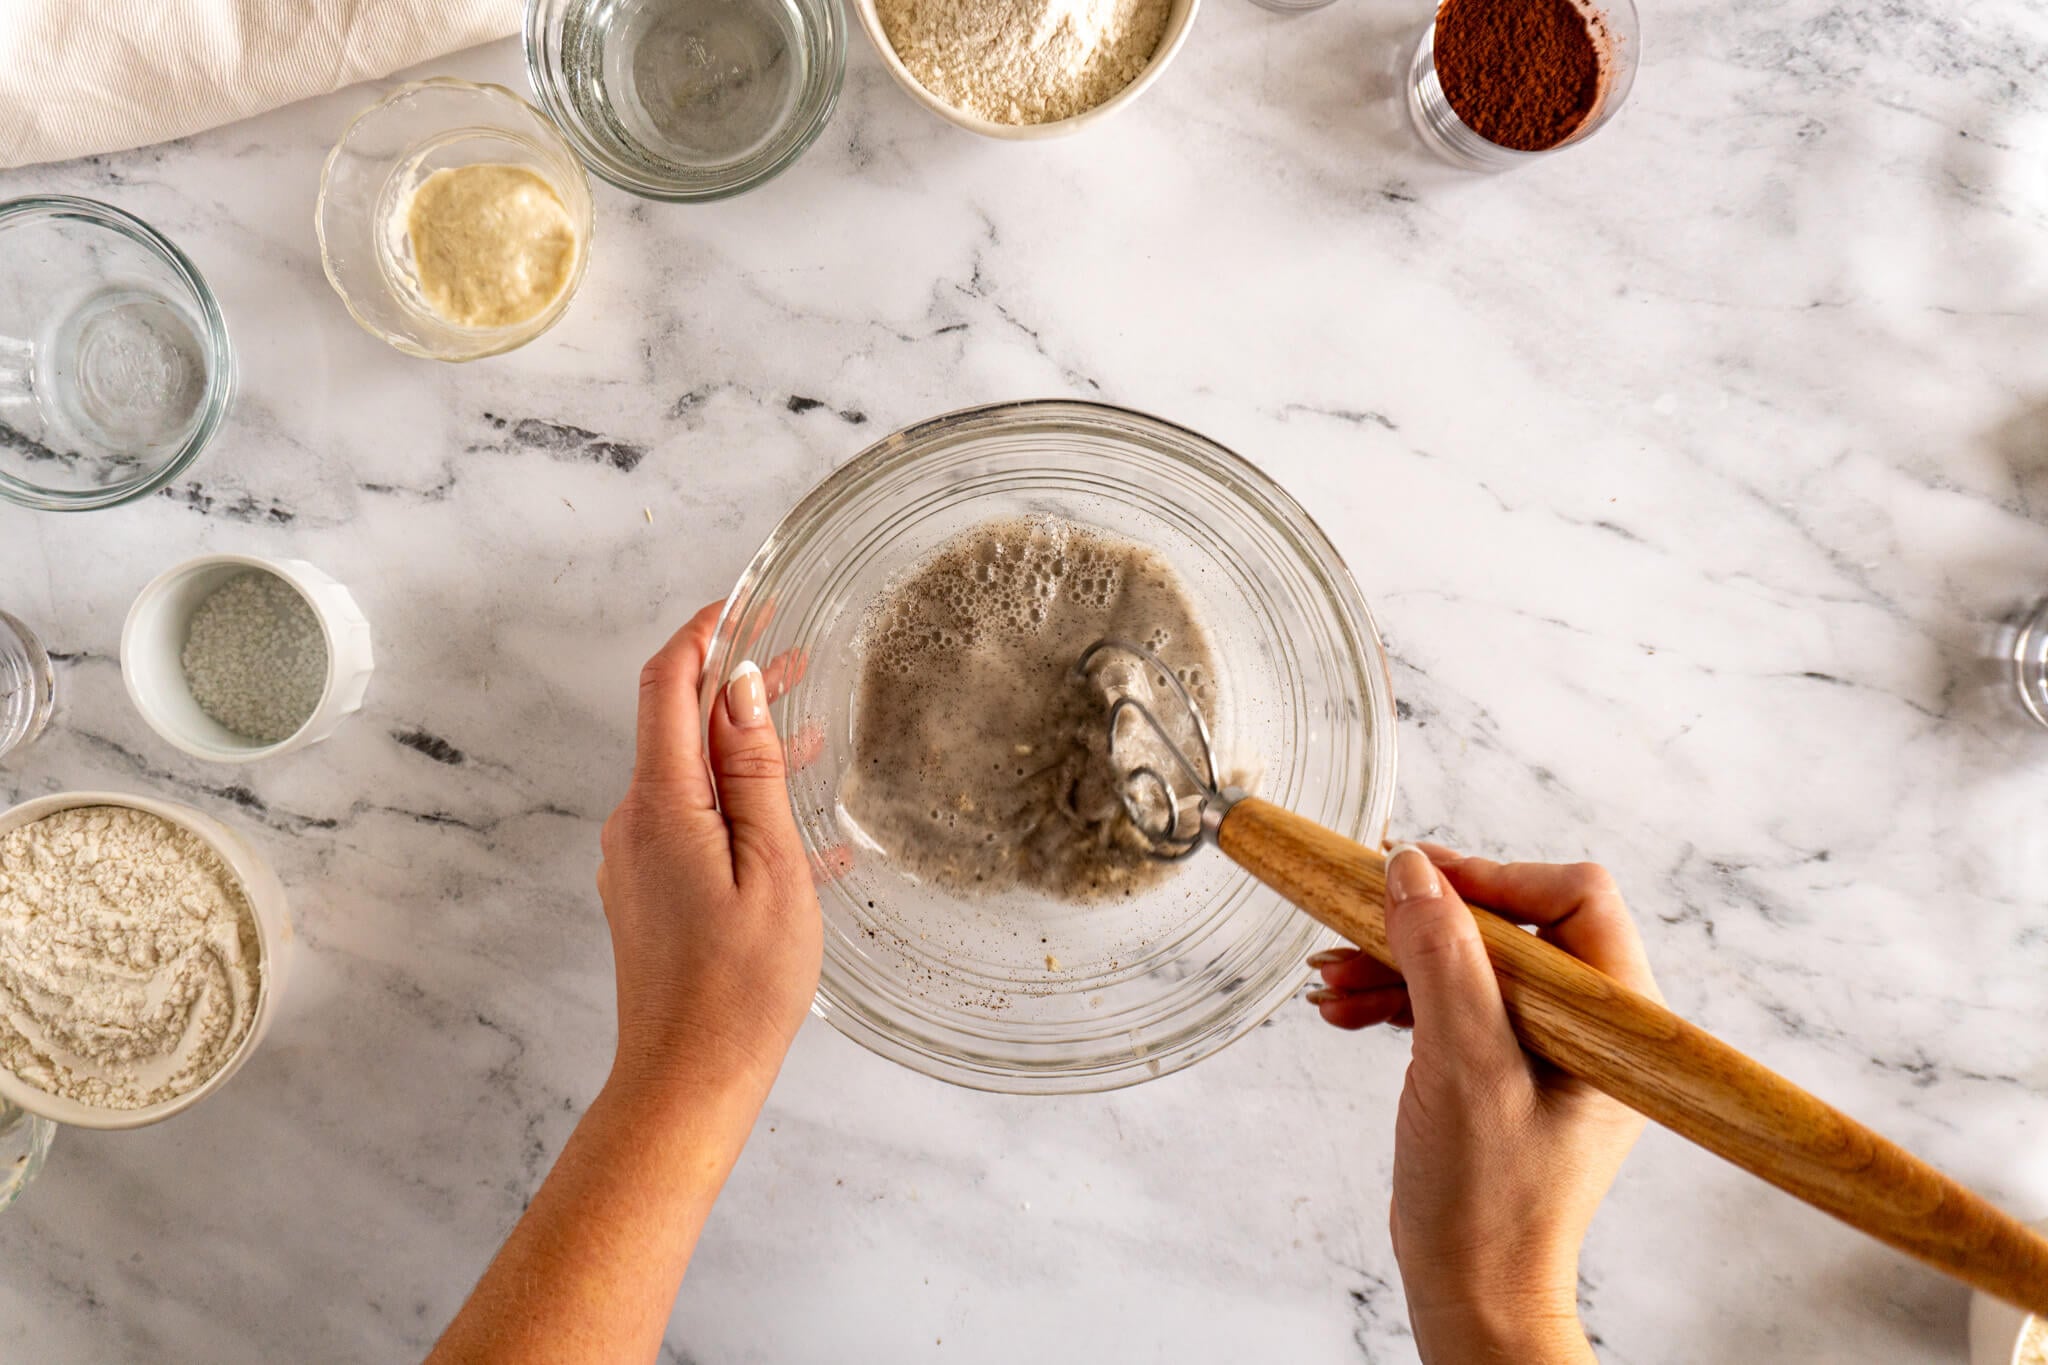
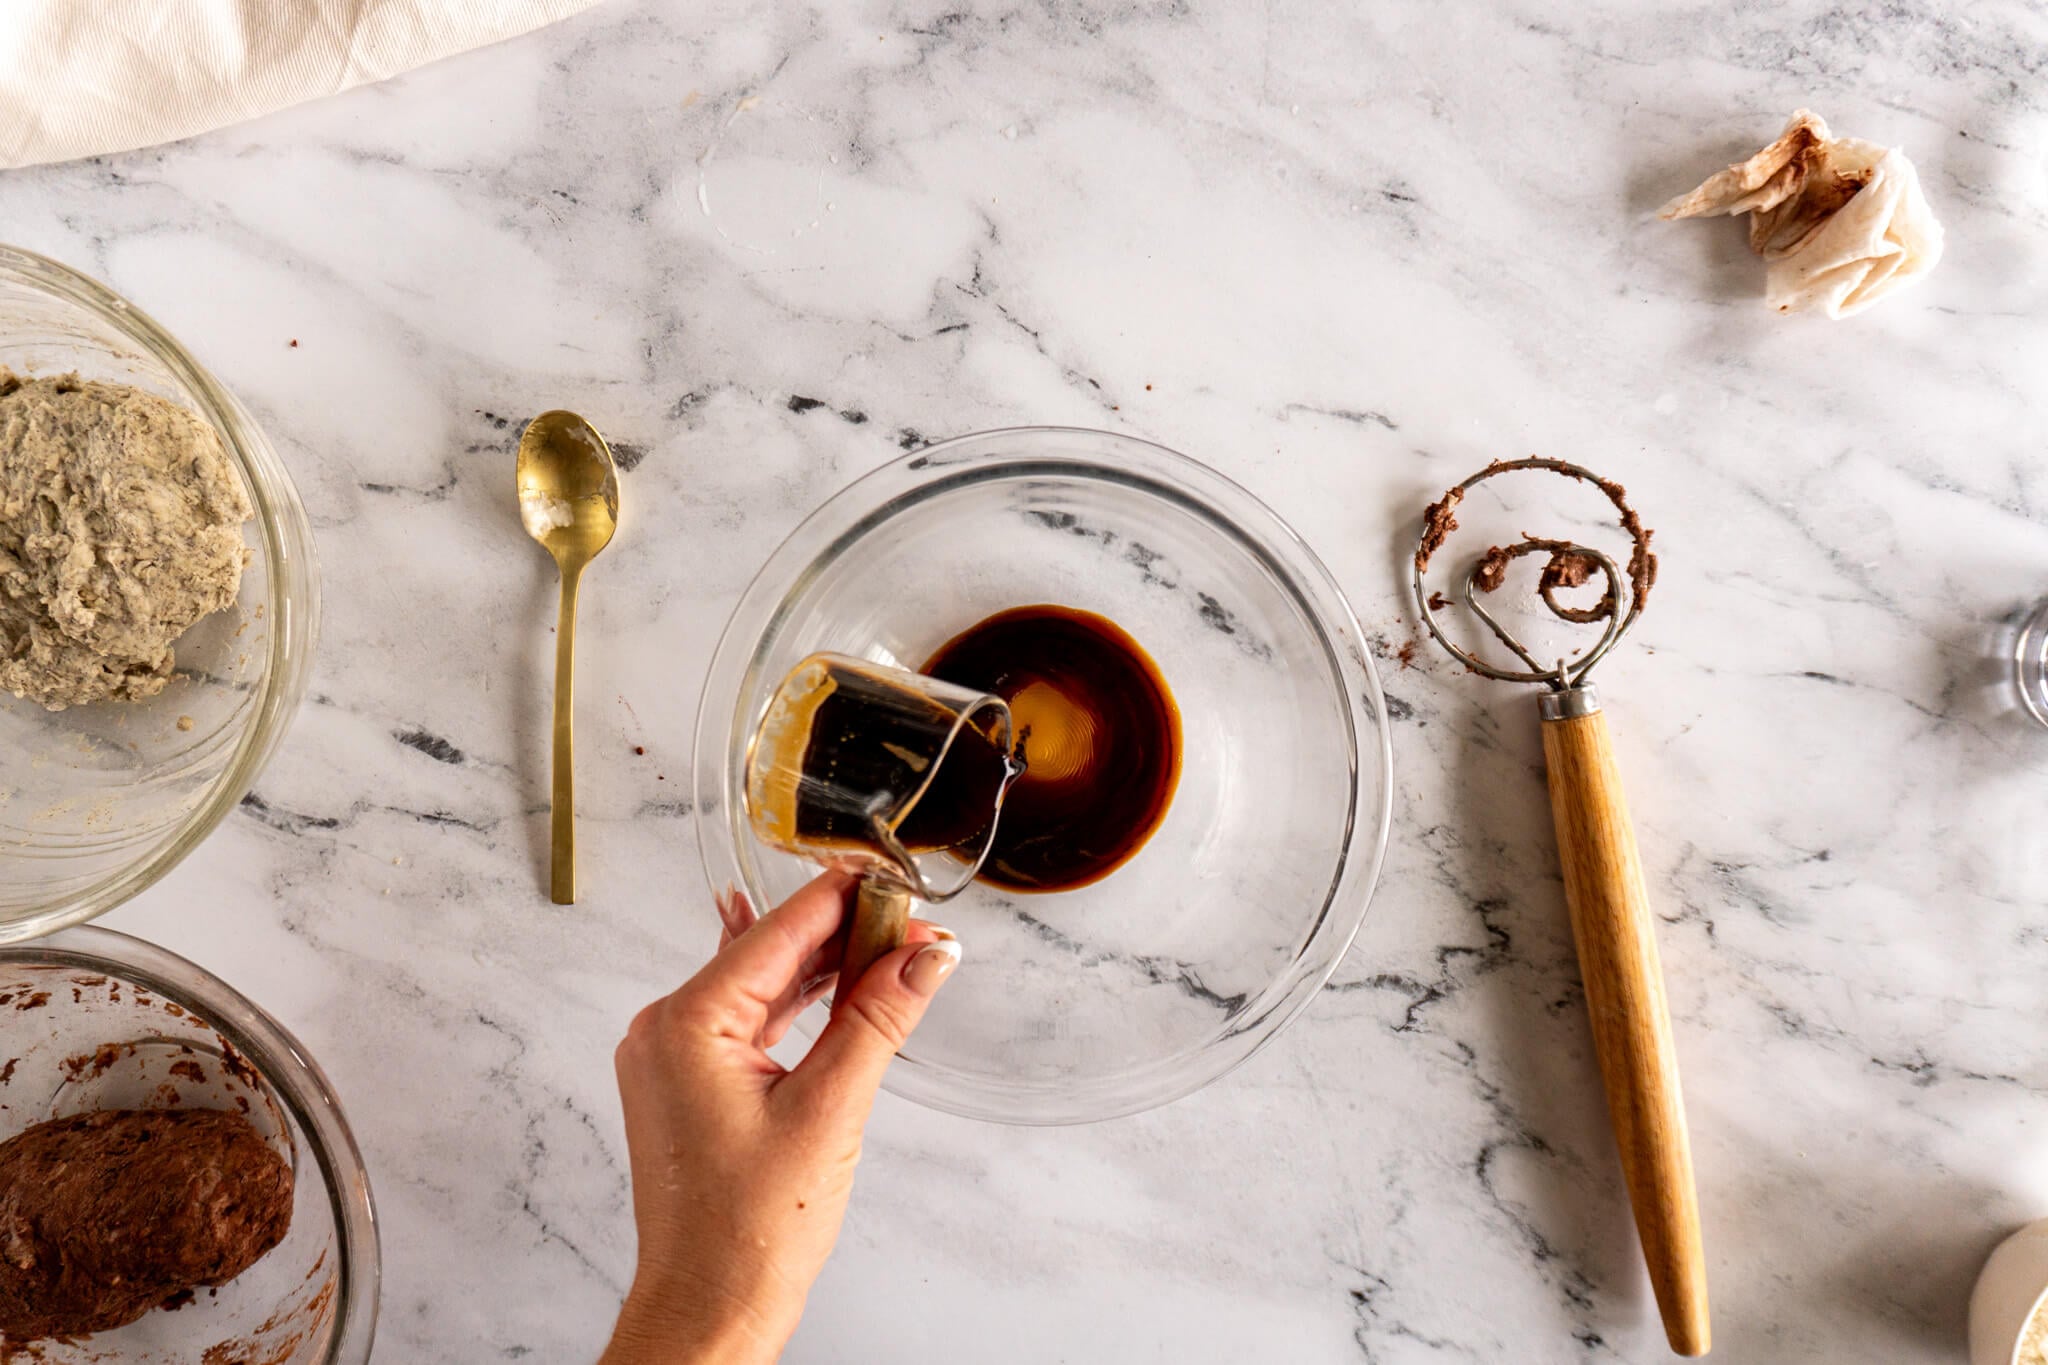
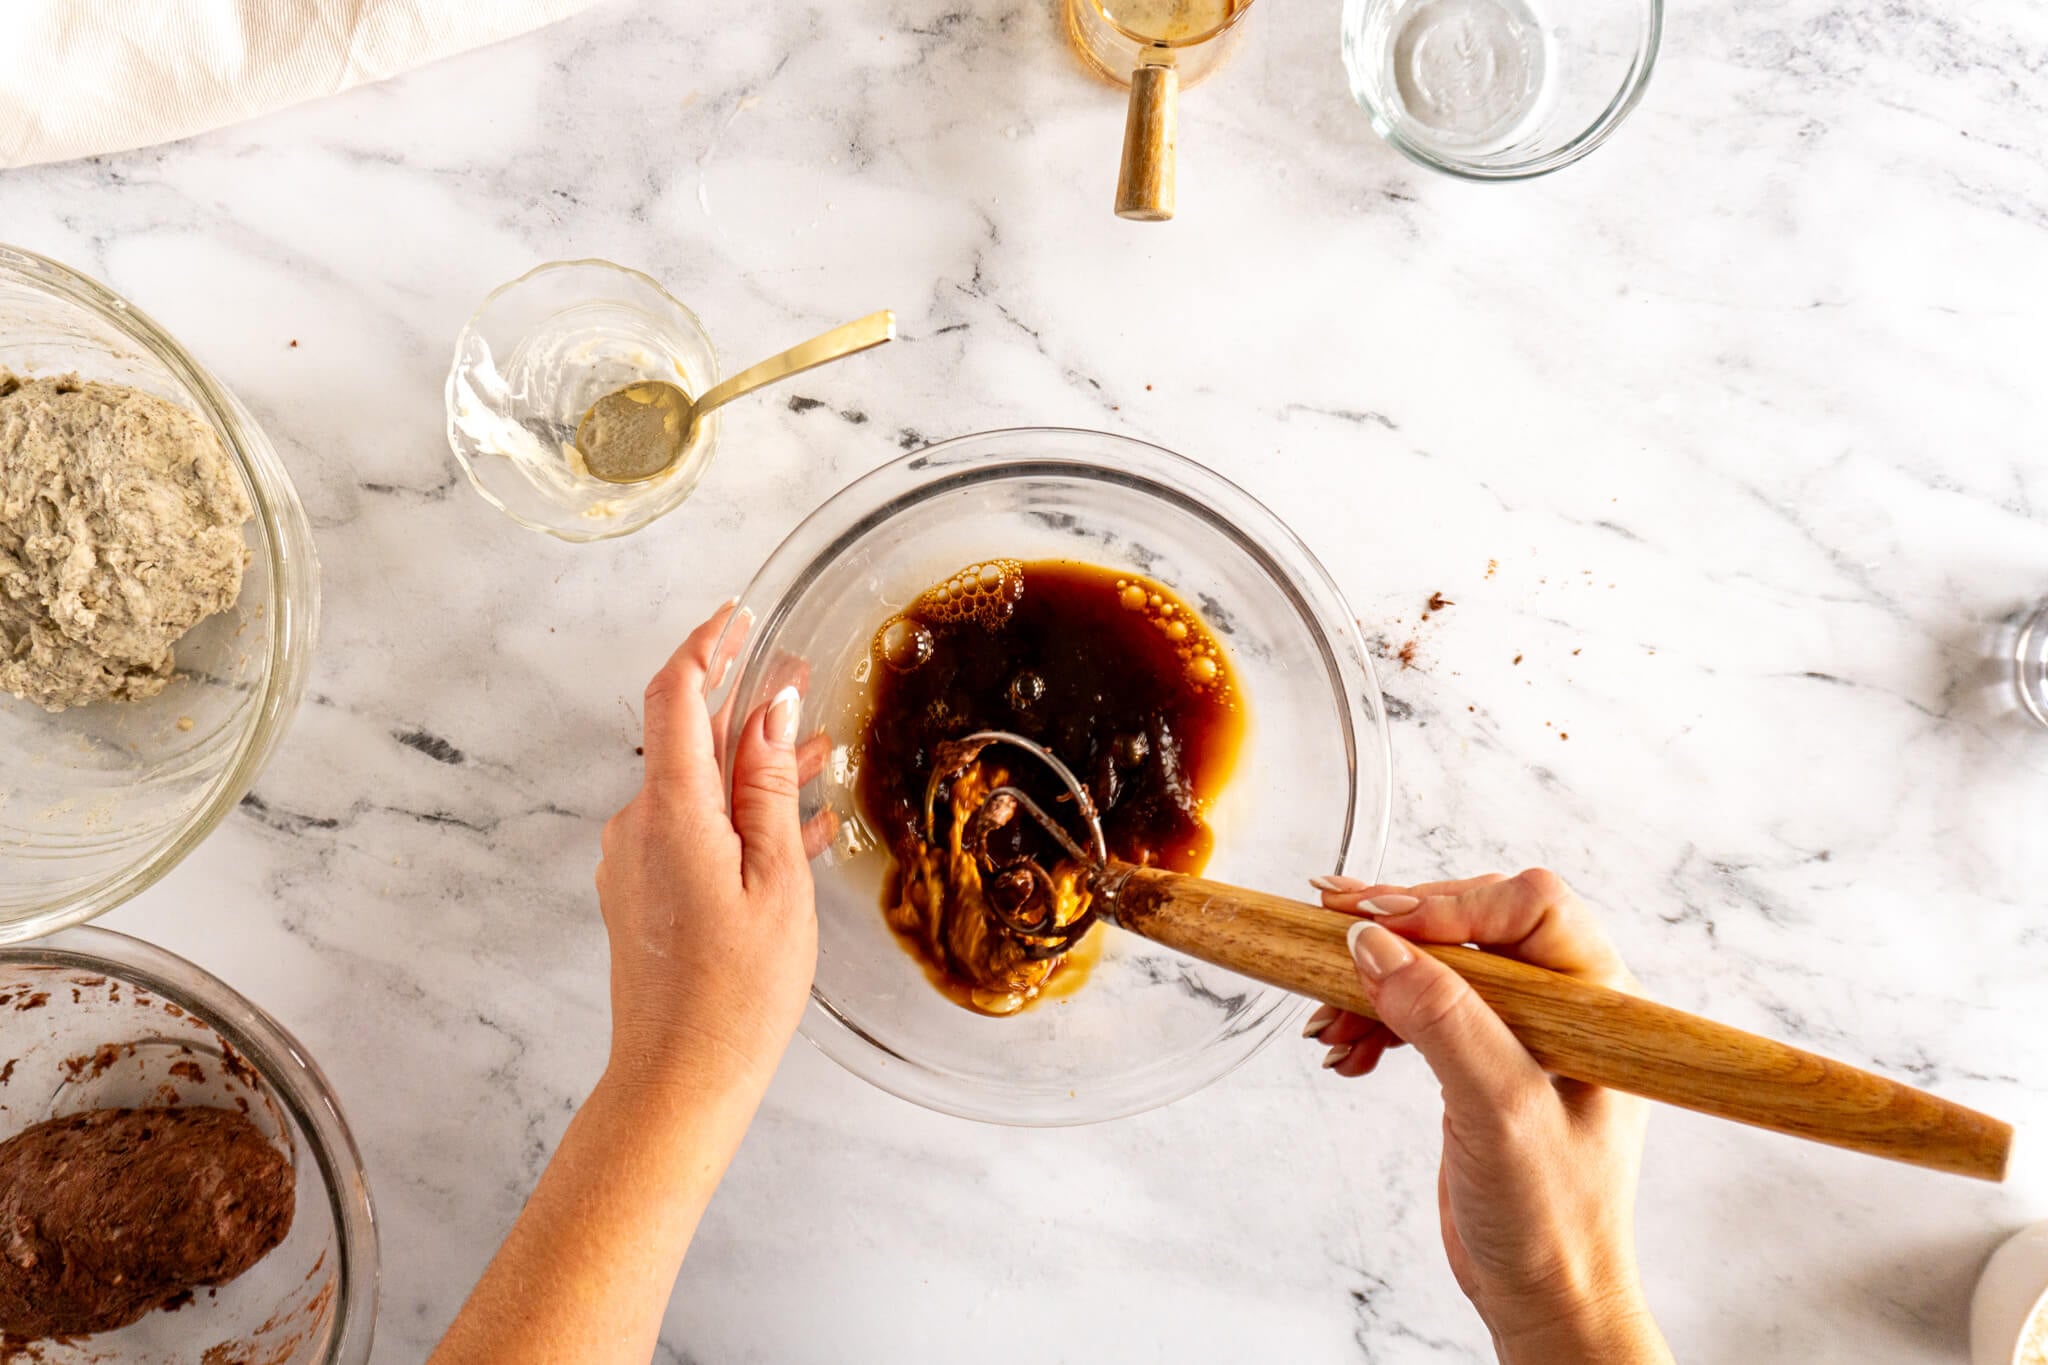
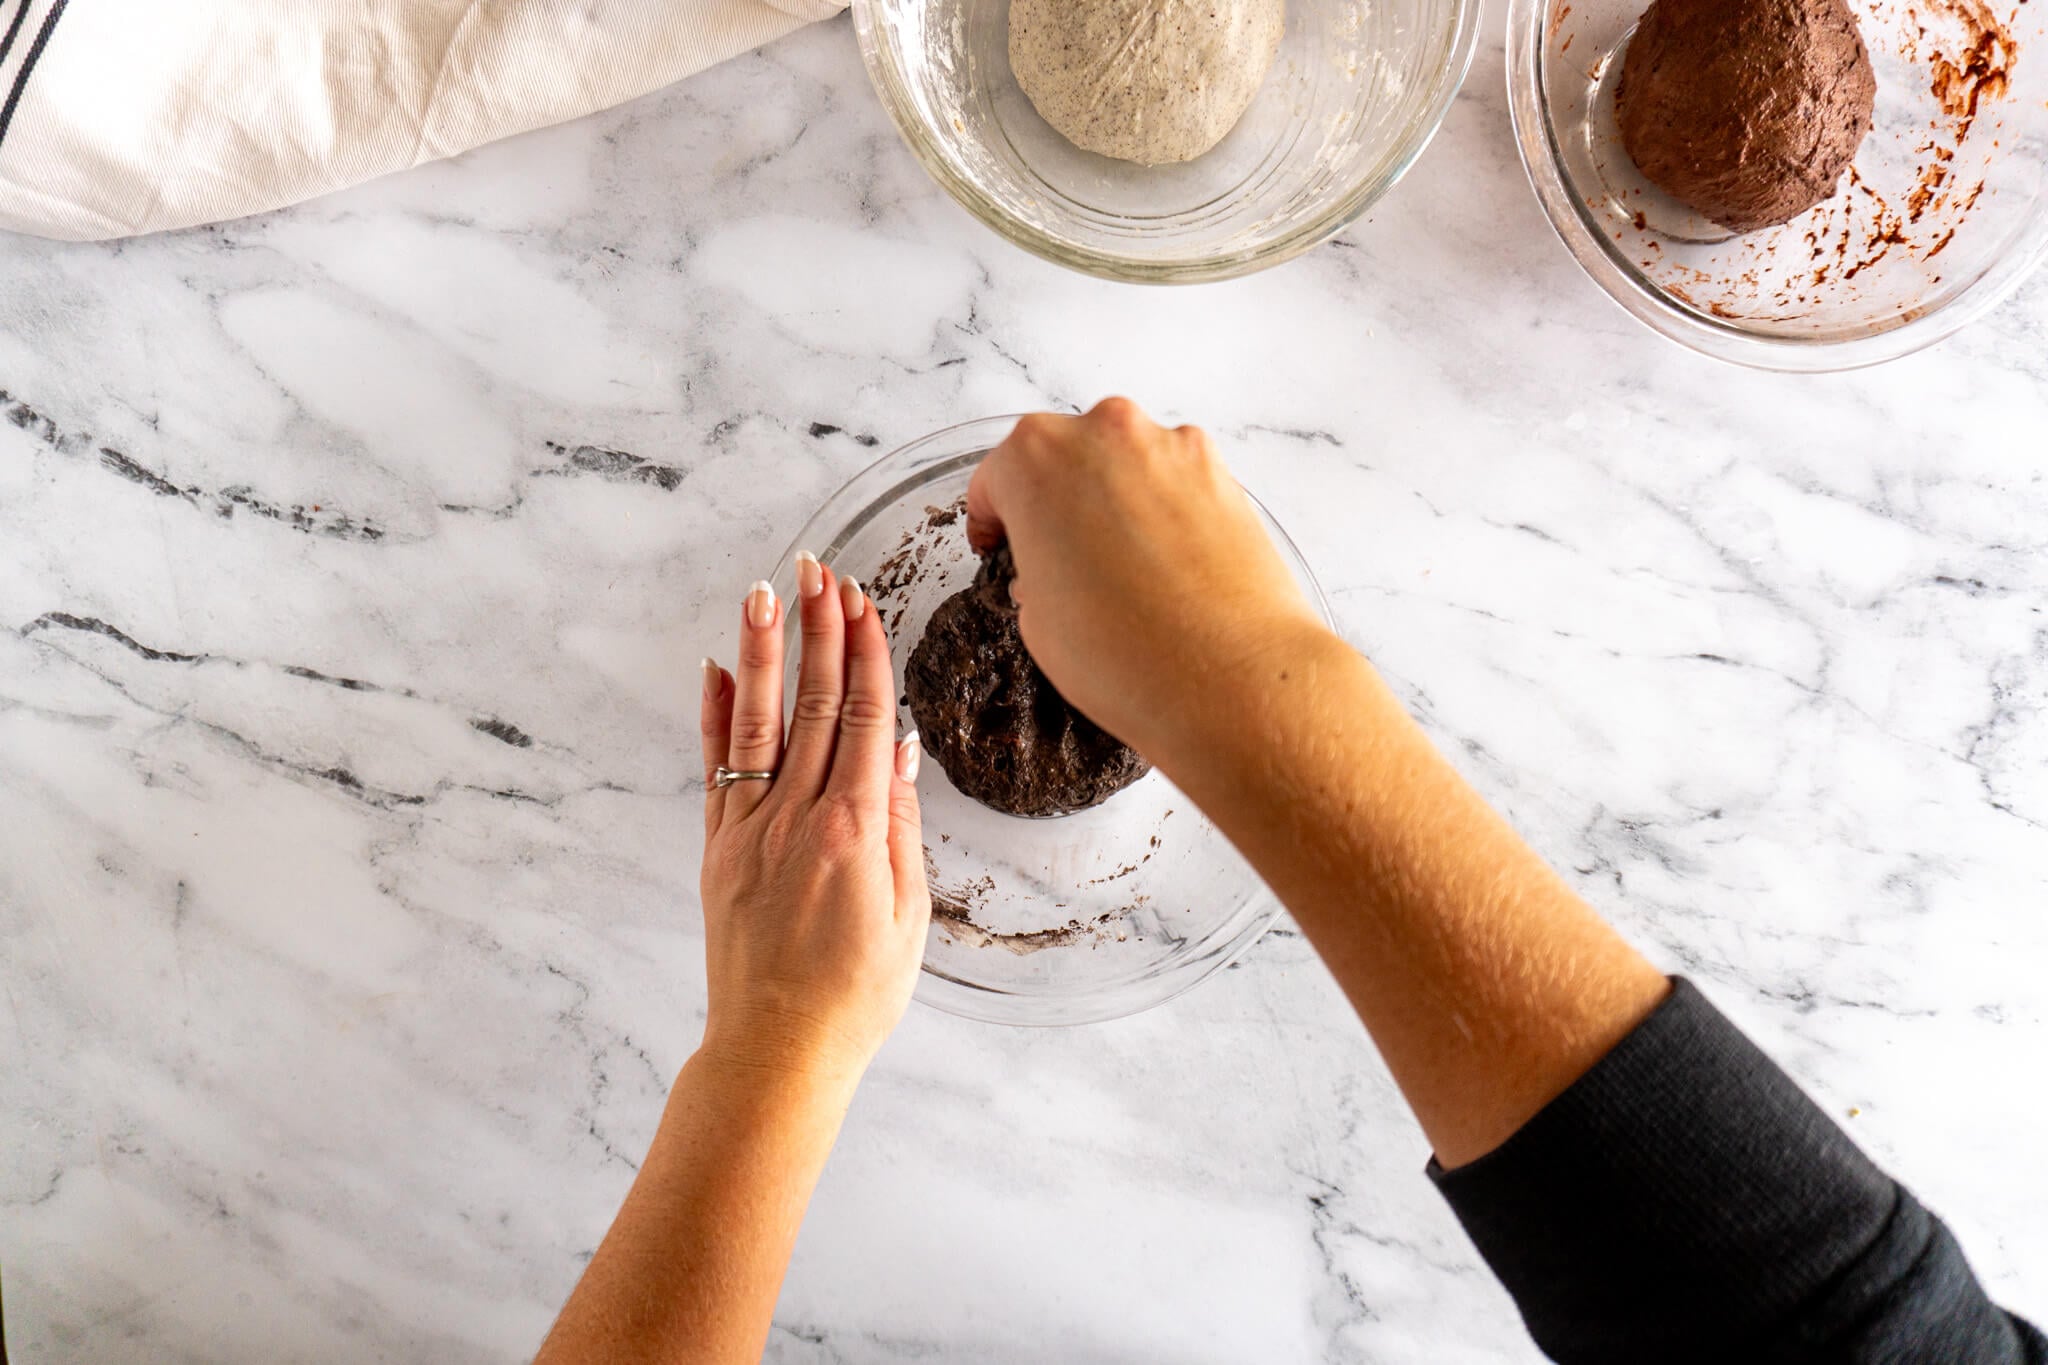
- Step 3: In a third bowl, whisk 50g cooled espresso, 65g water, and 30g sourdough starter until combined. Then add 140g unbleached bread flour, 15g black cocoa powder, and 4g salt. Mix until fully combined and no dry bits remain, this may require a bit of hand kneading to incorporate fully. Cover all three bowls and set aside for 60 minutes.
Stretch And Fold:
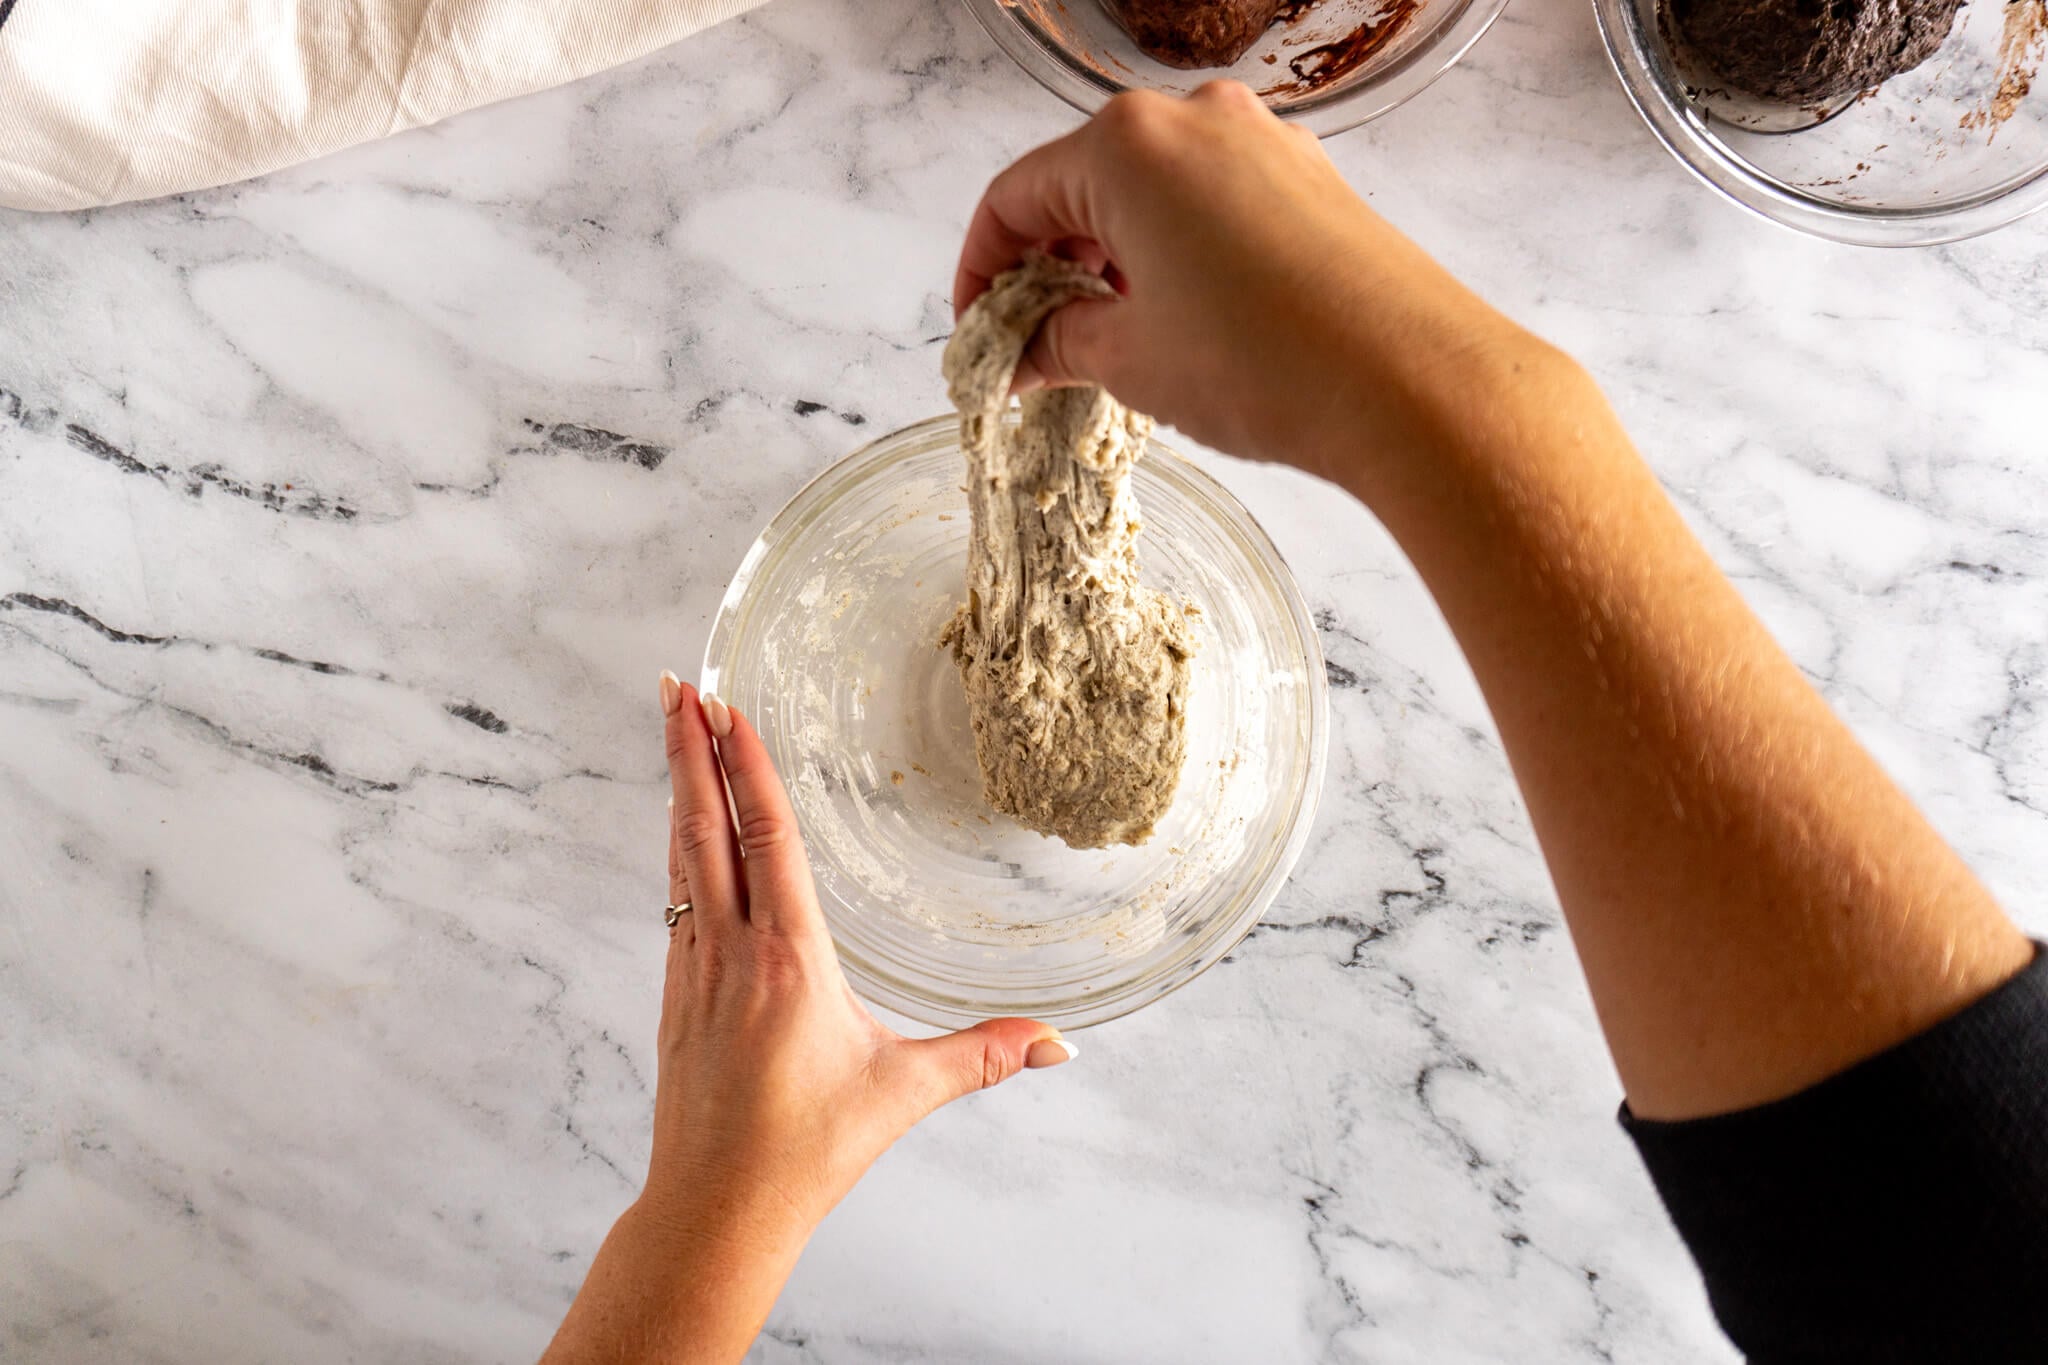
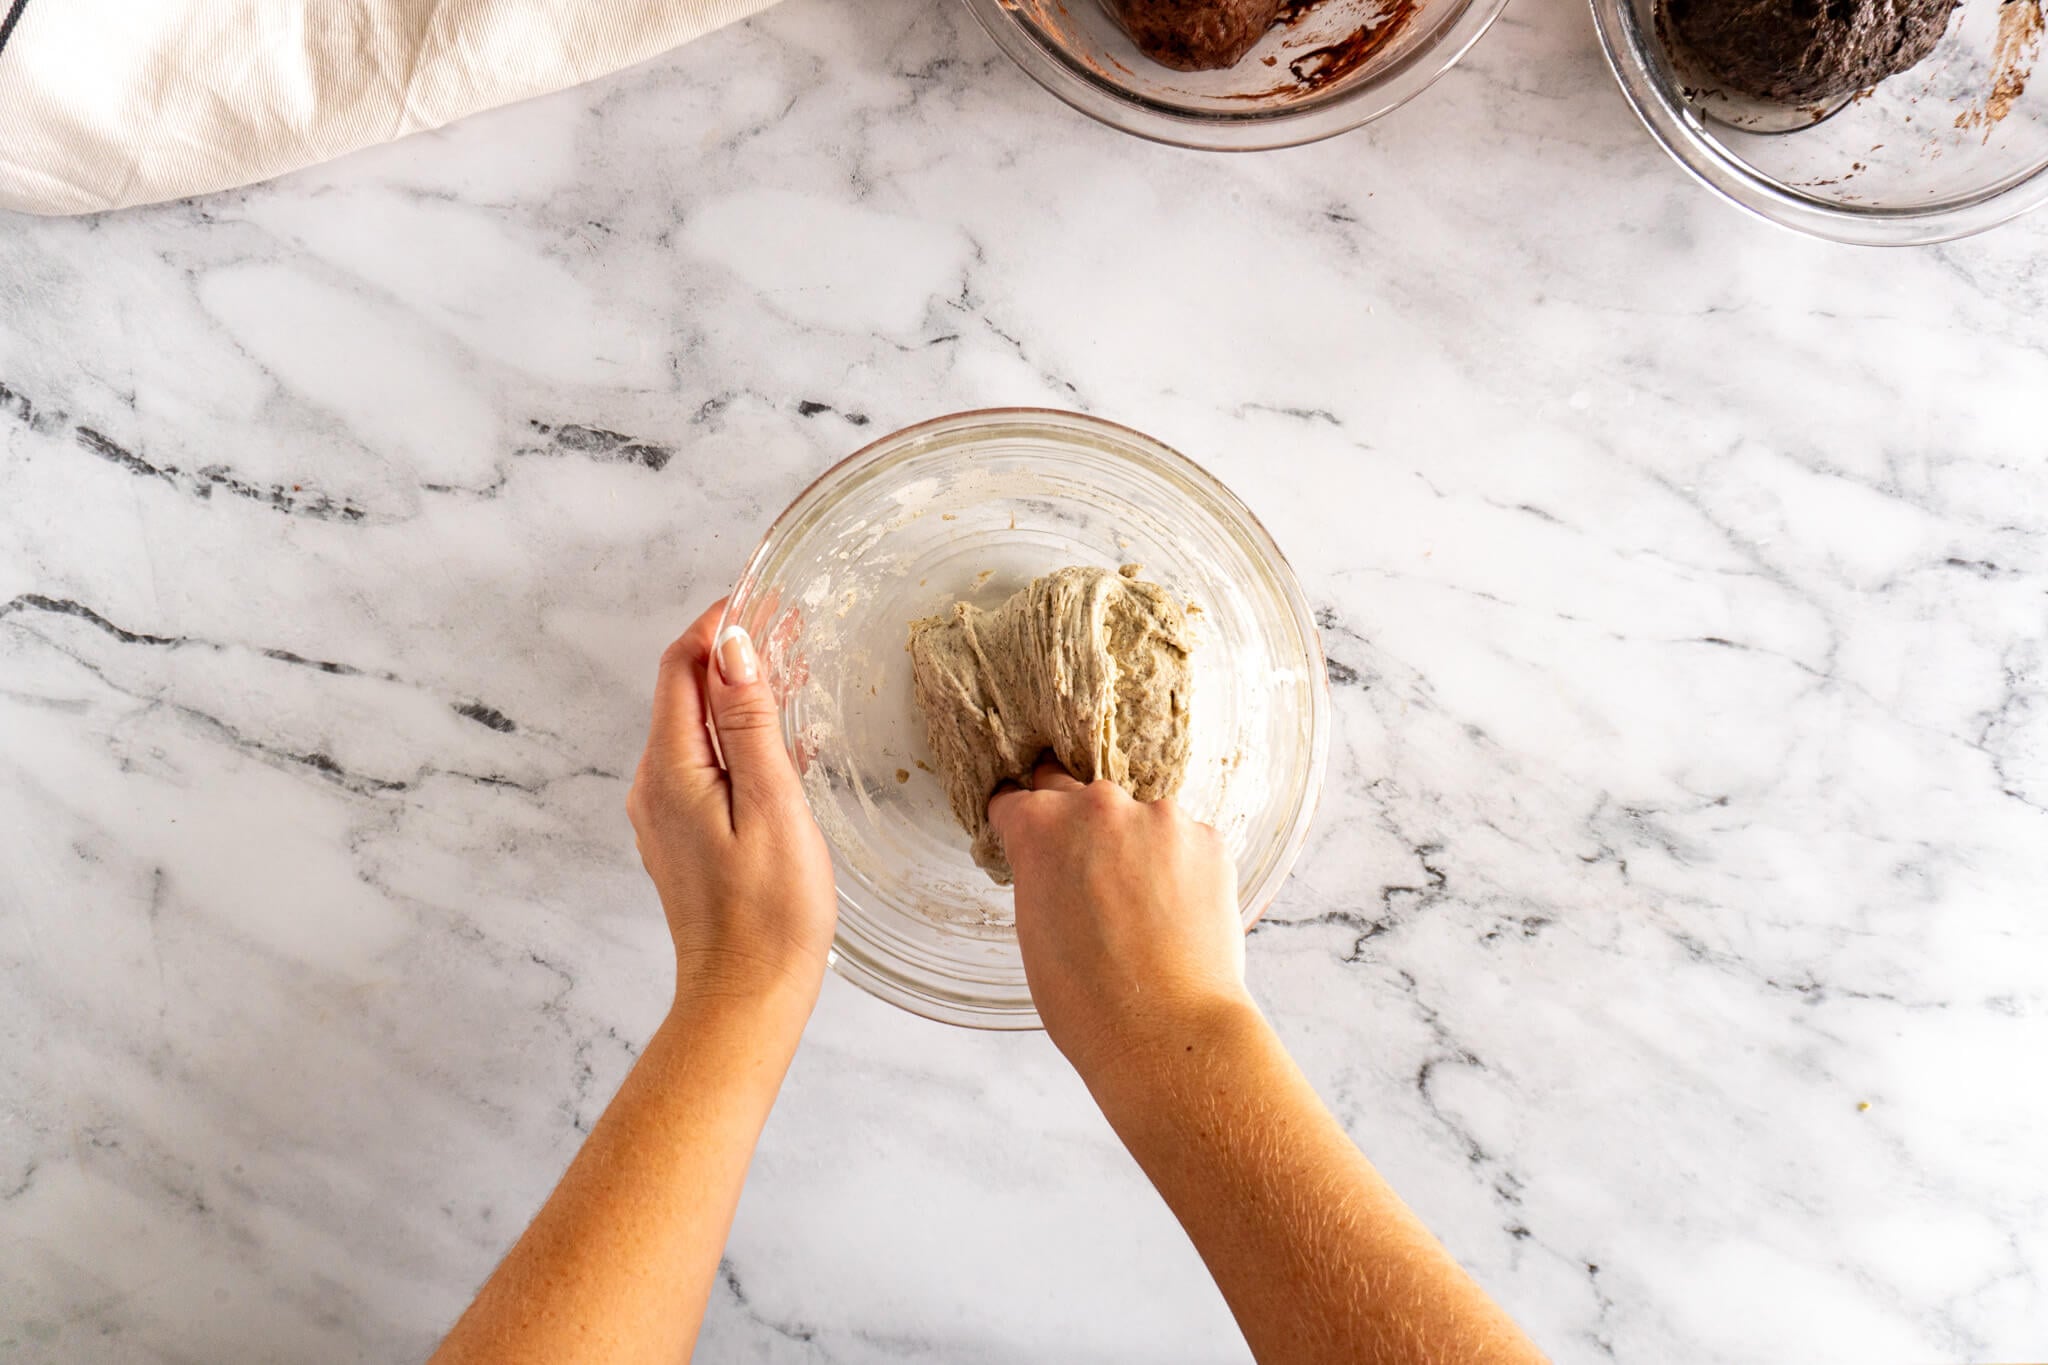
- Step 4: Work from lightest to darkest dough: using damp hands, grab one side of the dough, stretch it upward, and fold it over the center. Rotate the bowl a quarter turn and repeat until you’ve completed four folds, this is one set of stretch and folds.

- Step 5: Recover the bowl, and set it aside for 60 minutes.
- Step 6: Repeat the stretch and fold process 2 times over the next 2 hours, for a total of 3 sets of stretch and folds. Rest the dough for 60 more minutes after the final stretch and fold.
Laminate + Bulk Ferment
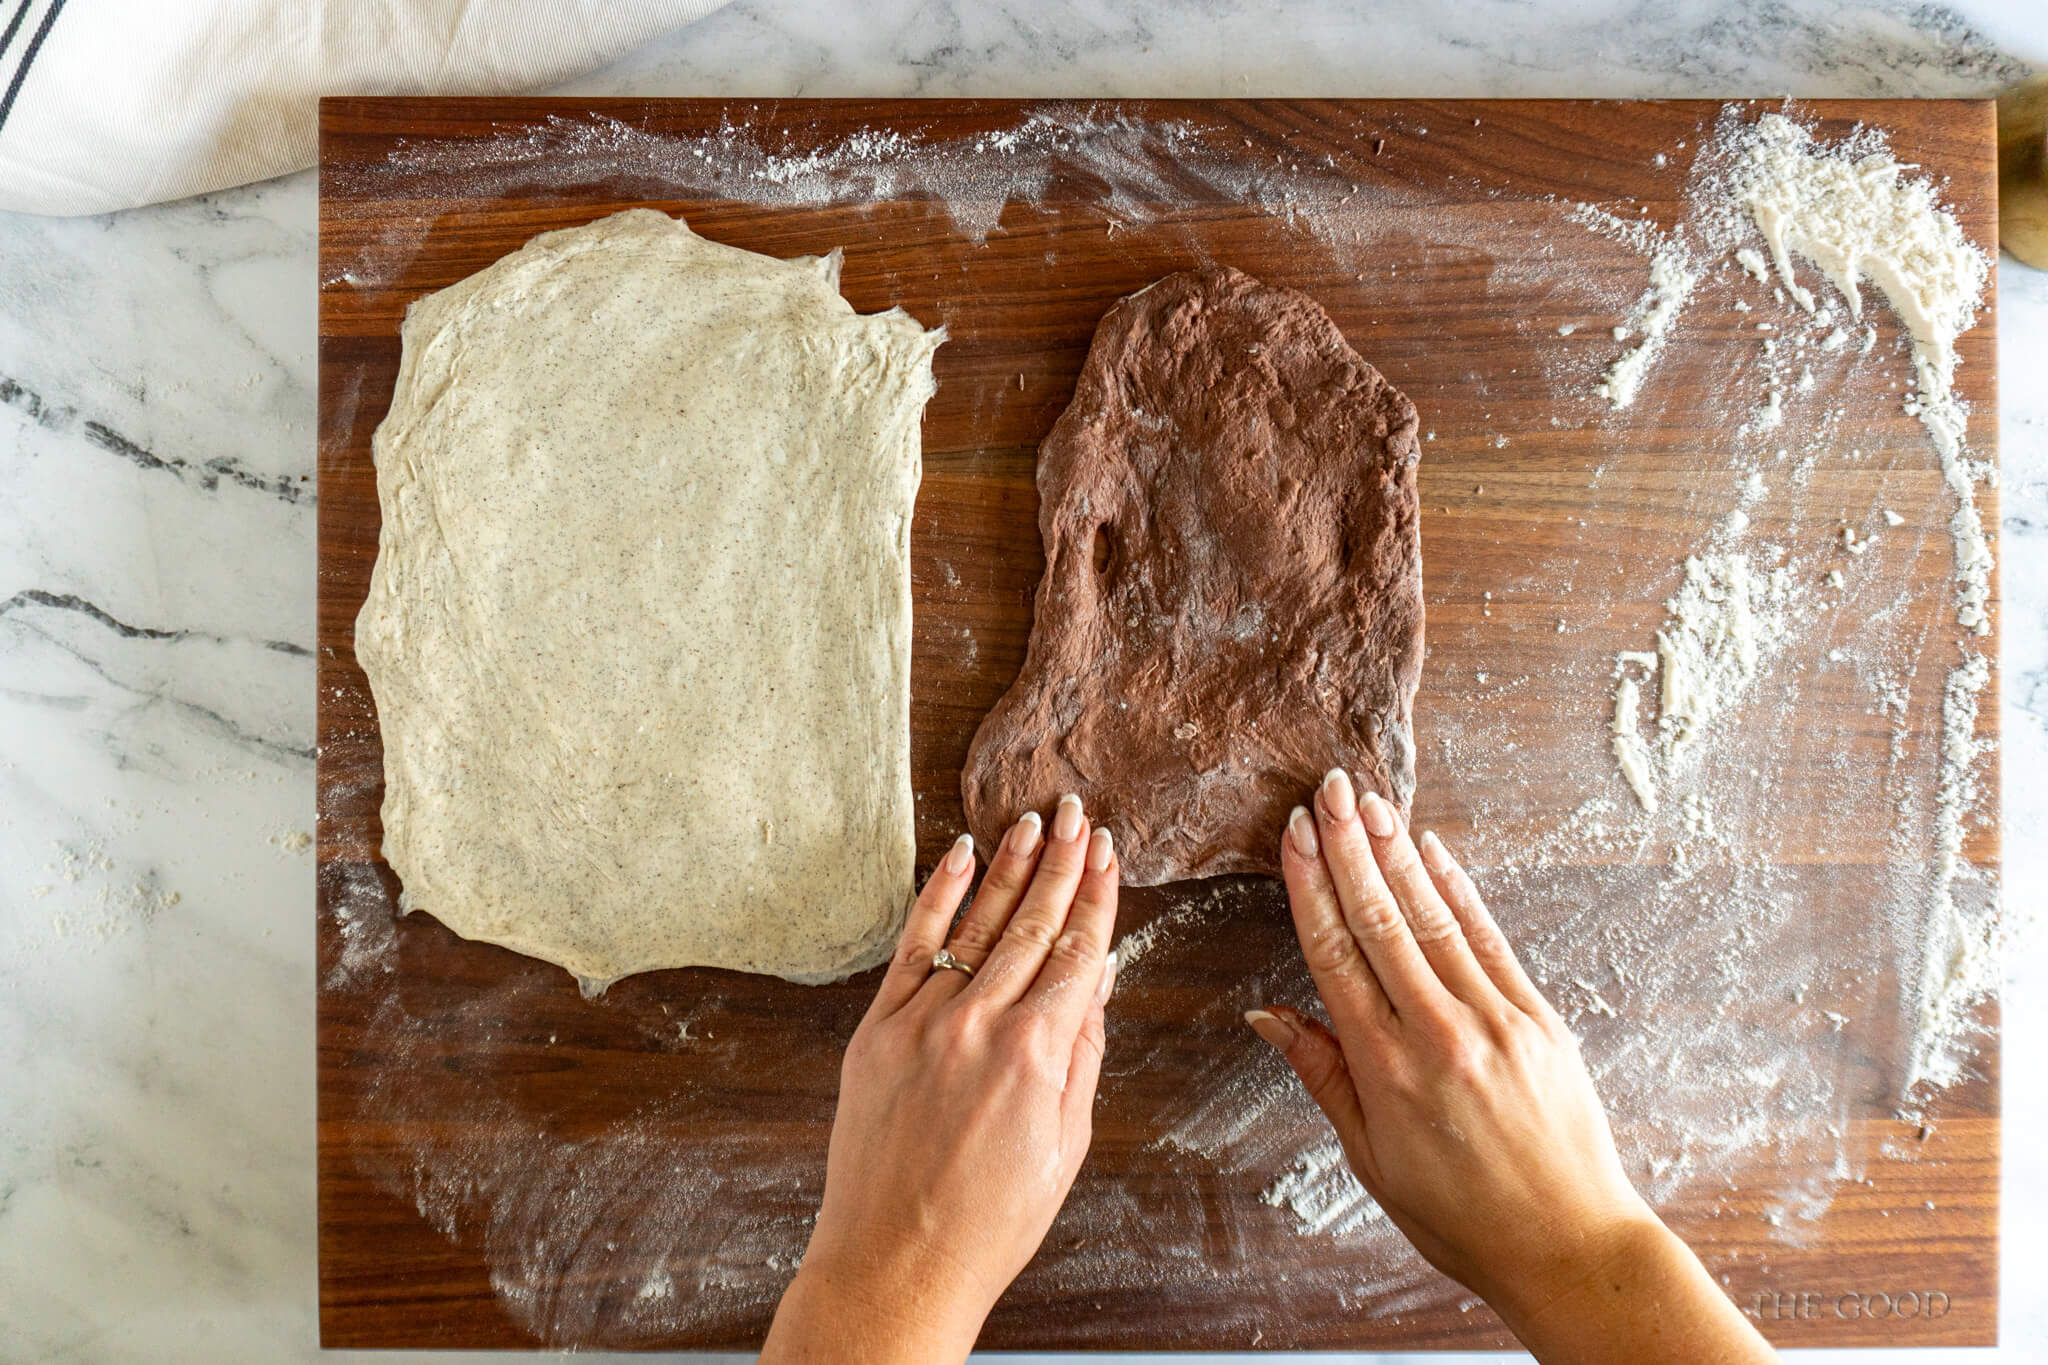
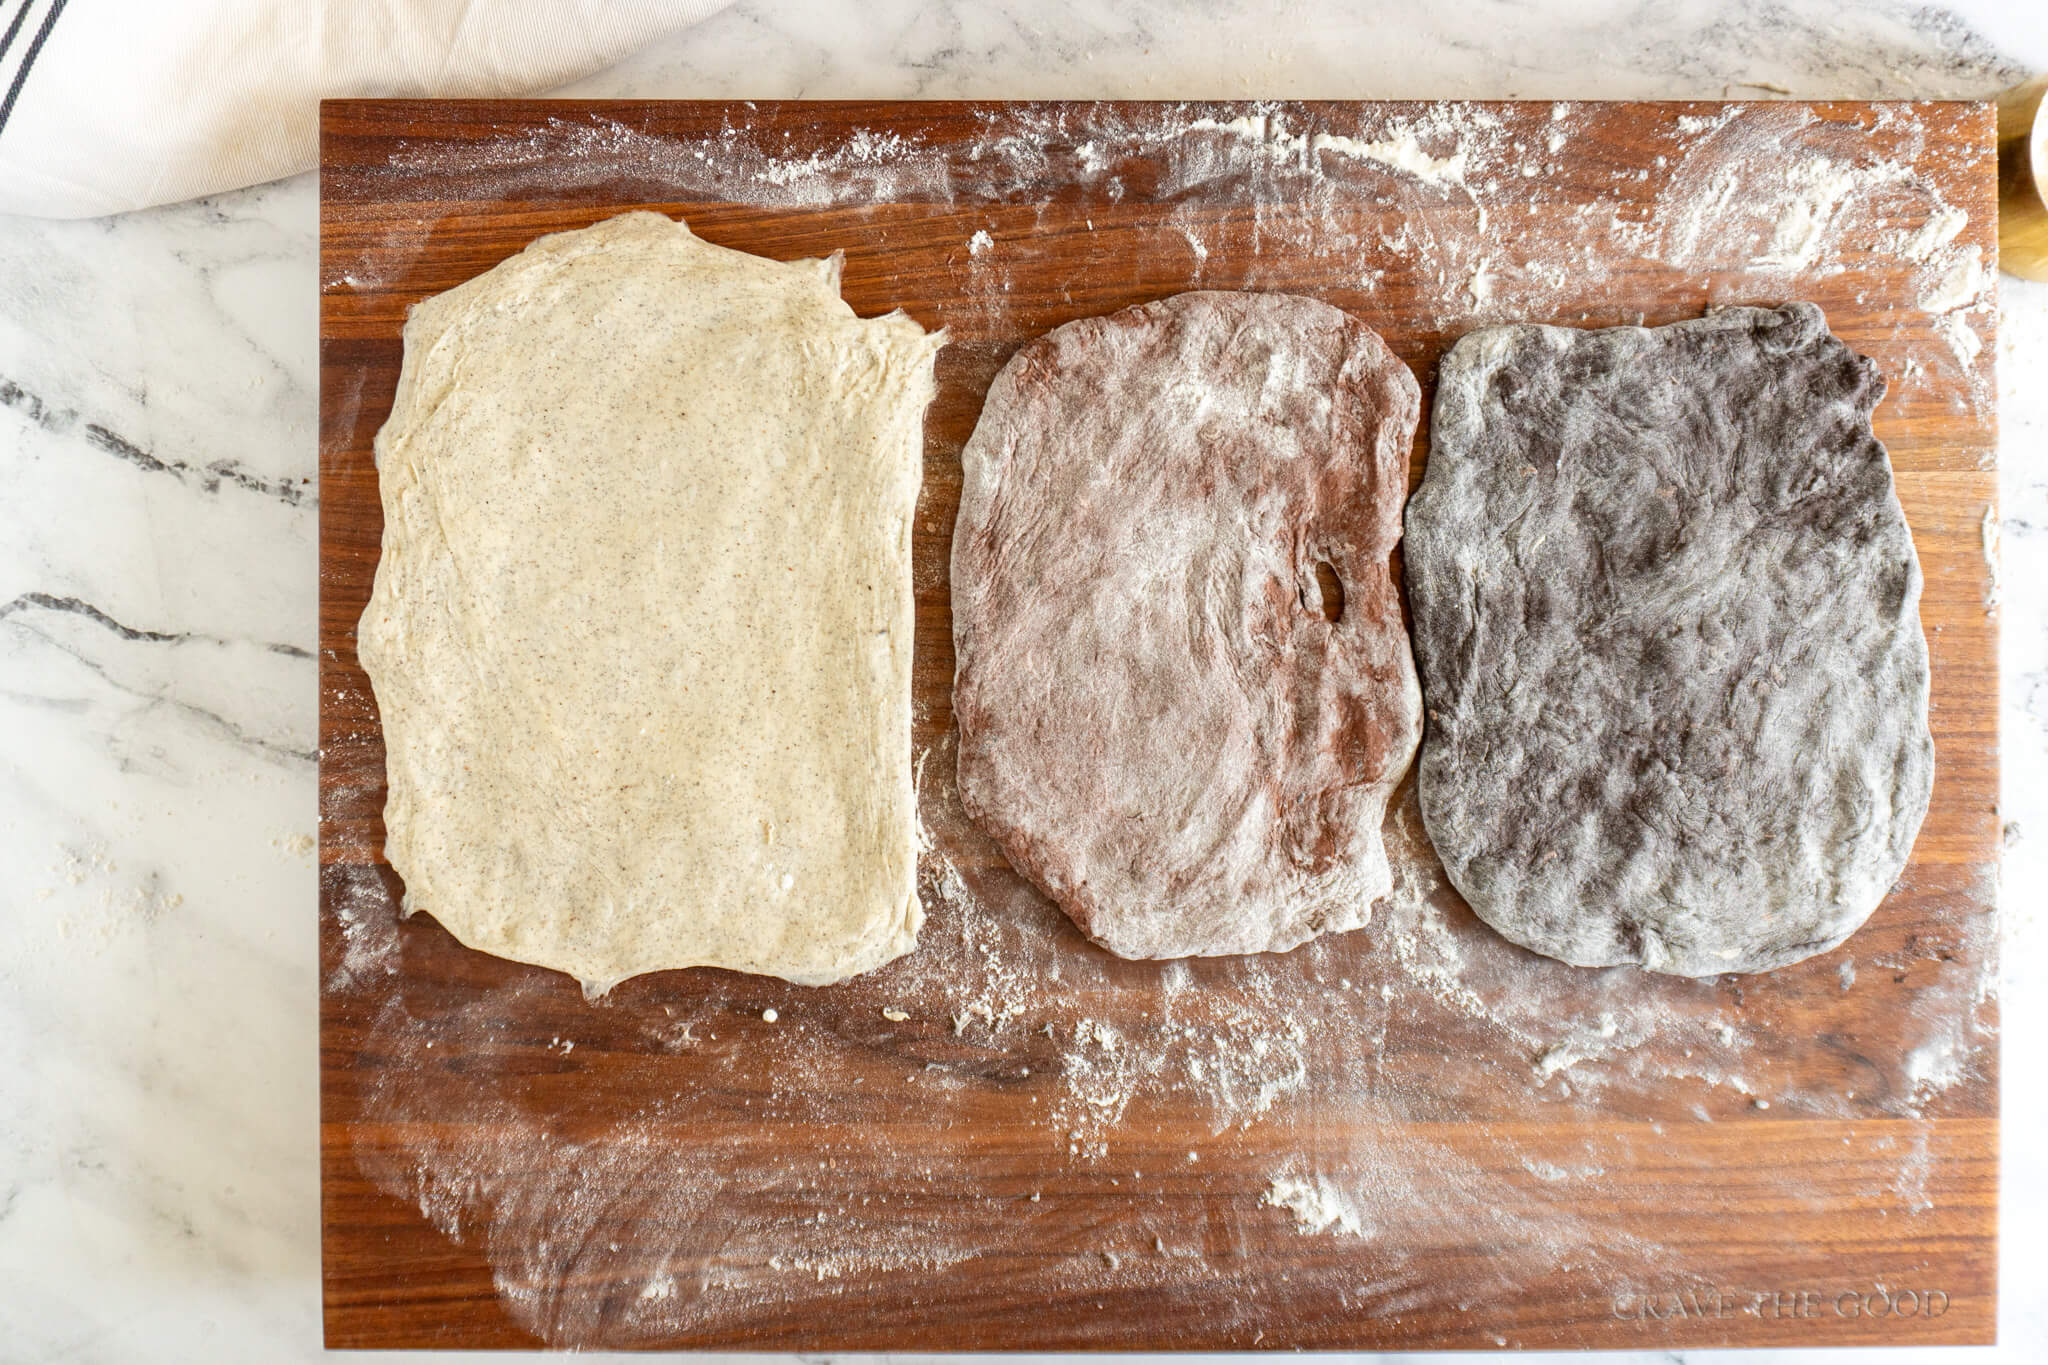
- Step 7: Lightly flour a working surface, then starting with vanilla, then cocoa, then black cocoa dough, turn the dough out of the bowl and carefully press and stretch into a rectangle. If the dough wants to tear, allow it to rest for a few minutes before trying again. Repeat with the other dough. The vanilla flavored dough is a bit higher hydration purposely, as it forms the base of the dough pile and needs to be stretched slightly larger.
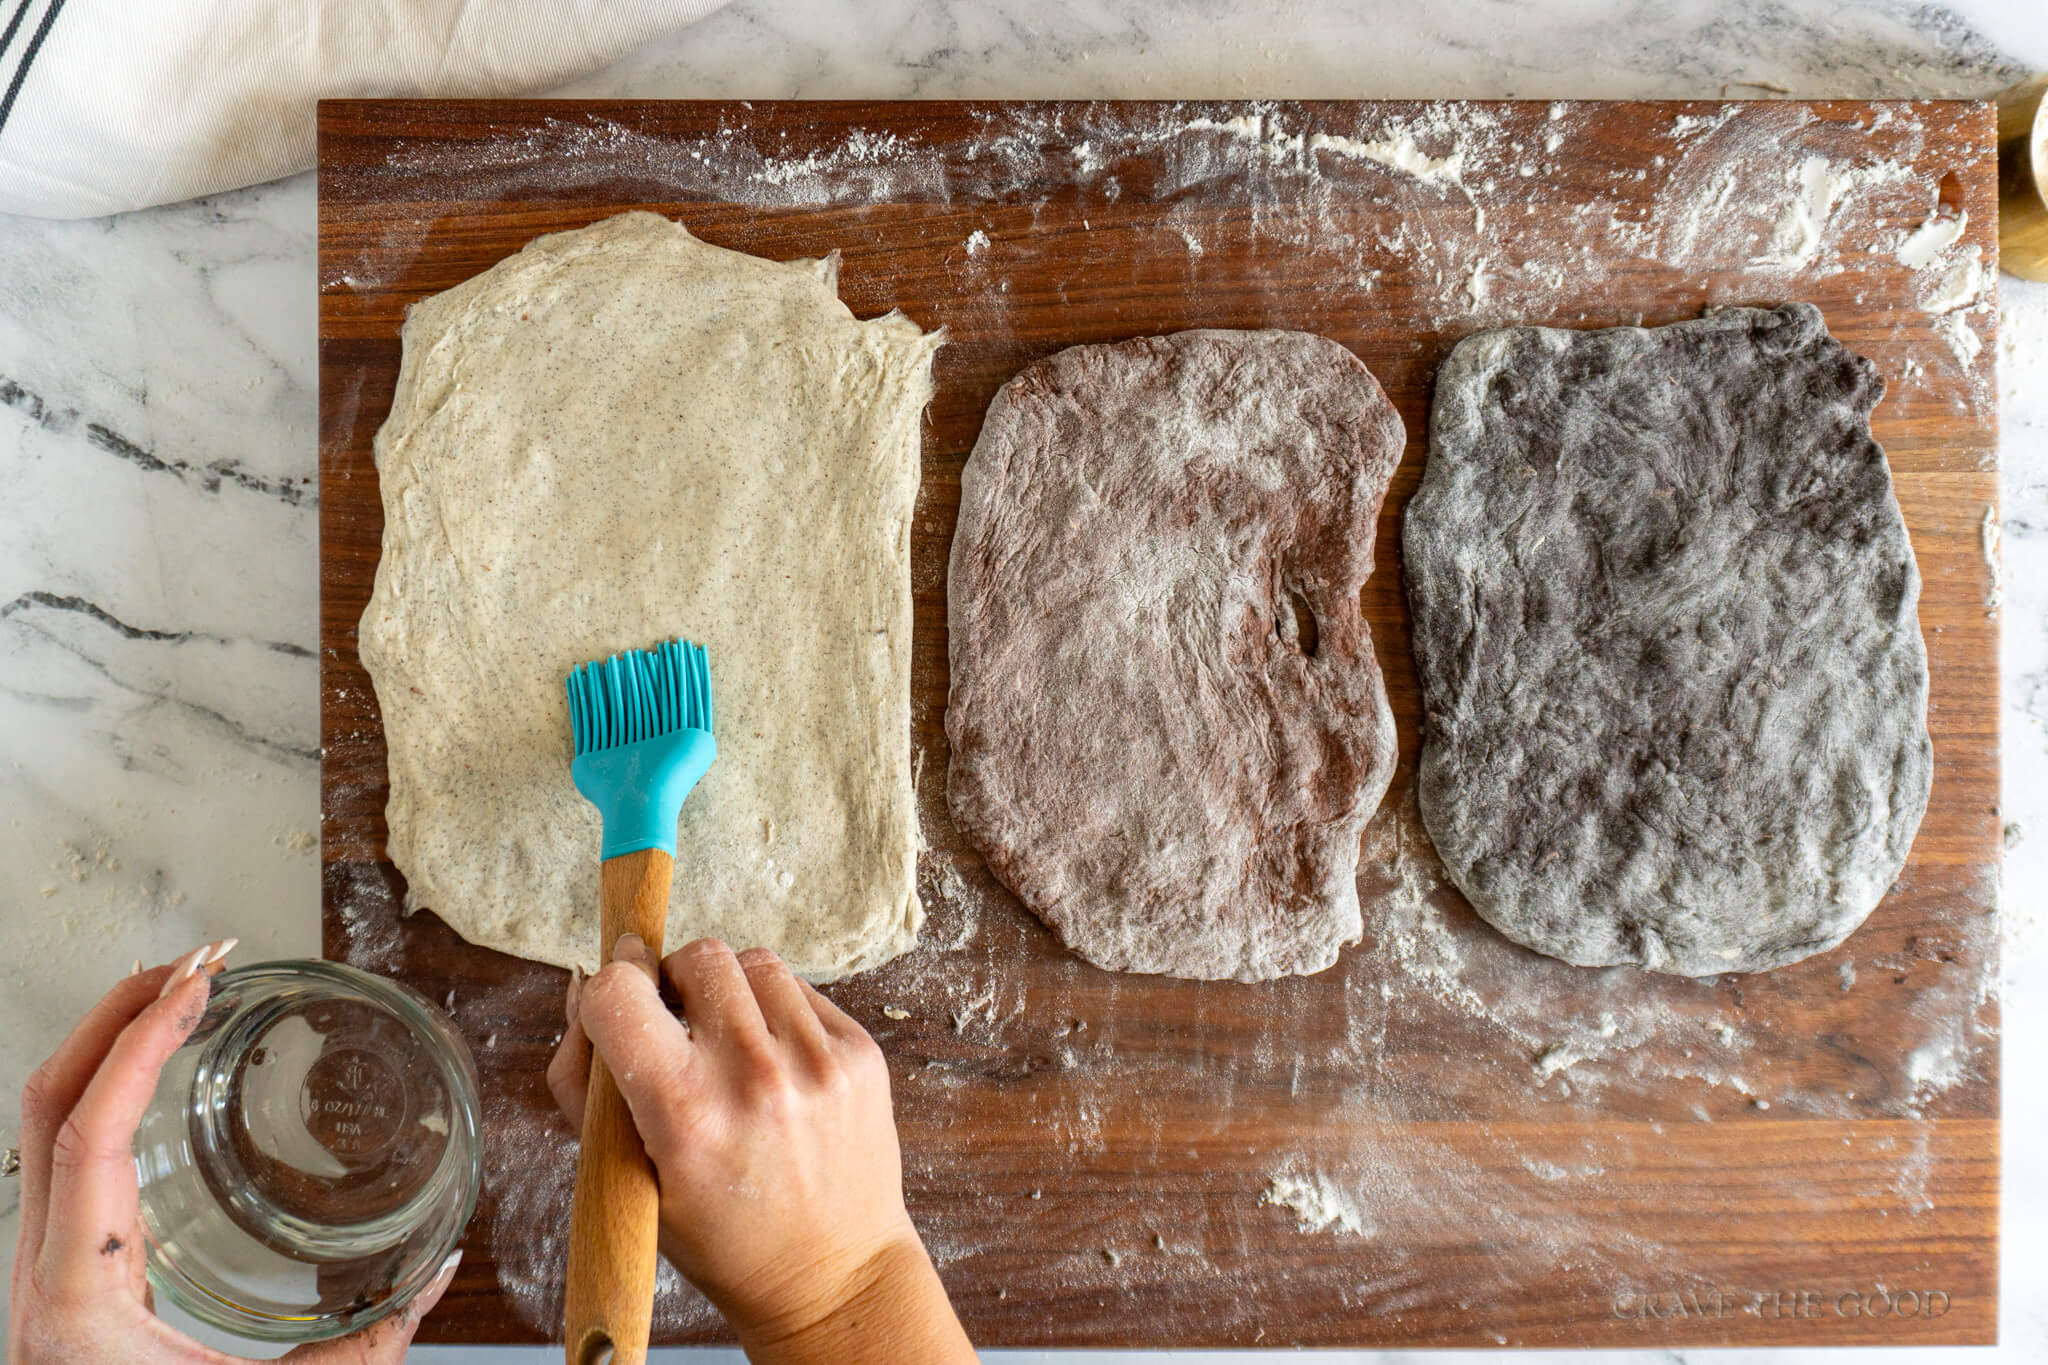
- Step 8: Using a pastry brush, brush the surface of the vanilla dough with water. Then carefully pick up the cocoa dough and place it on the vanilla dough. Press firmly around the surface of the dough to adhere them together. Then brush the surface of the cocoa dough with water and lift the black cocoa dough and place it on the cocoa dough, again pressing firmly to ensure the doughs adhere to each other. This can help prevent large bubbles forming between the layers.
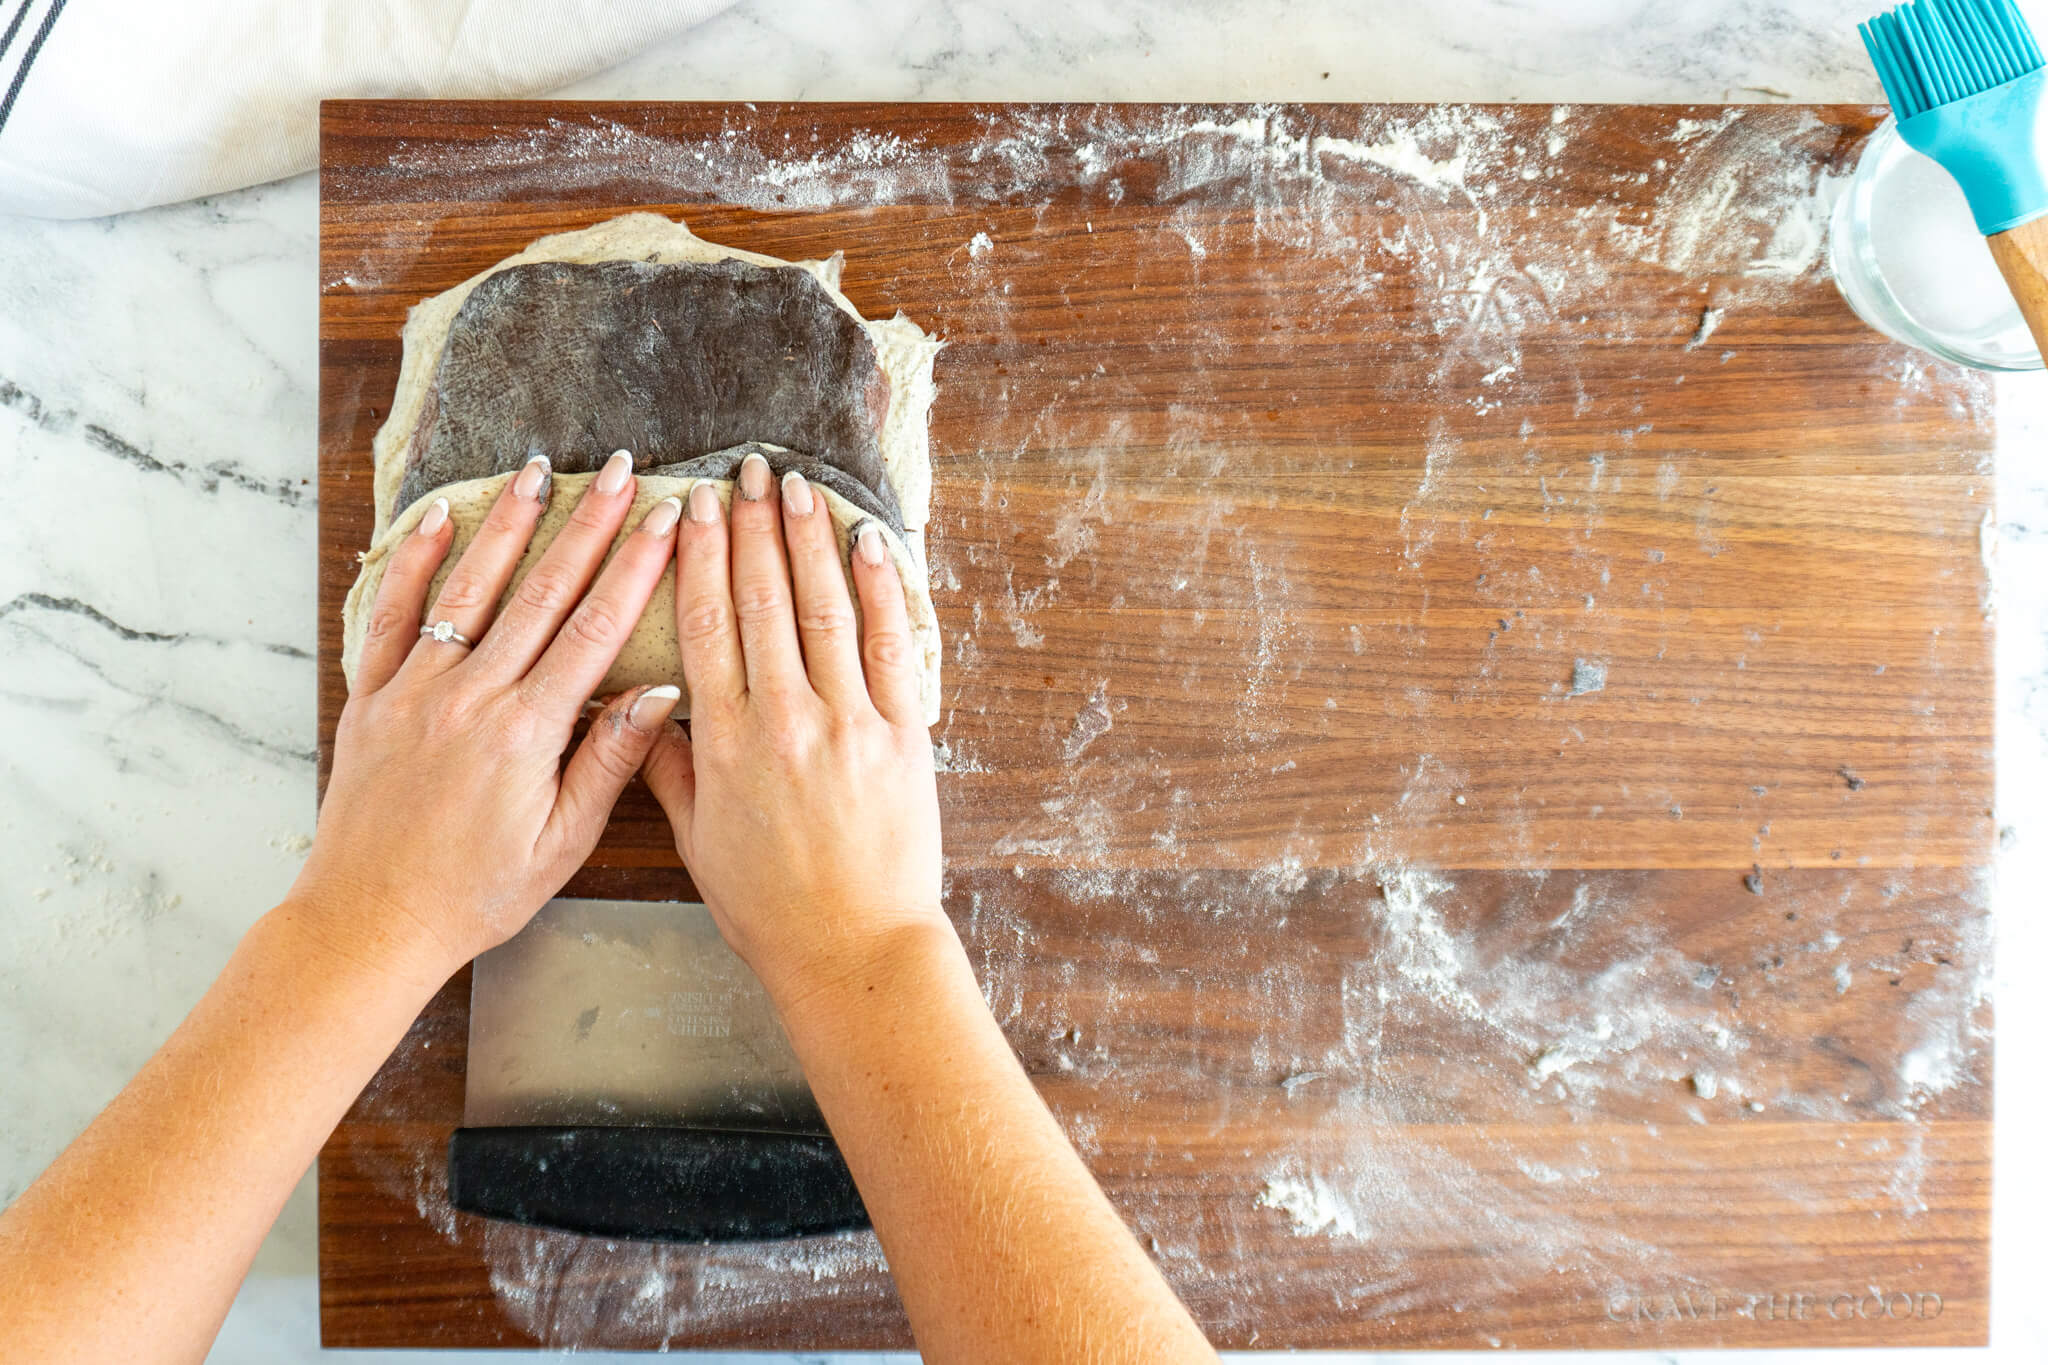
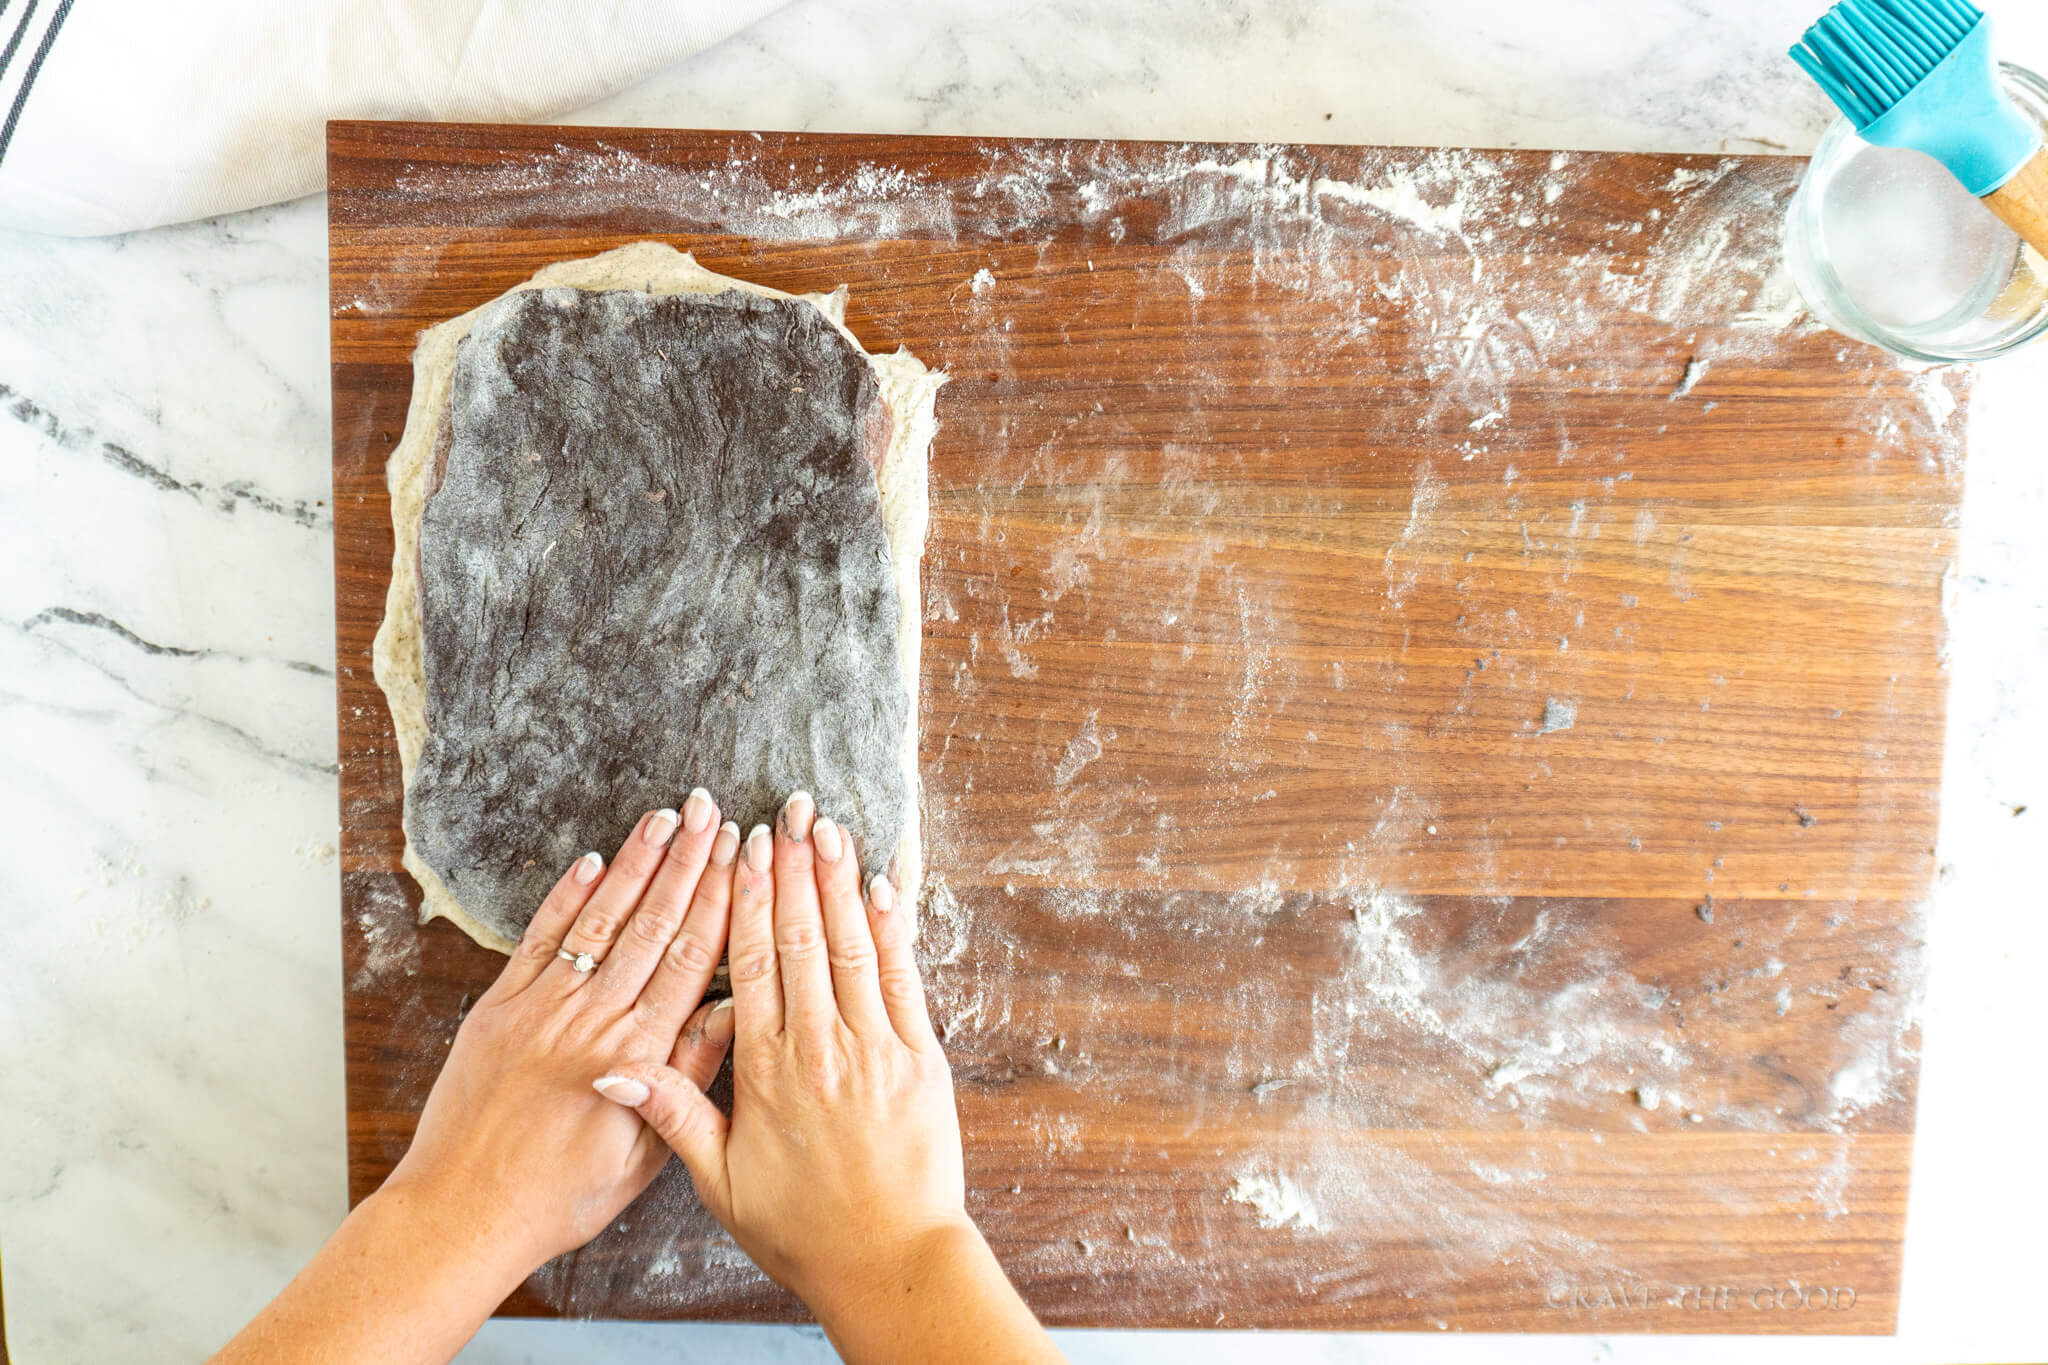
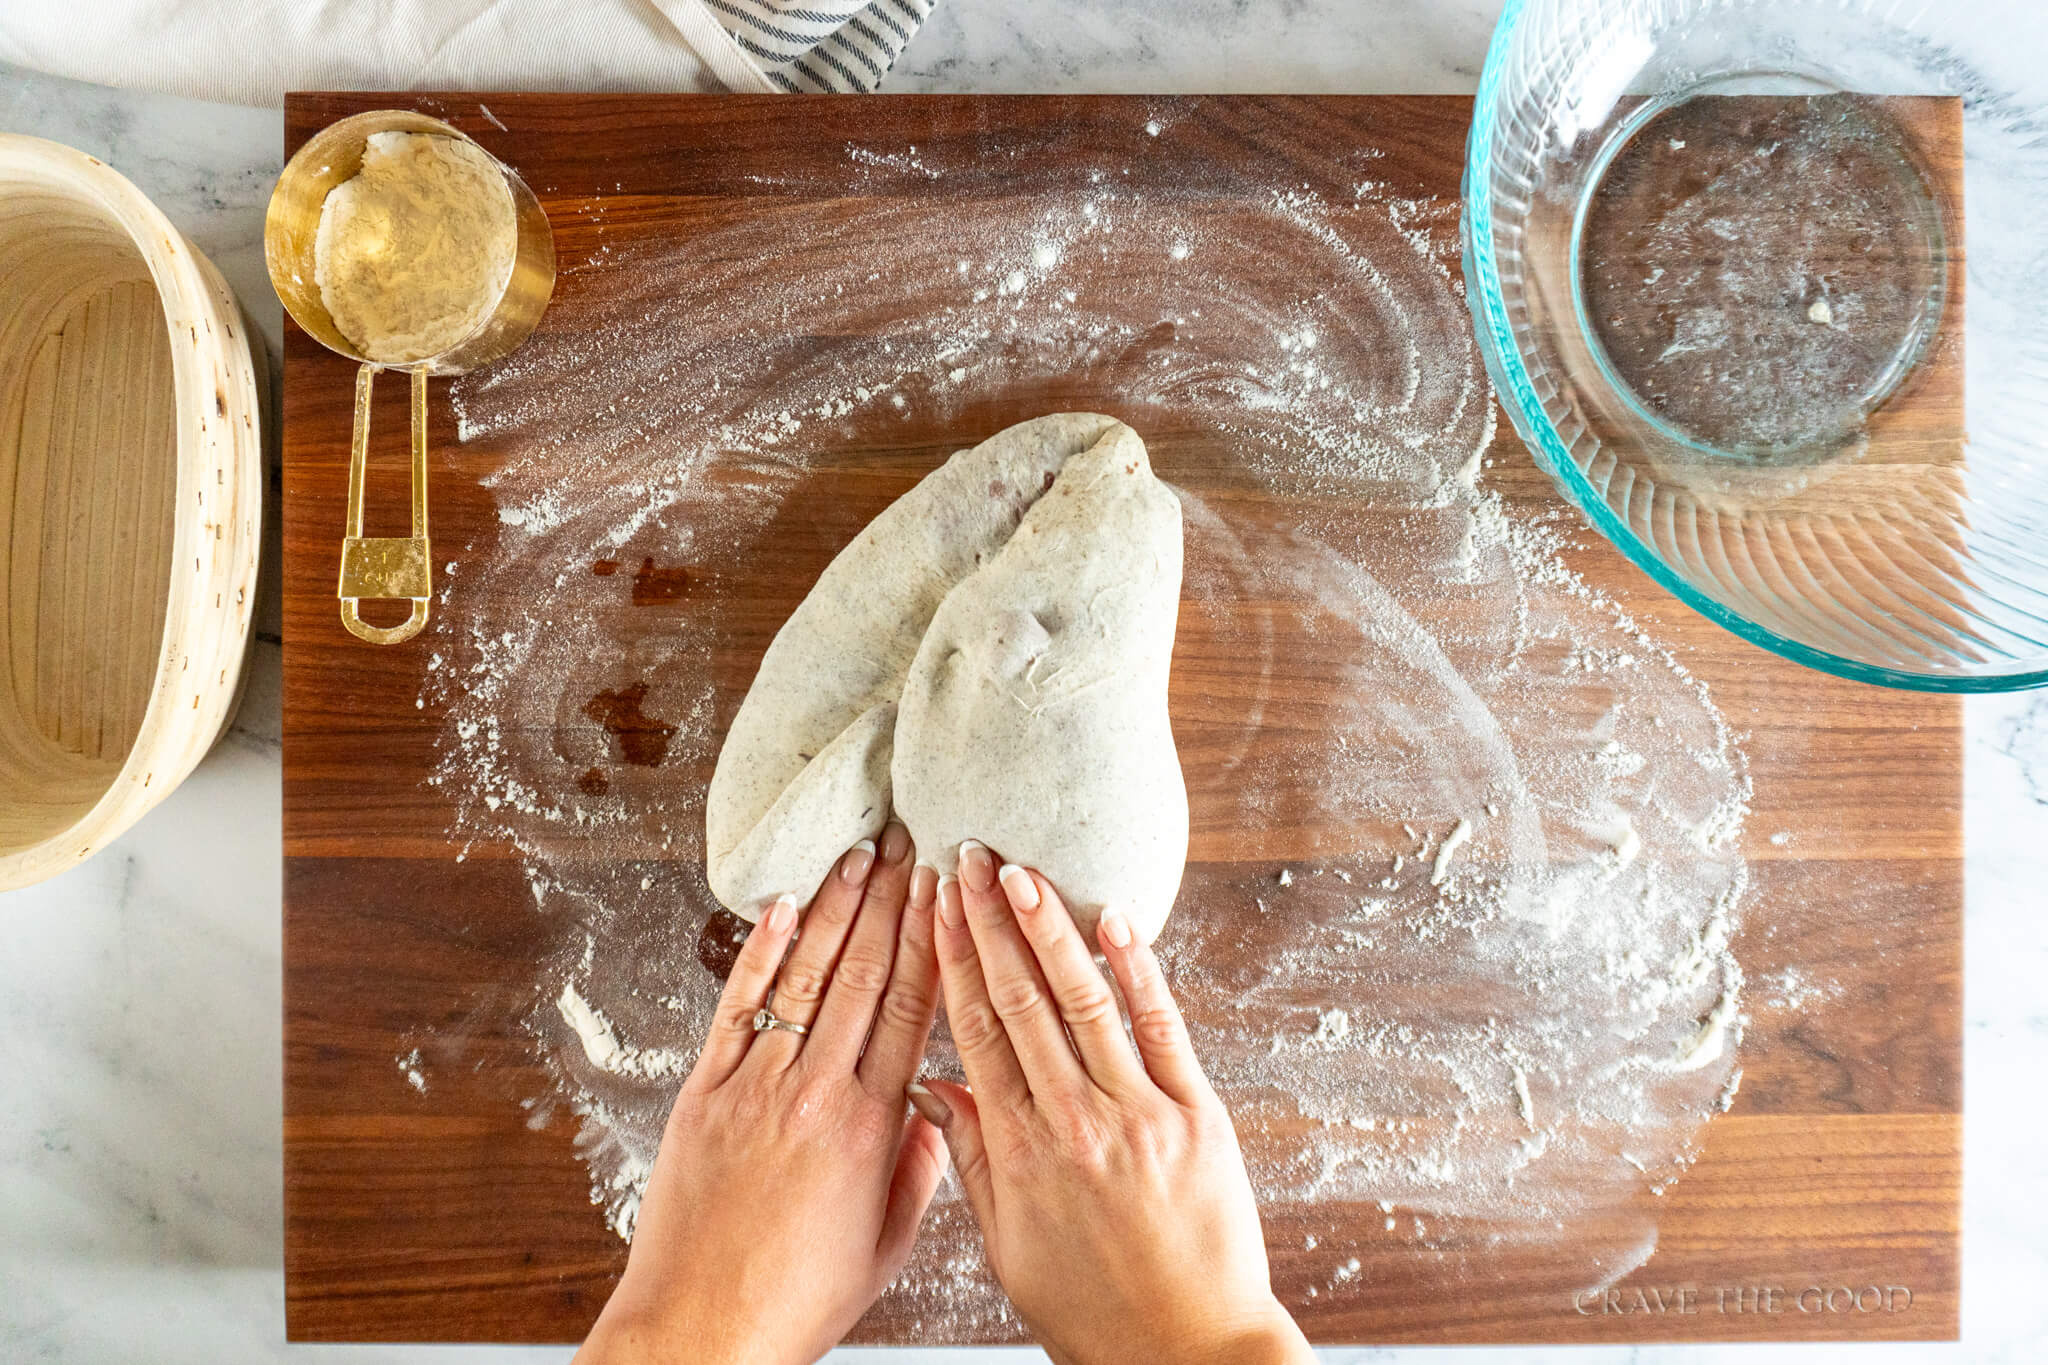
- Step 9: Brush the black cocoa dough with water, then fold up the bottom third of the dough, then fold the bottom right corner one third of the way across, fold the left corner across, then roll the dough into a log.
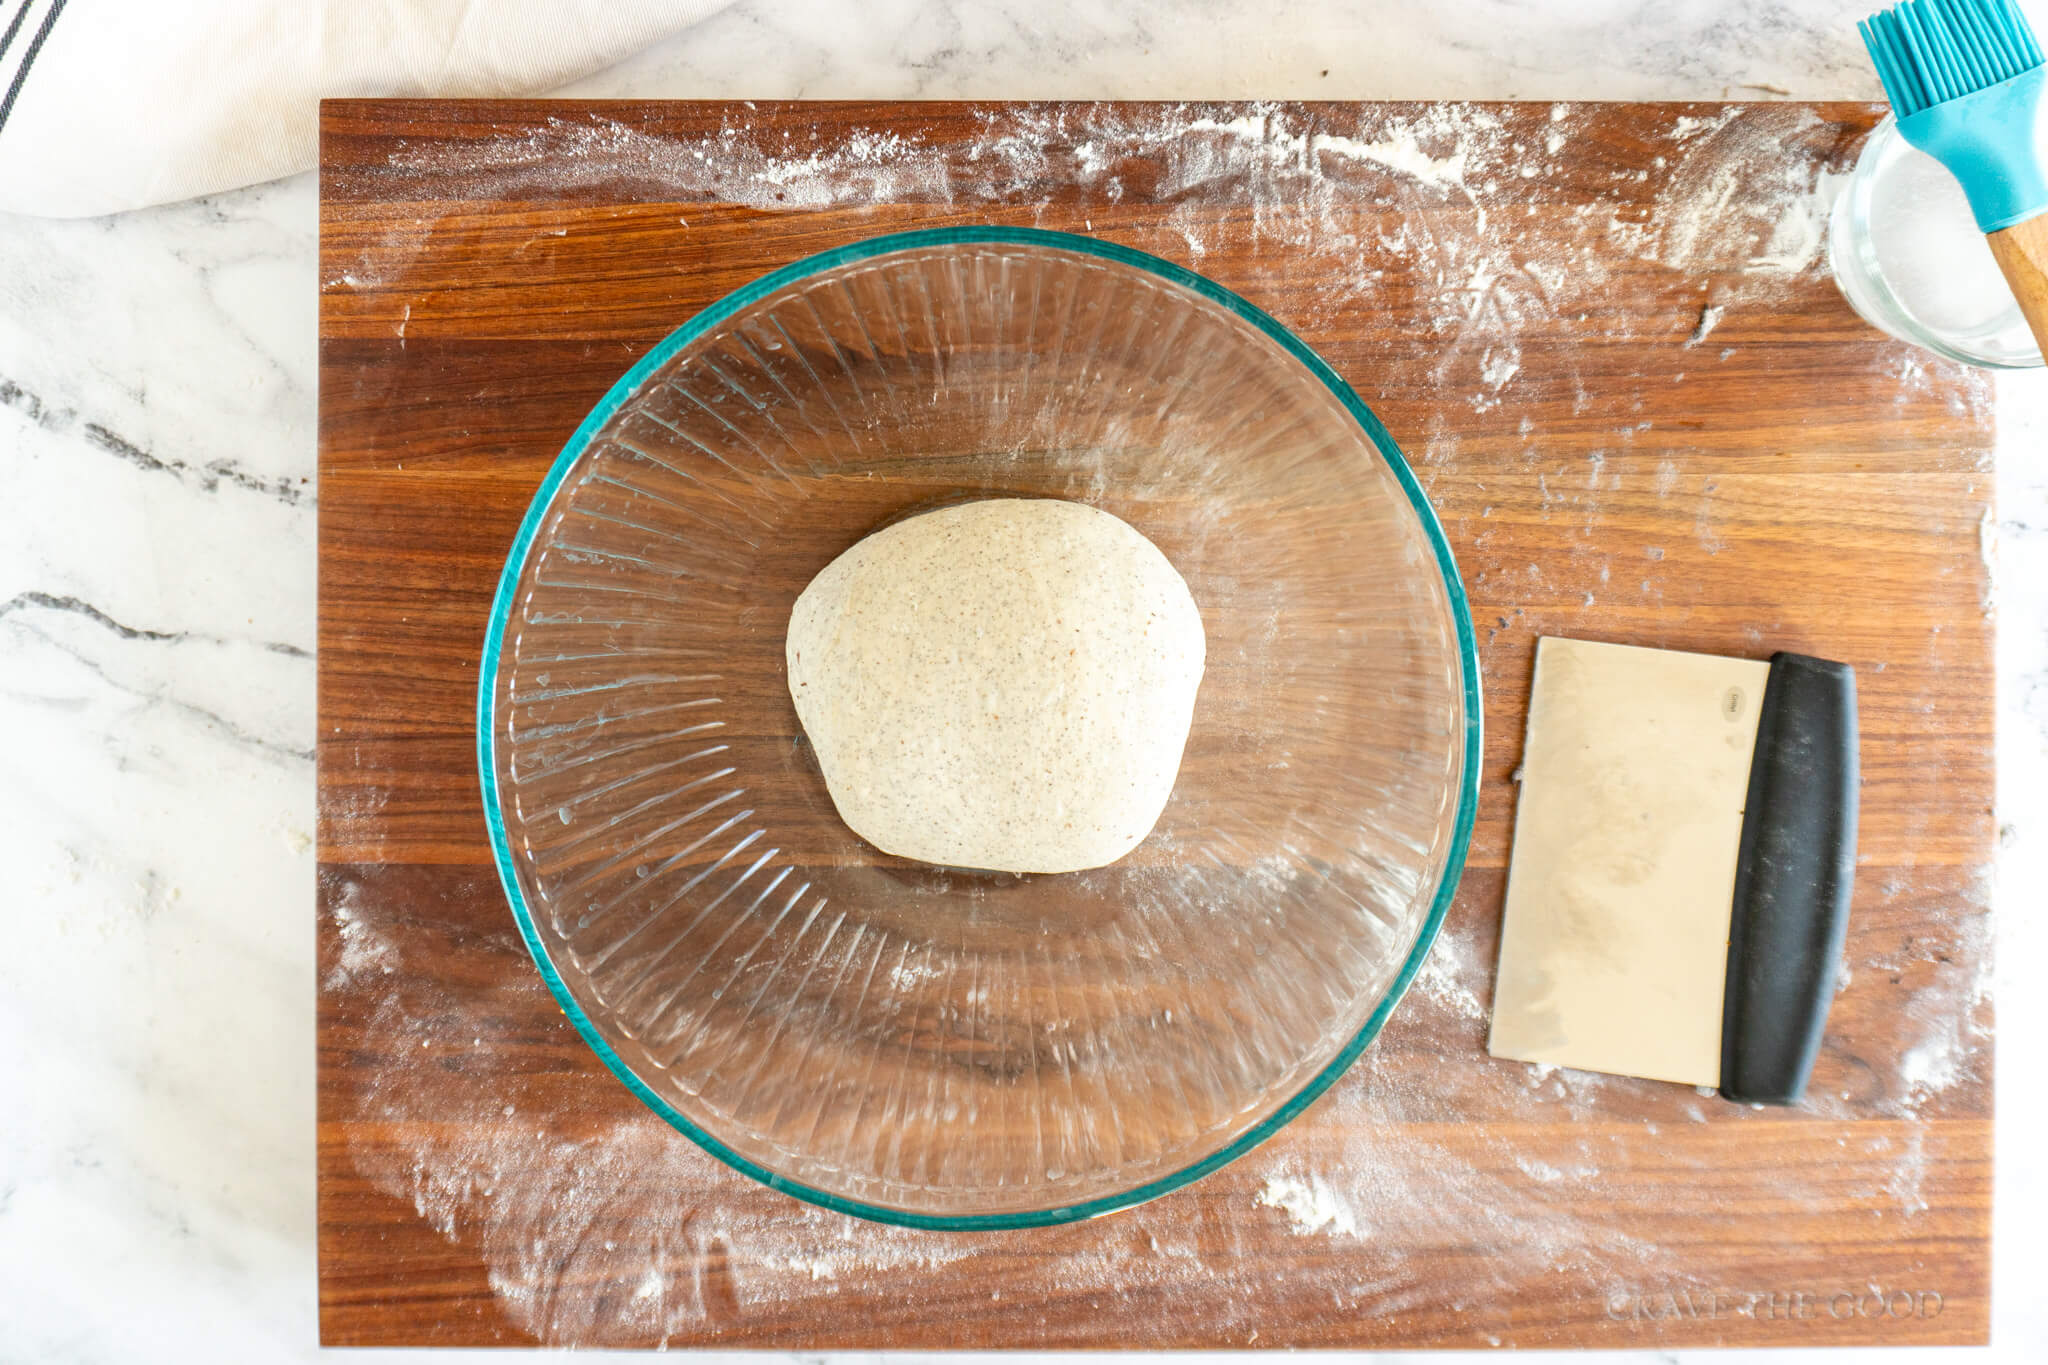
- Step 10: Use a bench scraper to pick up the dough and place it into a large bowl.
Cover the dough and bulk ferment for 2-3 hours.
Pre-Shape and Shape:
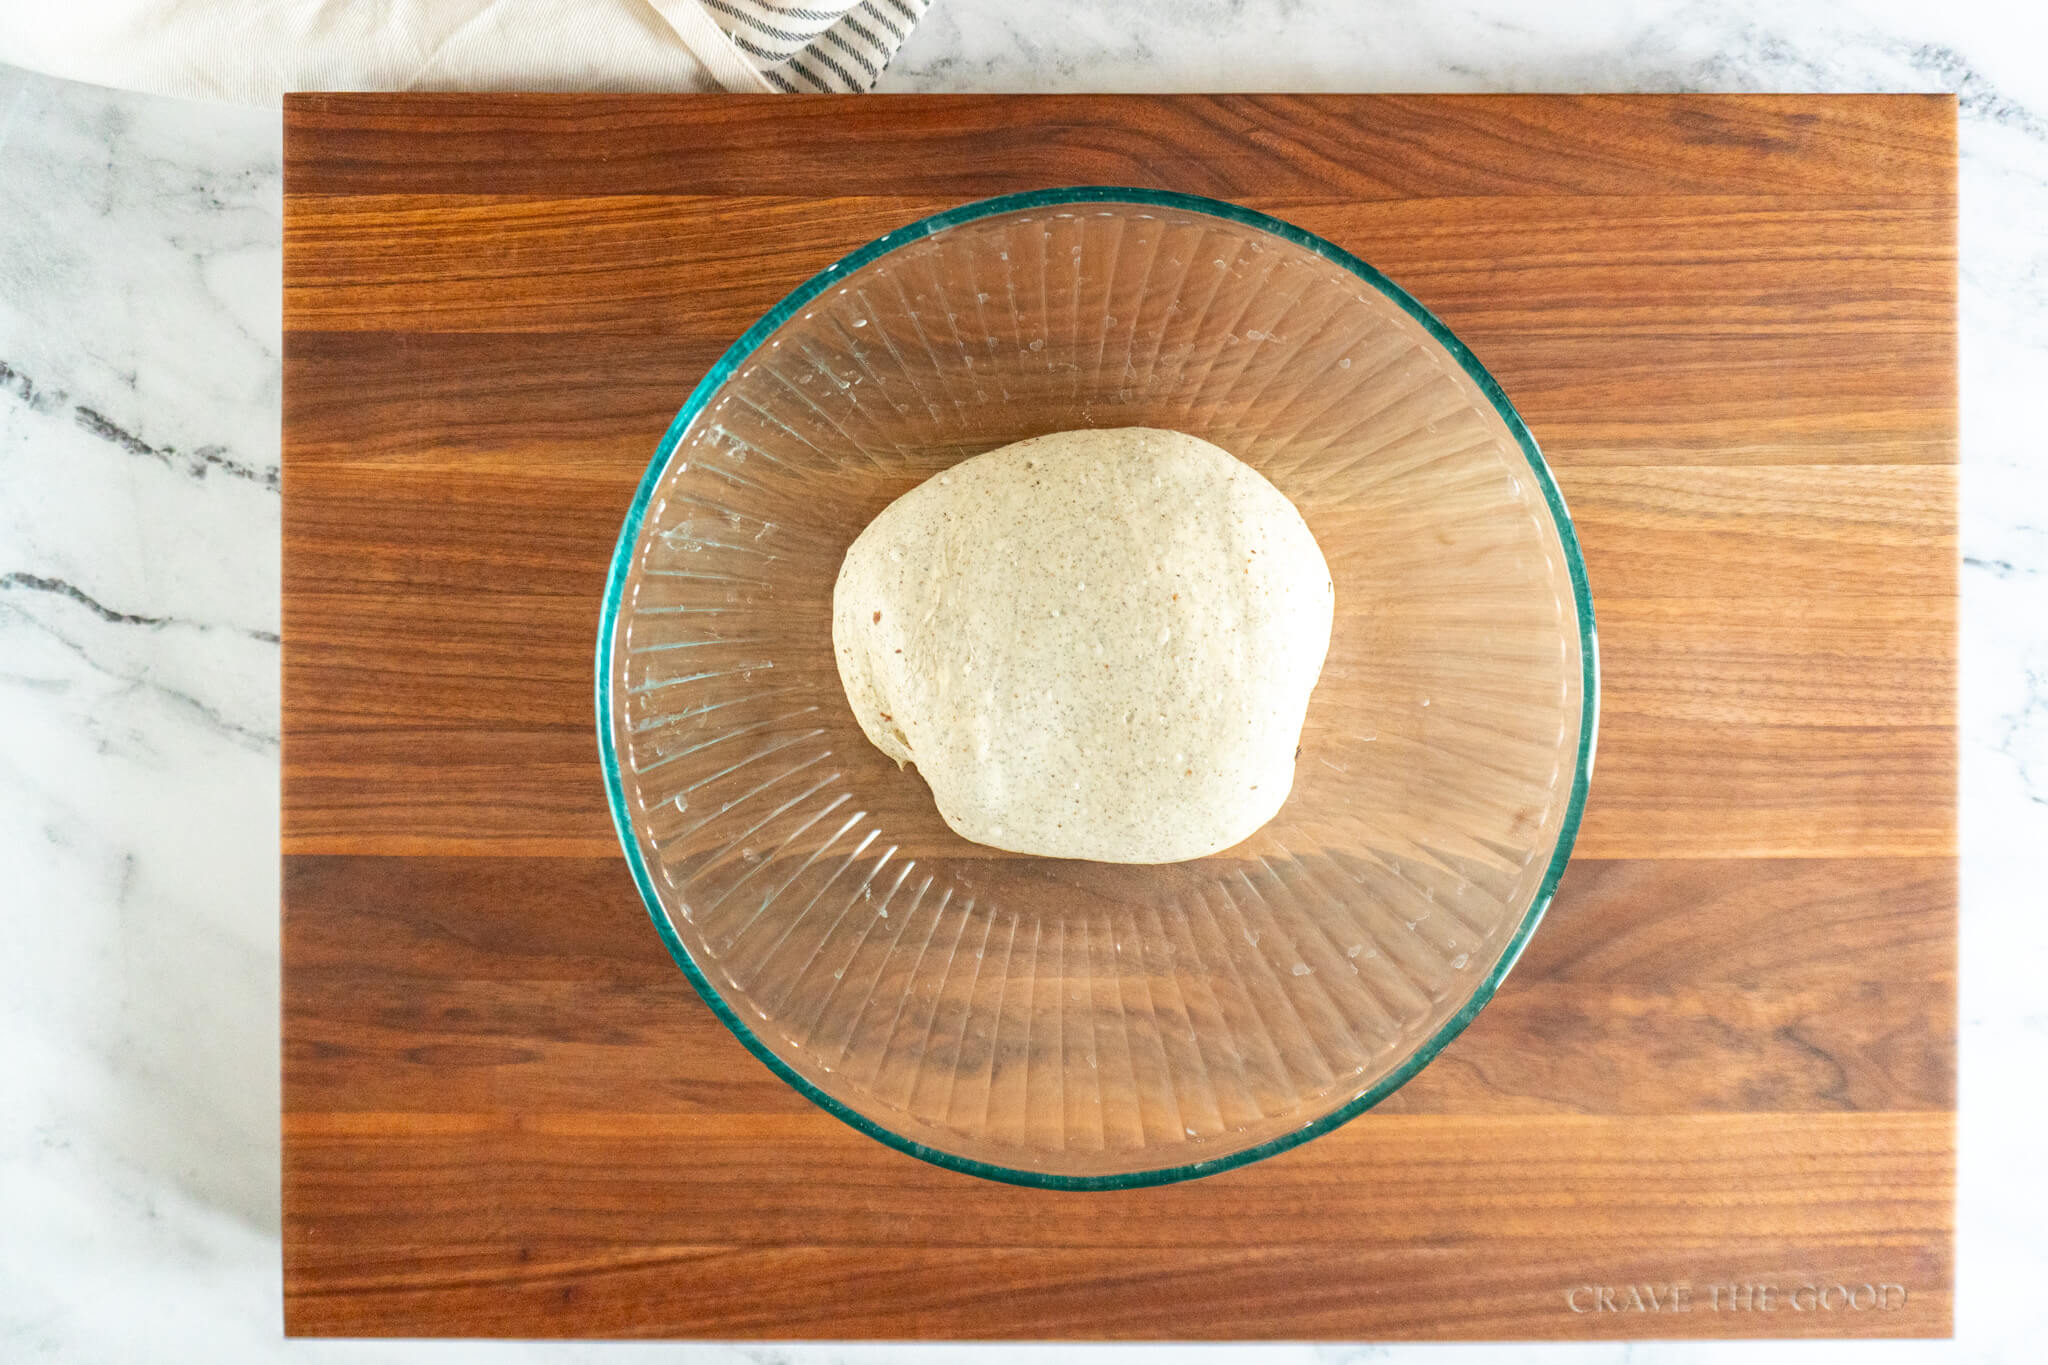
- Step 11: Observe your marbled dough, at this point, the dough should have risen in the bowl, and have a smooth surface with visible bubbles. If the dough is domed in the bowl it is ready to work with, if the dough is flat it may need more time in the bulk ferment.
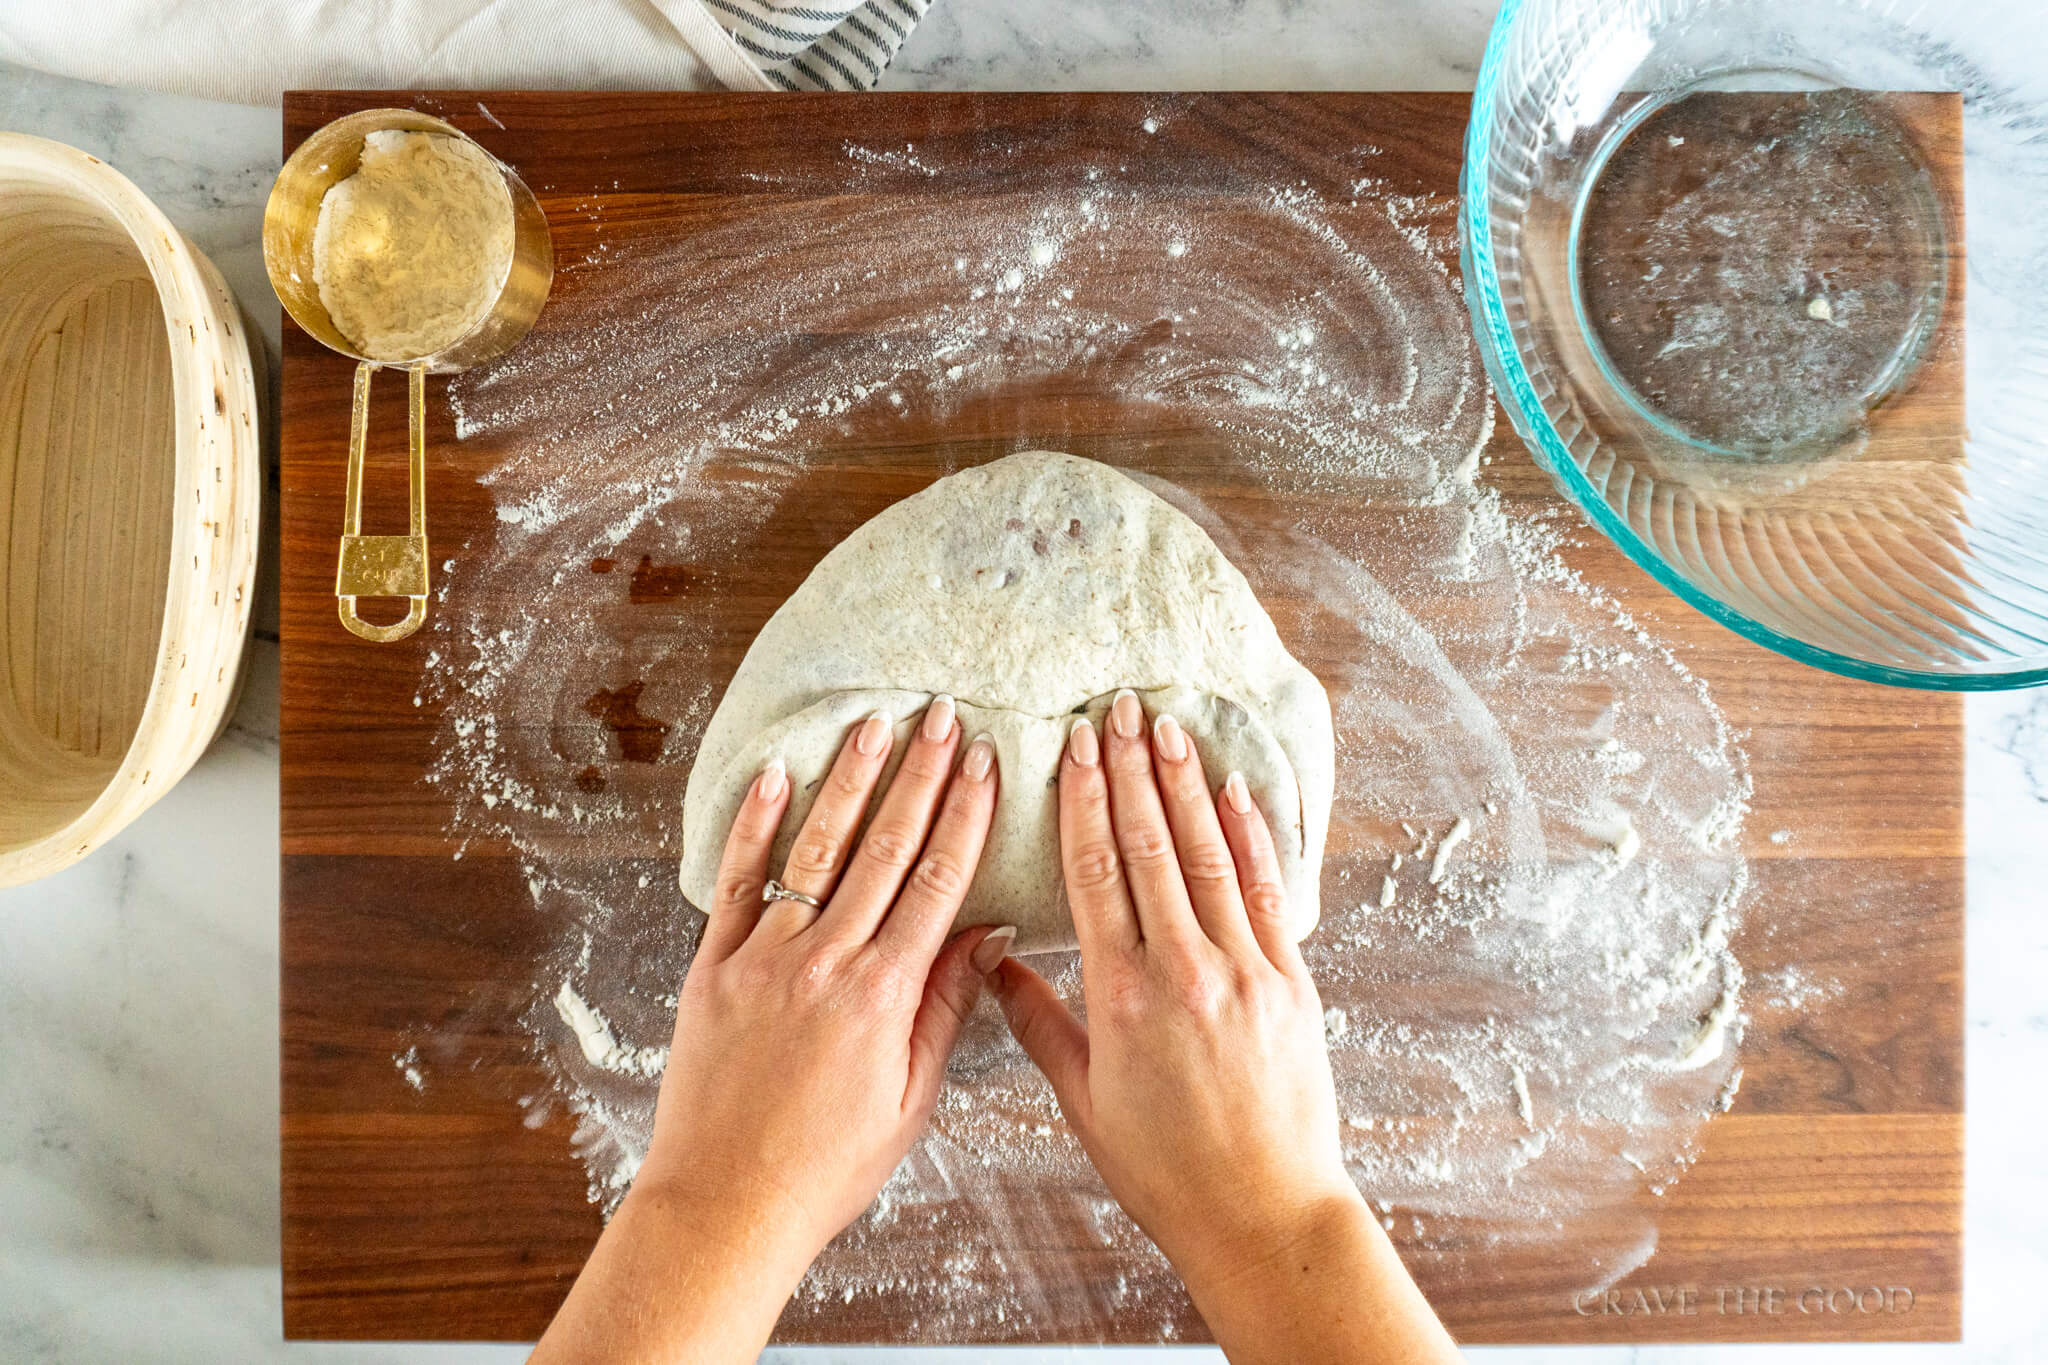
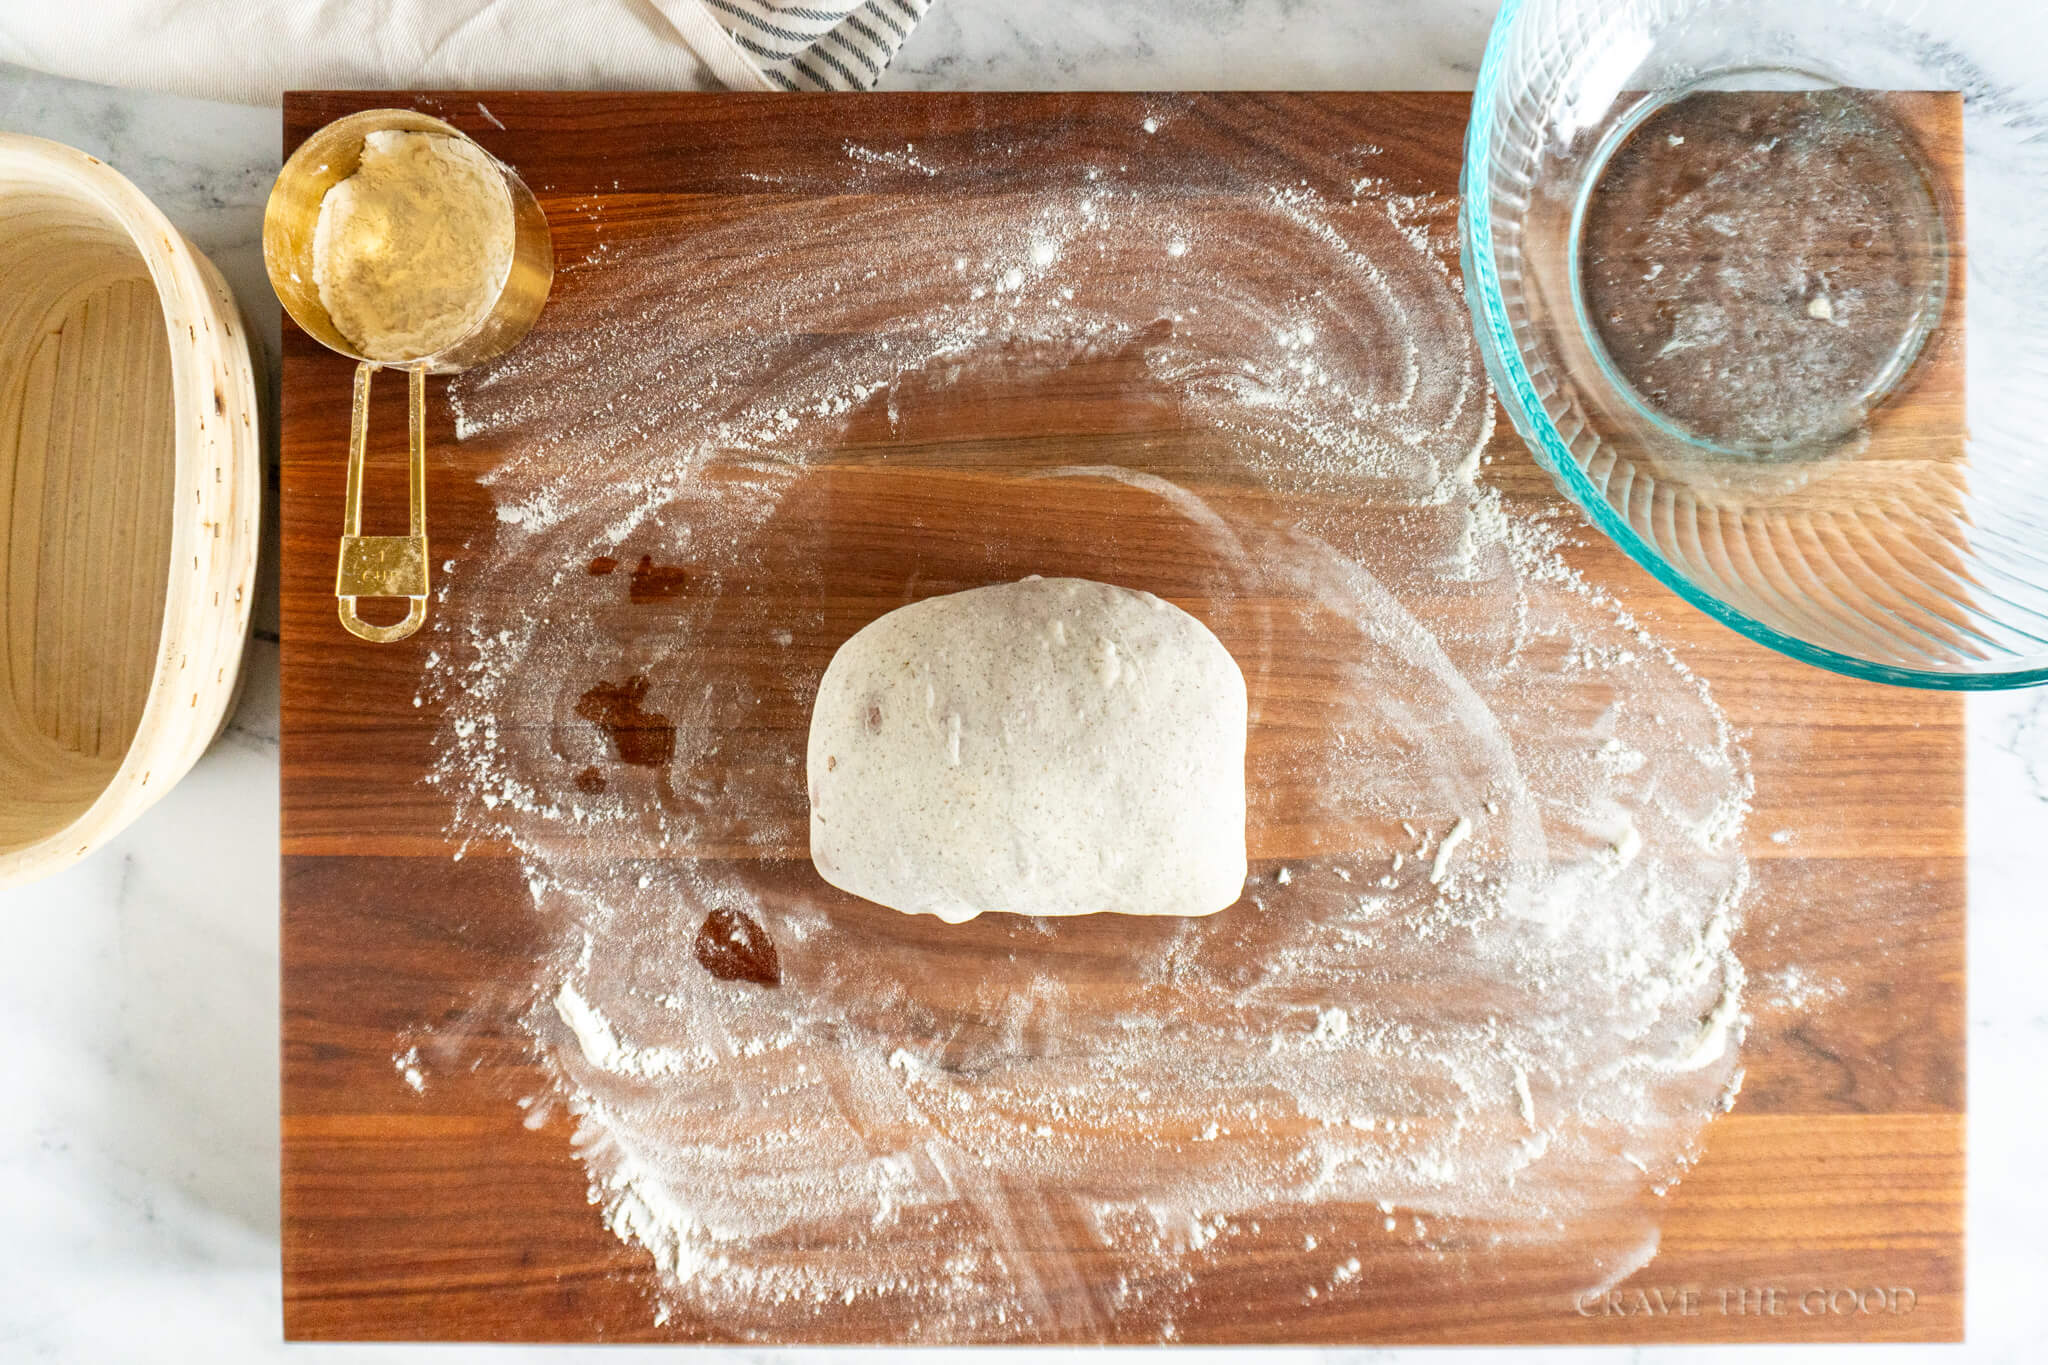
- Step 12: Uncover the dough and transfer to a lightly floured work surface or countertop. Gently press and spread the dough into a rectangle. Fold up the bottom third of the dough as though you were folding a letter.
- Step 13: Fold the bottom right corner one third of the way across, fold the left corner across. Roll into a log. Cover with a clean kitchen towel and rest for 30 minutes.
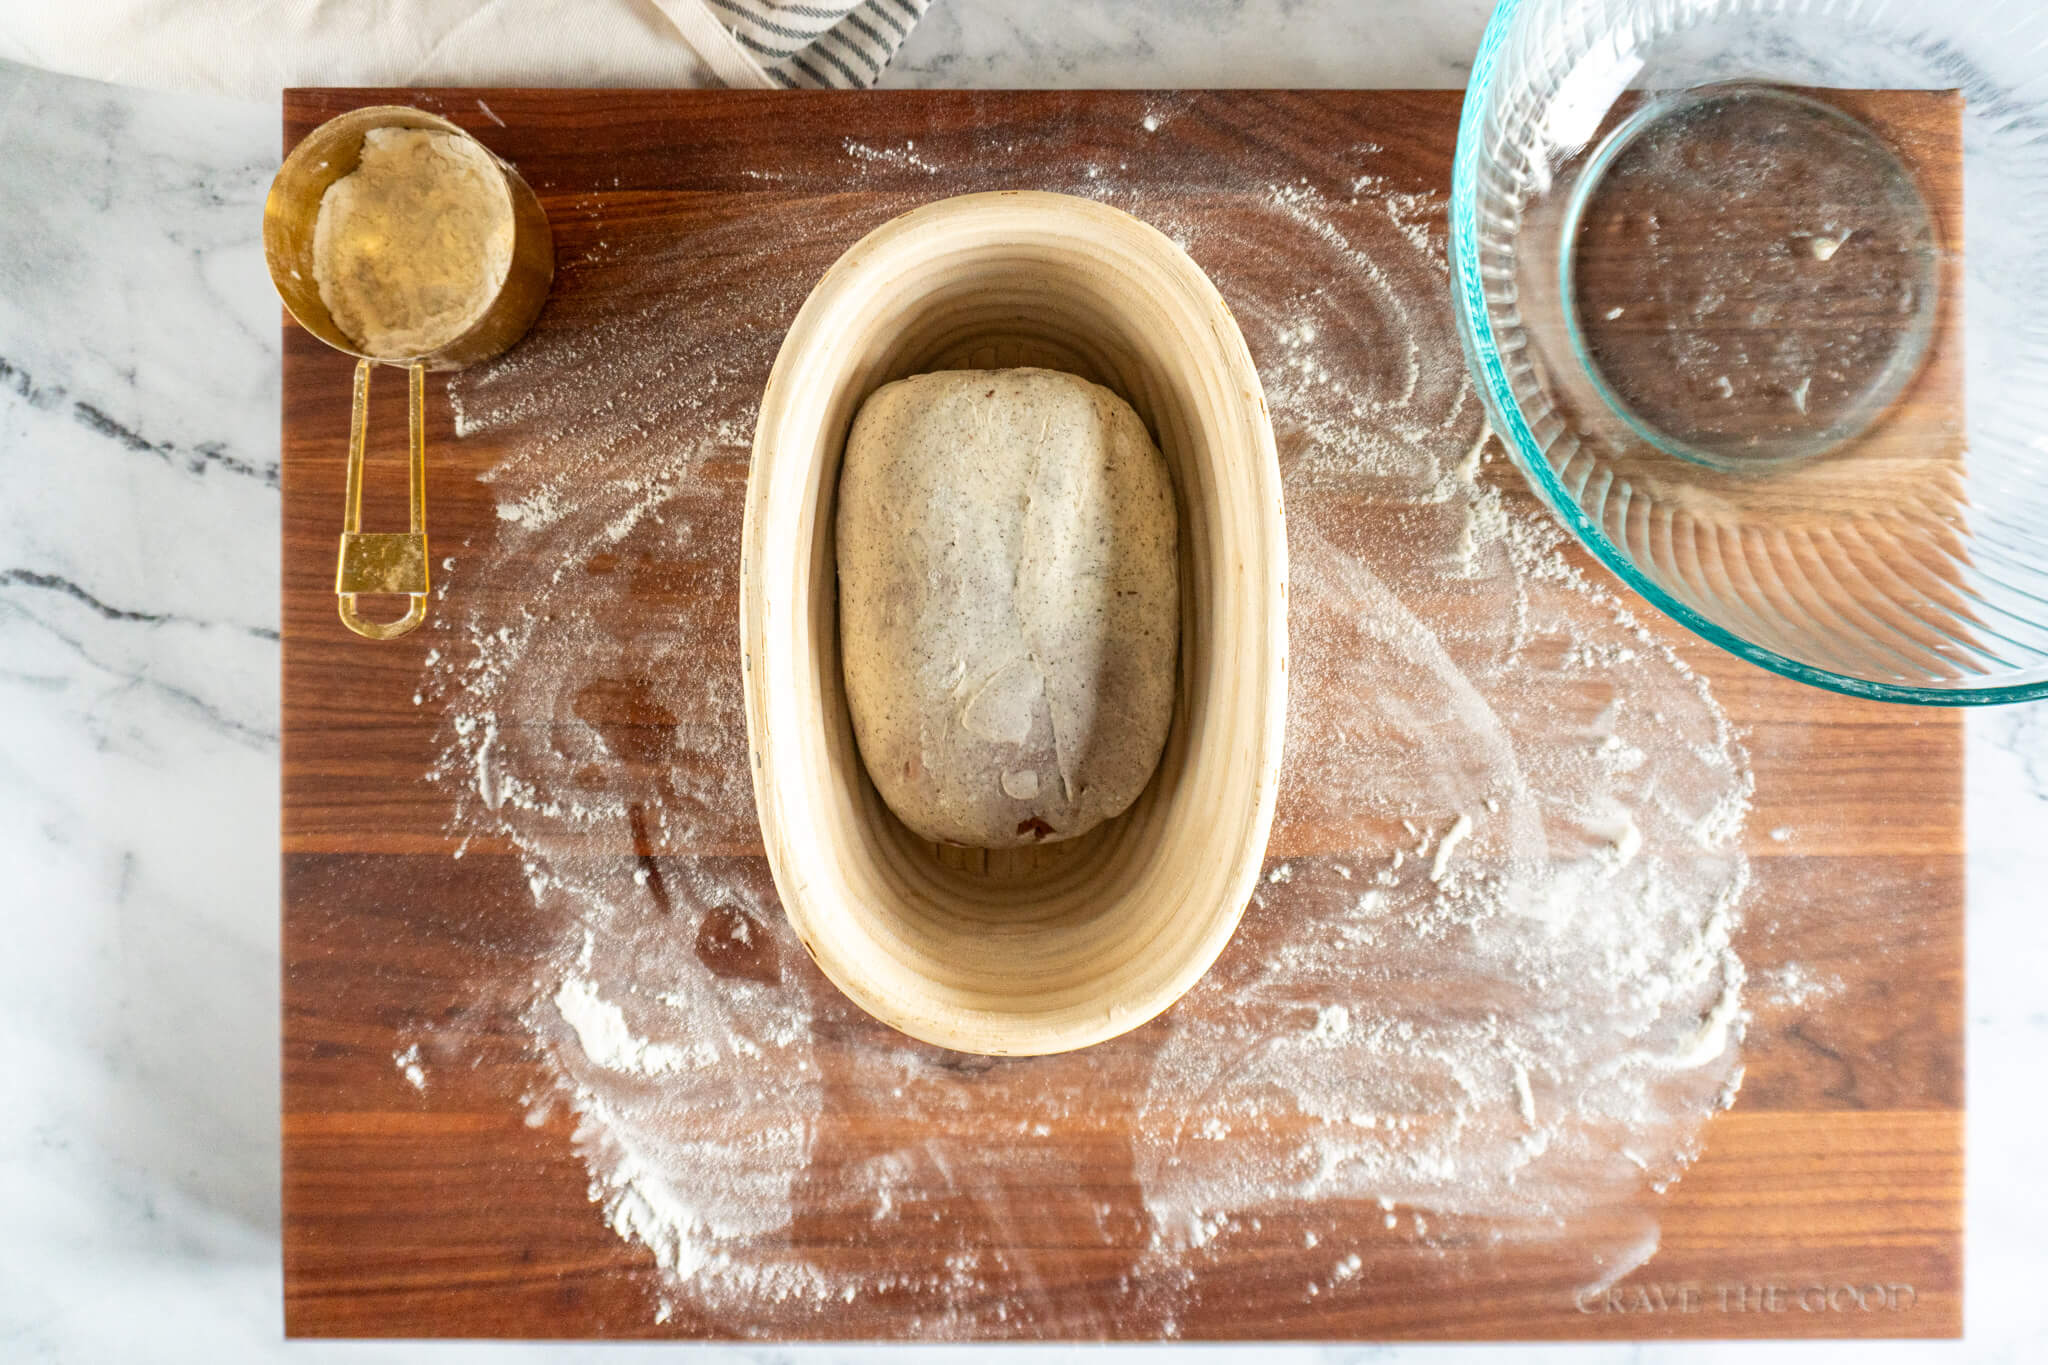
- Step 14: The final shape for this recipe is just about building more surface tension, so you’ll just place your pinkies underneath the far side of the dough roll and gently pull it towards yourself. The dough will tighten after a couple of pulls. It is important to not tear the vanilla layer of the dough, so use a gentle hand.
Prove + Cold Retard:
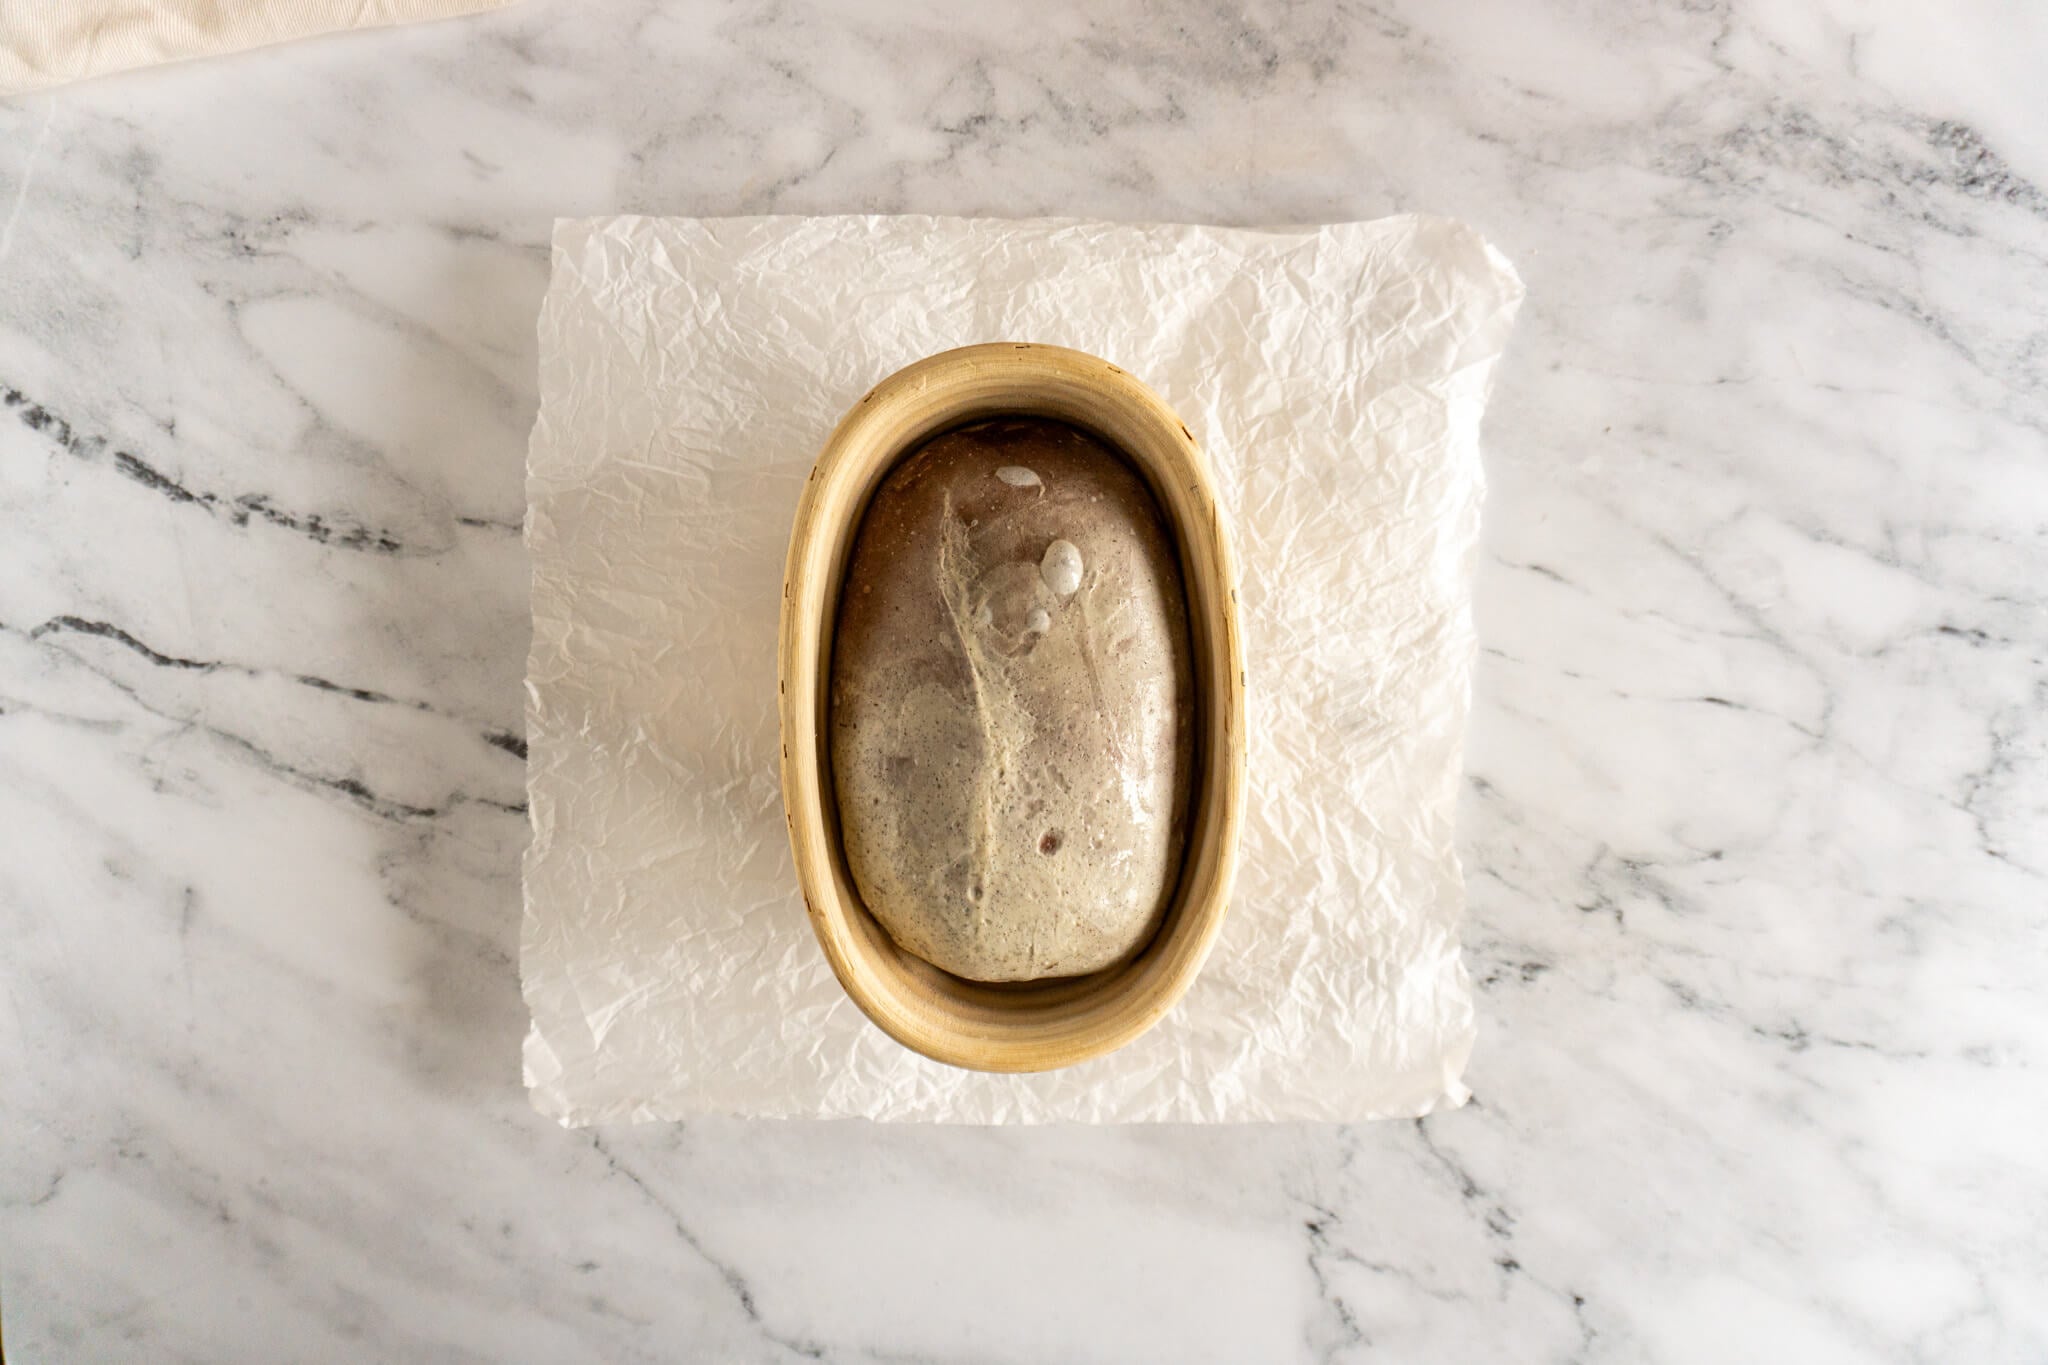
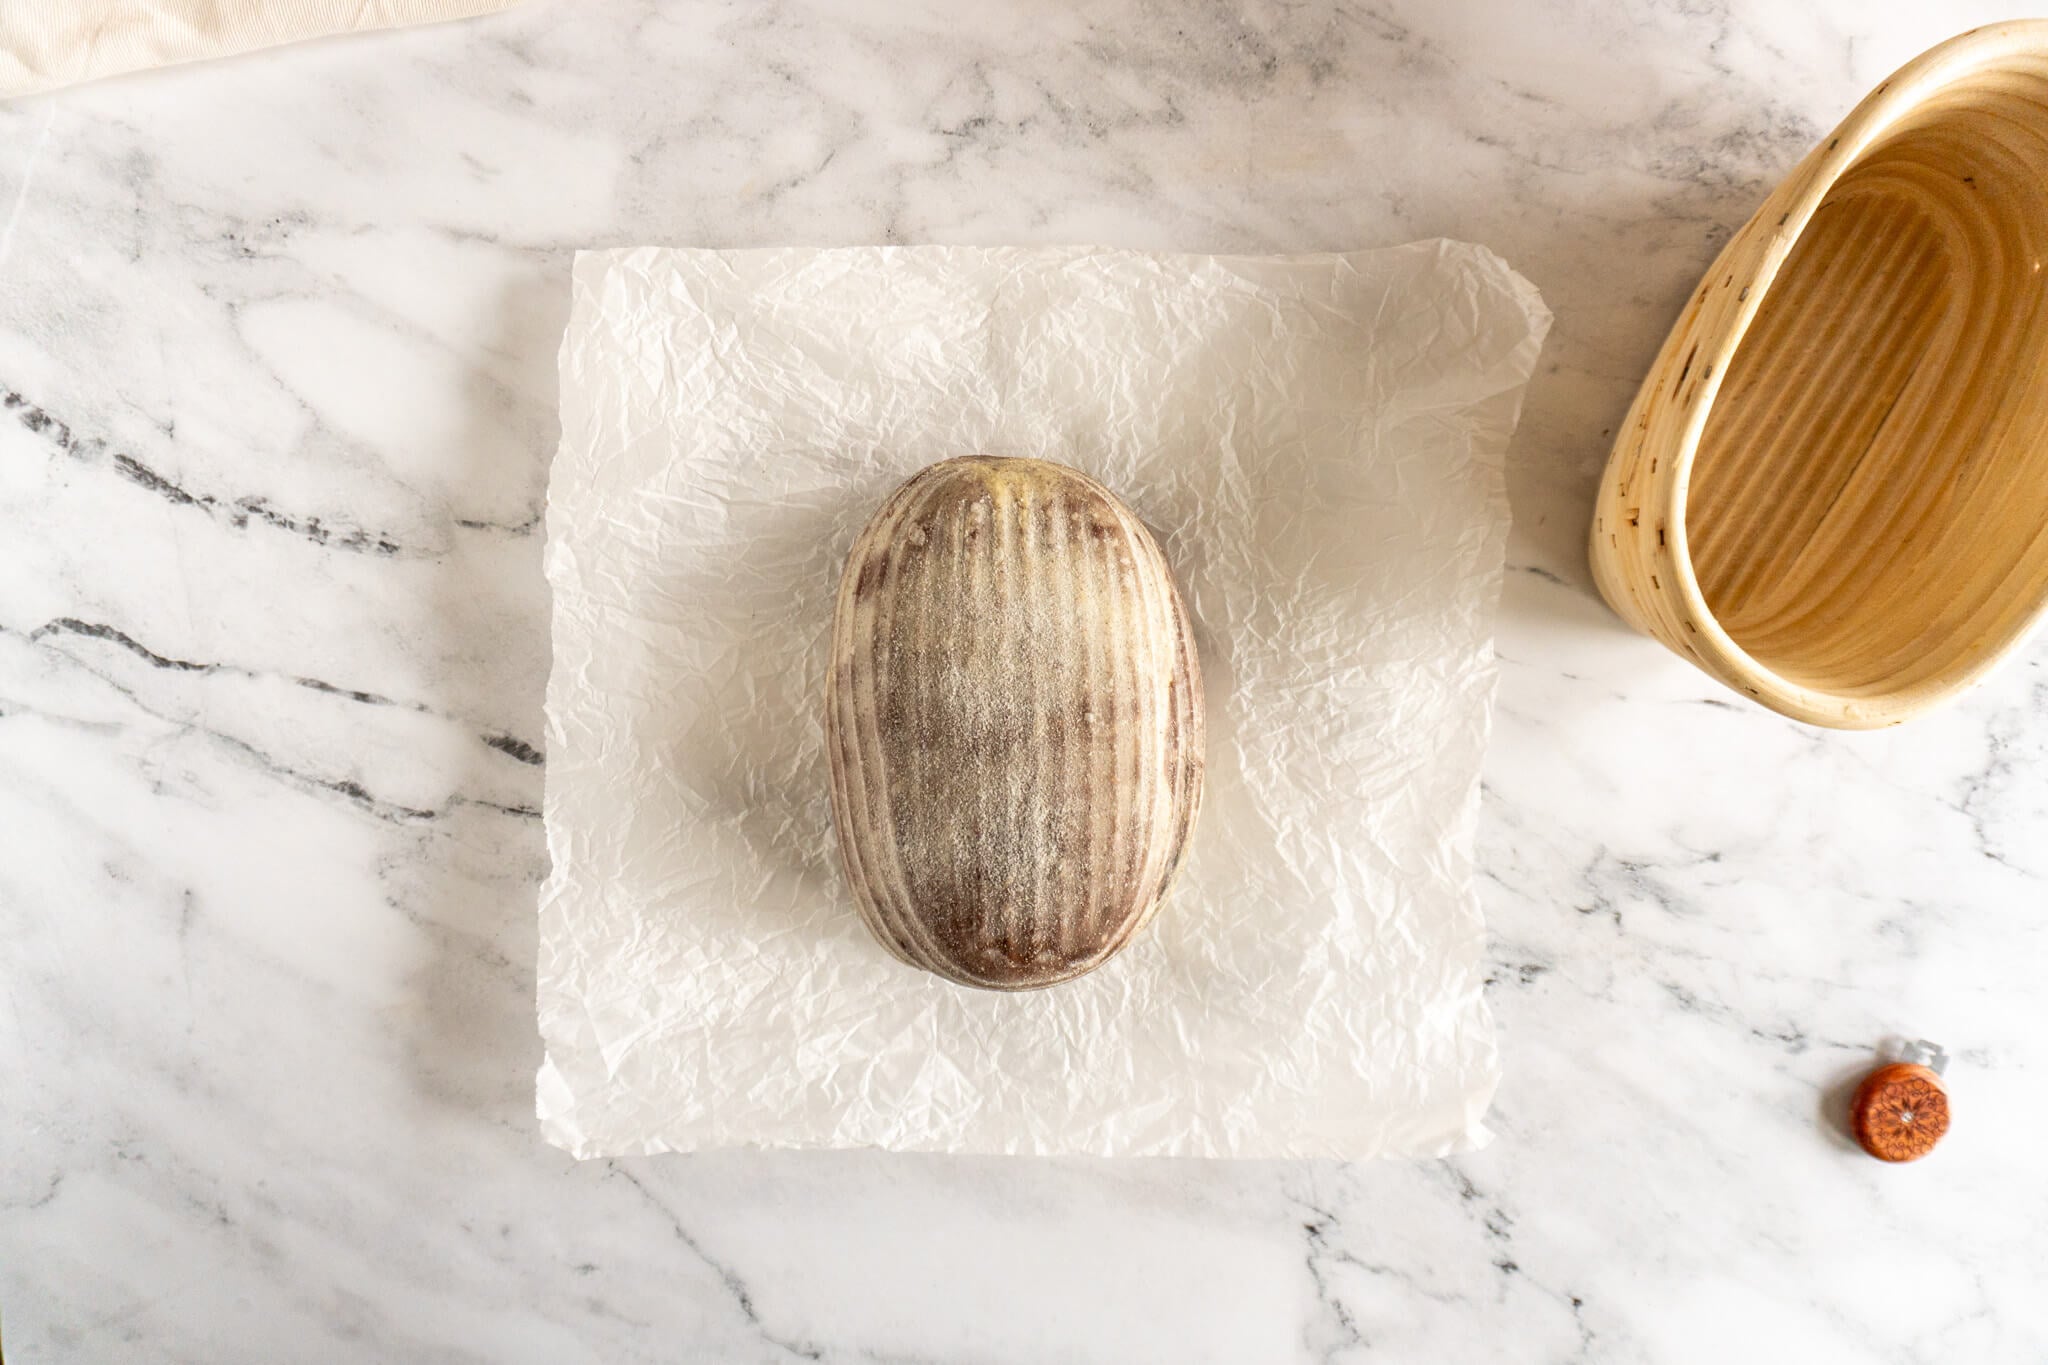
- Step 15: Prove the chocolate vanilla swirl sourdough loaf in the banneton for 2-3 hours in a warm place before covering and placing in fridge to cold retard for up to 3 days. If you want to bake it right after proving, you're welcome to, but I believe the flavor is better after resting in the fridge.
Bake:
I open baked this sourdough loaf and used the 5 minute score. If you want to dutch oven bake your sourdough, follow the directions listed below the sourdough open bake method.
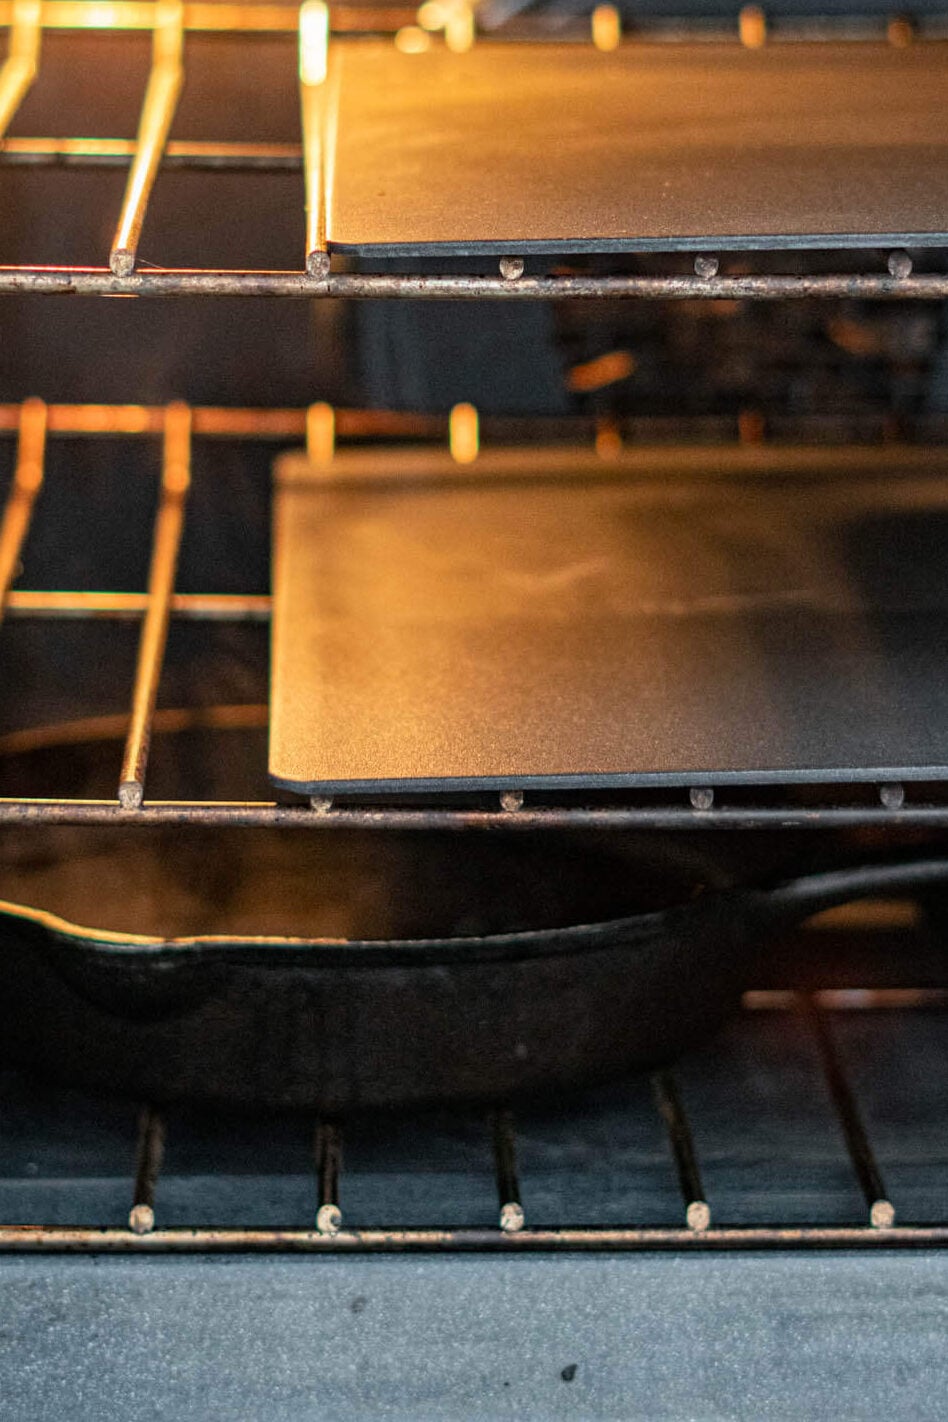
- Step 16: When ready to bake, place one oven rack on the oven floor, and place a cast-iron skillet on that rack. Add 4 cups of water to the skillet.
Then place a second oven rack in the lower third of your oven, usually you’ll need to place it in the second from bottom slot in order to clear the skillet. Place your baking stone or baking steel on the rack.
- Step 17: Preheat the oven to 450f, with the baking stone in the oven for at least 45 minutes.
Once the oven is fully preheated, turn your proofed dough out of the banneton onto a sheet of parchment paper.
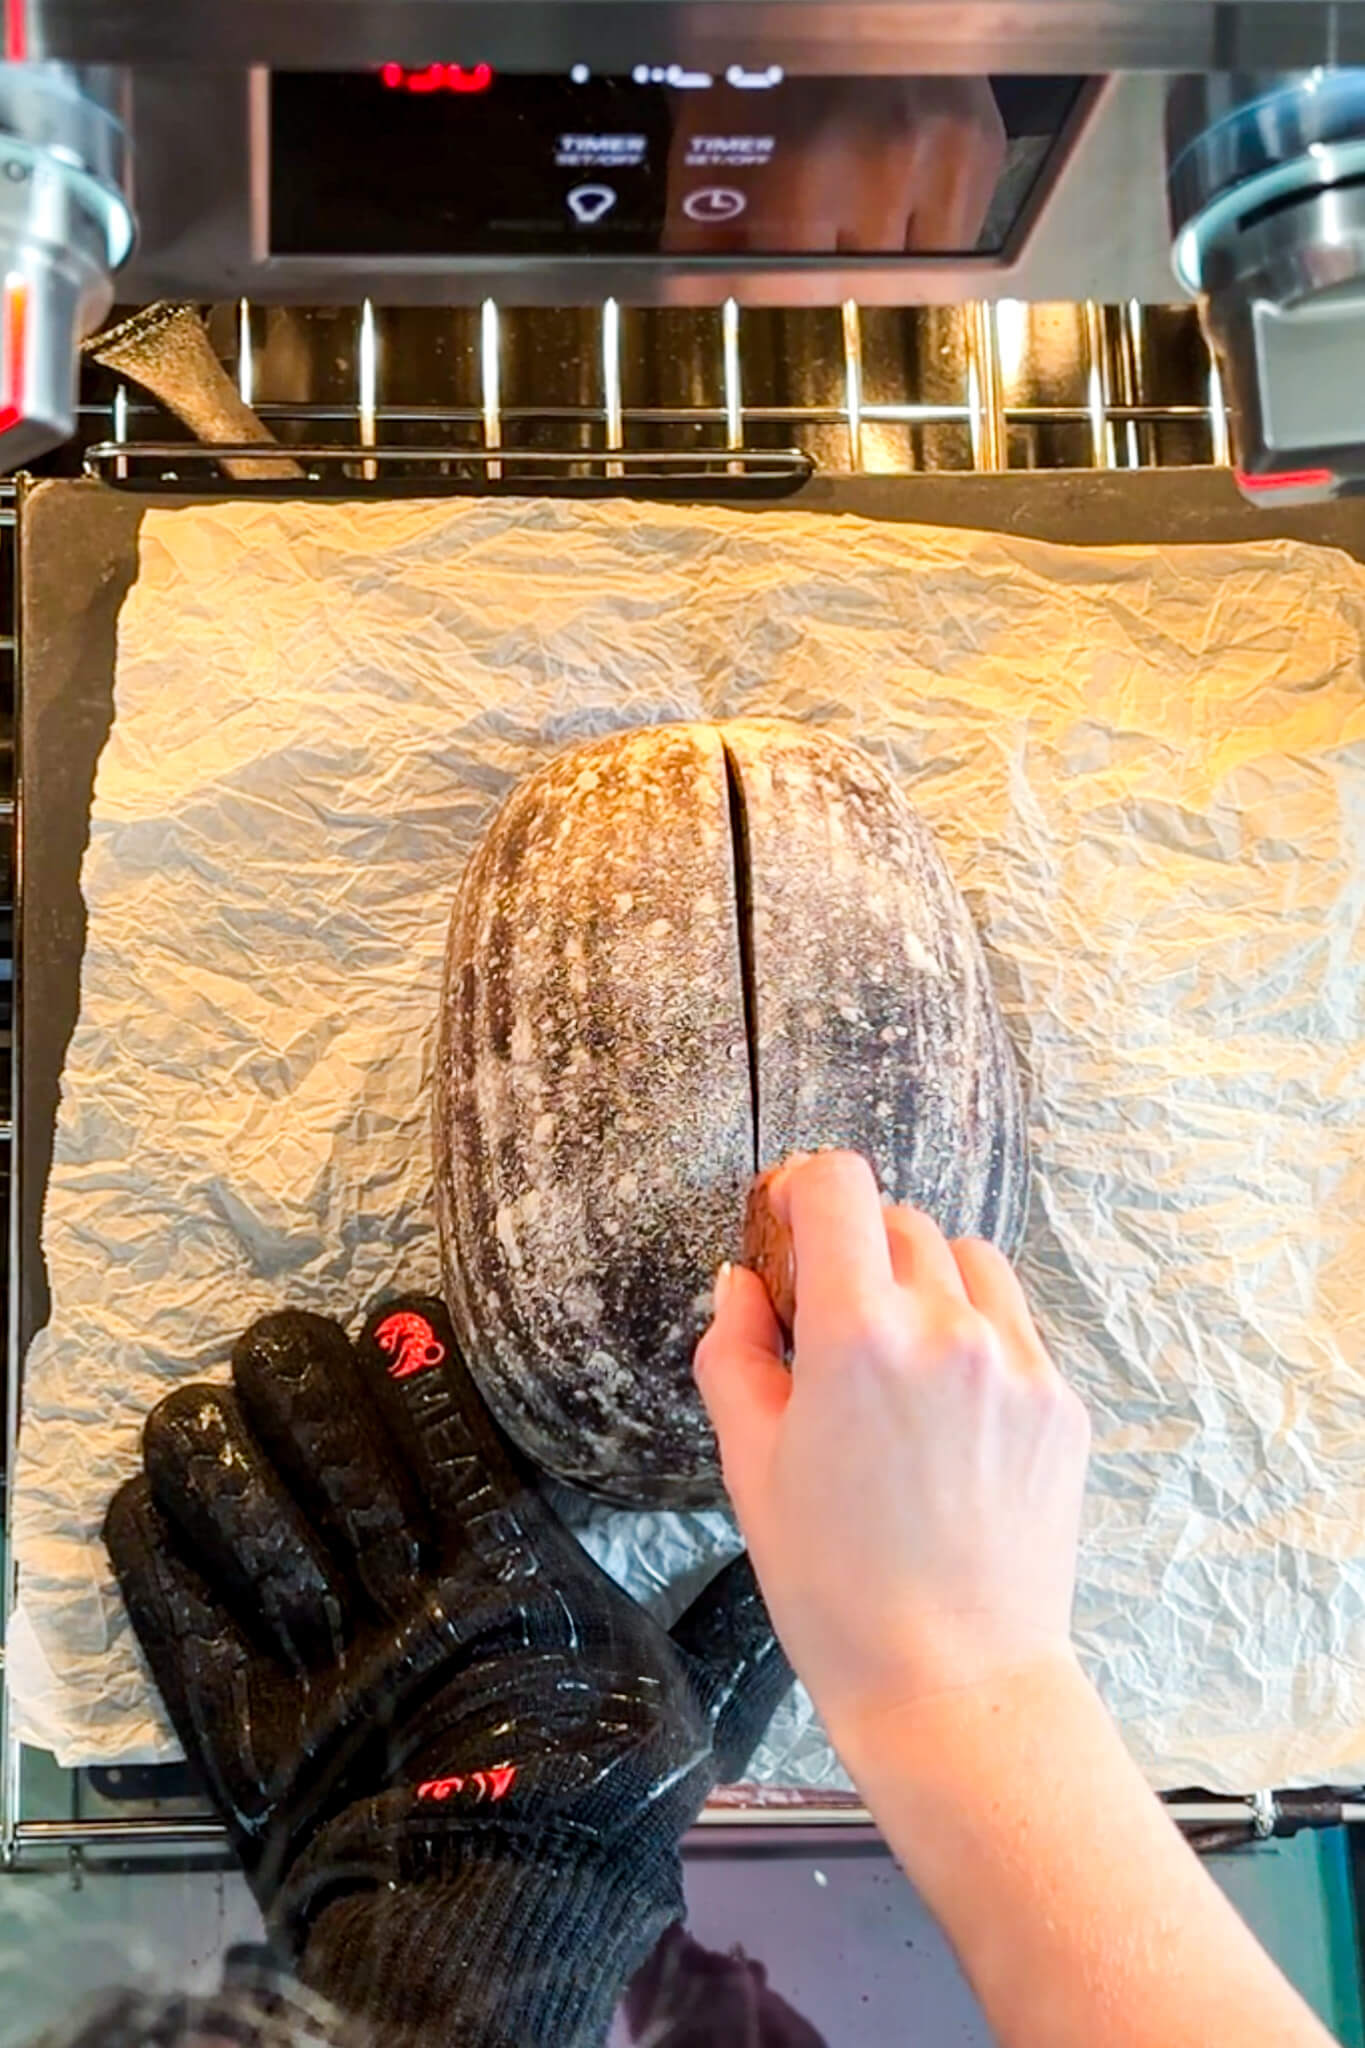
- Step 18: Quickly, but carefully, open the oven and using a pizza peel or the parchment paper as a sling, place the sourdough onto the heated baking stone and bake uncovered with the water-filled skillet for as 5 minutes before opening the oven and scoring the dough deeply down the center of the loaf.
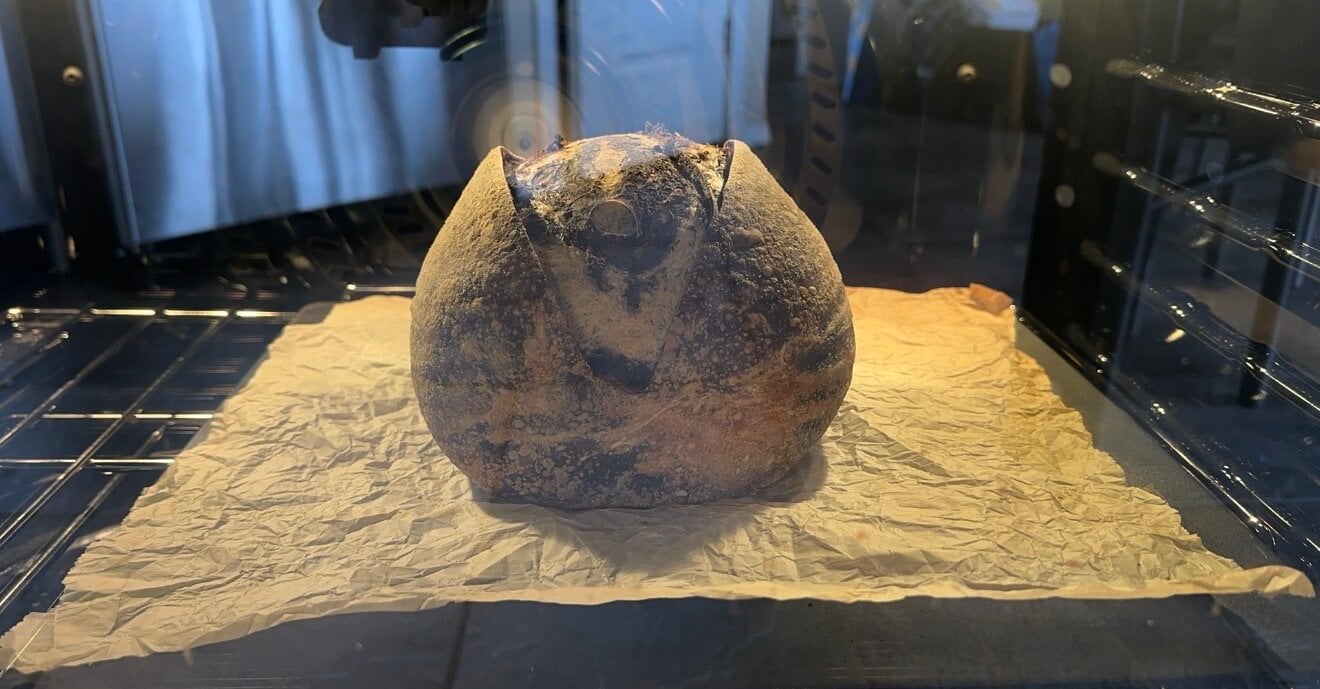
- Step 19: Continue baking another 30 minutes, then carefully remove the skillet, and continue baking until the crust has reached your desired color, usually another 5-10 minutes or until the bread is cooked through. You can check the internal temperature – it should be between 205 and 210 Fahrenheit.
Cool:
- Step 20: Remove baked bread from the oven and transfer it to a wire mesh cooling rack to cool completely before slicing. I like to leave it for at least 2 hours before slicing, as slicing too soon can affect the crumb and texture of your loaf.
Don’t Have A Baking Steel? Bake In Your Dutch Oven:
- Place your dutch oven, cloche, or desired baking dish in the oven and preheat to 450f.
- Once the oven is preheated, invert the banneton onto a sheet of parchment paper.
- Use a lame, sharp knife, or clean razor blade to score the dough, with a decorative loaf, I like to use a simple slash down the center but you can get as fancy as you like!
- Carefully remove the dutch oven from the oven, and using the parchment paper as a sling, transfer the sourdough loaf from the counter into the dutch oven.
- Bake the dough at 450f covered for 30 minutes and uncovered at 450f for 10-15 minutes, or until the loaf is cooked through and the crust is nicely browned. Bread is cooked once it reaches 205 - 210 degrees Fahrenheit internal temperature.
Expert Tips
- In order to get the intense contrasting swirls, this recipe requires you to make 3 separate batches of dough and combine them before completing the bulk ferment. This is the extra effort I mentioned earlier, but without this process, that spectacular three-toned bread isn’t possible.
- Black cocoa powder is black. It’s worth being cautious when you’re using it, as the powder flies and can definitely stain your clothing and linens.
- When working with your doughs, work from lightest to darkest, and you won’t have color bleed through the batches.
Why This Recipe Works
Hydration is deliberate. The vanilla dough is slightly softer and more extensible, which allows it to stretch and wrap around the cocoa layers during lamination. The chocolate doughs are a bit firmer, so they hold their shape and keep the pattern intact as the loaf ferments and bakes.
Lamination makes the swirl. By stacking and folding the doughs instead of kneading them together, you preserve those clean layers while still developing gluten strength.
Espresso deepens the chocolate. It doesn't turn the loaf into a mocha bread, it just amplifies the cocoa and rounds out the flavor so it tastes richer and more complete.
Marbled Chocolate Sourdough FAQs
There are a couple of ways to store sourdough bread to help prolong its quality after cutting.
Our go to when storing sourdough bread is to store it cut side down on a cutting board, this method keeps the crust crusty and the crumb tender and delicate. Usually we finish the loaf before the crust gets too hard! I do recommend transferring it to a bread bag after 16-18 hours though.
It’s easy to freeze your sourdough loaf, too! Cool the loaf to room temperature, then tightly wrap it in plastic wrap, slide it into a plastic bread bag, seal the bag with a knot or twist tie, and place in the freezer for 1-2 months. To eat after freezing, remove the sourdough from the freezer, unwrap, and allow it to come to room temperature (1 -2 hours) before slicing and enjoying.
Cocoa powder changes dough in ways that aren't always obvious at first. It absorbs moisture at a higher rate than flour, effectively lowering the dough's hydration, which can lead to a tighter, denser crumb. There's also the visual side of things. If you try to swirl chocolate into a single dough, the colors tend to blend together as you handle it, and you end up with more of a brown loaf than a true swirl.
By making three separate doughs, you're solving both problems at once. Each dough develops properly on its own, and when you layer them, you get that clean, high-contrast marbling instead of a muddled pattern. The slight differences in hydration also make the doughs easier to stretch and stack without tearing, which makes the whole process smoother.
Not really. This isn't a dessert bread.
The cocoa adds richness and a slight bitterness, while the sourdough fermentation brings a gentle tang. The overall flavor is more complex than sweet, think dark chocolate rather than chocolate cake.
This usually comes down to handling. If the dough is overworked during lamination or shaping, the layers can start to blend together.
For this recipe, the dough is laminated then folded into a log for the bulk ferment, after the bulk ferment, the dough is gently pressed out and folded again during the pre-shaping process, and only pulled against itself to add more surface tension during the final shape. These minimal dough manipulations are important to maintaining the swirl.
Working from lightest to darkest dough, handling gently, and avoiding excessive folding will help keep those lines clean and defined.


If you tried this Chocolate Vanilla Swirl Sourdough Bread or any other recipe on my blog, please leave a 🌟 star rating and let me know how it went in the comments below. Thanks for visiting!
📖 Printable Recipe
Chocolate Swirl Sourdough Bread
Ingredients
Vanilla Dough
- 110 g water, room temperature
- 30 g sourdough starter, active
- 6 g vanilla paste
- 160 g bread flour
- 4 g sea salt, coarse
Cocoa Dough
- 115 g water, room temperature
- 30 g sourdough starter, active
- 140 g bread flour
- 15 g dutch process cocoa powder
- 4 g salt
Black Cocoa Dough
- 65 g water, room temperature
- 50 g fresh brewed espresso, cooled
- 30 g sourdough starter, active
- 140 g bread flour
- 15 g black cocoa powder
- 4 g salt
Instructions
Make The Dough:
- In a medium bowl, combine 110g water with 30g sourdough starter and 6g vanilla paste. Whisk together with a dough whisk or spoon until combined. Then add 160g unbleached bread flour, and 4g sea salt. Mix until completely combined and no dry bits remain.
- In a second bowl, whisk 115g water with 30g sourdough starter until combined. Add 140g unbleached bread flour, 15g dutch process cocoa powder, and 4g sea salt. Mix until fully combined and no dry bits remain. Cover and set aside for 60 minutes.
- In a third bowl, whisk 50g cooled espresso, 65g water, and 30g sourdough starter until combined. Then add 140g unbleached bread flour, 15g black cocoa powder, and 4g salt. Mix until fully combined and no dry bits remain. Cover all three bowls and set aside for 60 minutes.
Stretch And Fold:
- Work from lightest to darkest dough: using damp hands, grab one side of the dough, stretch it upward, and fold it over the center. Rotate the bowl a quarter turn and repeat until you've completed four folds, this is one set of stretch and folds.Recover the bowl, and set it aside for 60 minutes.
- Repeat the stretch and fold process 2 times over the next 2 hours, for a total of 3 sets of stretch and folds. Rest the dough for 60 more minutes after the final stretch and fold.
Laminate + Bulk Ferment:
- Lightly flour a working surface, then starting with vanilla, then cocoa, then black cocoa dough, turn the dough out of the bowl and carefully press and stretch into a rectangle. If the dough wants to tear, allow it to rest for a few minutes before trying again. Repeat with the other doughs. The vanilla flavored dough is a bit higher hydration purposely, as it forms the base of the dough pile and needs to be stretched slightly larger.
- Using a pastry brush, brush the surface of the vanilla dough with water. Then carefully pick up the cocoa dough and place it on the vanilla dough. Press firmly around the surface of the dough to adhere them together. Then brush the surface of the cocoa dough with water and lift the black cocoa dough and place it on the cocoa dough, again pressing firmly to ensure the doughs adhere to each other. This can help prevent large bubbles forming between the layers.
- Brush the black cocoa dough with water, then fold up the bottom third of the dough, then fold the bottom right corner one third of the way across, fold the left corner across, then roll the dough into a log.Use a bench scraper to pick up the dough and place it into a large bowl.
- Cover the dough and bulk ferment for 2-3 hours.
Pre-Shape and Shape:
- Observe your marbled dough, at this point, the dough should have risen in the bowl, and have a smooth surface with visible bubbles. If the dough is domed in the bowl it is ready to work with, if the dough is flat it may need more time in the bulk ferment.
- Uncover the dough and transfer to a lightly floured work surface or countertop. Gently press and spread the dough into a rectangle.
- Fold up the bottom third of the dough as though you were folding a letter then fold the bottom right corner one third of the way across, fold the left corner across. Rotate the dough 90 degrees then roll into a log. Cover with a clean kitchen towel and rest for 30 minutes.
- The final shape for this recipe is just about building more surface tension, so you'll just place your pinkies underneath the far side of the dough roll and gently pull it towards yourself. The dough will tighten after a couple of pulls.
- Dust the dough with rice flour then tuck seam side up into a banneton.
Prove + Cold Retard:
- Prove the double chocolate vanilla swirl sourdough loaf in the banneton for 2-3 hours in a warm place before covering and placing in fridge to cold retard for up to 3 days. If you want to bake it right after proving, you're welcome to, but I believe the flavor is better after resting in the fridge.
Bake:
- When ready to bake, place one oven rack on the oven floor, and place a cast-iron skillet on that rack. Add 4 cups of water to the skillet.
- Then place a second oven rack in the lower third of your oven, usually you'll need to place it in the second from bottom slot in order to clear the skillet. Place your baking stone or baking steel on the rack.
- Preheat the oven to 450f, with the baking stone in the oven for at least 45 minutes. Once the oven is fully preheated, turn your proofed dough out of the banneton onto a sheet of parchment paper.
- Quickly, but carefully, open the oven and using a pizza peel or the parchment paper as a sling, place the sourdough onto the heated baking stone and bake uncovered with the water-filled skillet for as 5 minutes before opening the oven and scoring the dough deeply down the center of the loaf.
- Continue baking another 30 – 35 minutes, until the crust has reached your desired color. You can check the internal temperature - it should be between 205 and 210 Fahrenheit.
Cool:
- Remove baked bread from the oven and transfer it to a wire mesh cooling rack to cool completely before slicing. I like to leave it for at least 2 hours before slicing, as slicing too soon can affect the crumb and texture of your loaf.
Video
Notes
Expert Tips
- In order to get the intense contrasting swirls, this recipe requires you to make 3 separate batches of dough and combine them before completing the bulk ferment. This is the extra effort I mentioned earlier, but without this process, that spectacular three-toned bread isn't possible.
- Black cocoa powder is black. It's worth being cautious when you're using it, as the powder flies and can definitely stain your clothing and linens.
- When working with your doughs, work from lightest to darkest, and you won't have color bleed through the batches.


I am interested in making this bread – making the vanilla part strawberry using freeze-dried strawberries – chocolate-covered strawberry for Valentine’s Day. I do want the bread to be a bit sweet and am concerned that with all the cocoa powder and no sugar it will be a bit bitter. How much sugar do you think I can add to the dough without affecting it too dramatically?
You can definitely add sugar – but it will speed up the fermentation timeline, in my experience. I didn’t find the dough bitter with the addition of the cocoa but if I were to add sugar, I would probably add between 5-8g per flavor!
This recipe is SO fun to make. The visual appeal is off the charts – I love that the flavor is subtle, so it can be used for things other than toast!